Goggles Music Manager (or GMM for short) is a music player written using the FOX toolkit, with support for Ogg Vorbis, FLAC, MP3, MP4, ASF and Musepack. FOX is a fast toolkit for creating graphical interfaces (another application which I reviewed in the past which uses FOX is Xfe - review here - a file manager for Linux).
Showing posts with label tutorial. Show all posts
Showing posts with label tutorial. Show all posts
Friday, 26 November 2010

Monday, 20 September 2010
Collection of 18 Popular APT & DPKG Tips for Debian and Ubuntu
This is a guide containing the most popular and useful ways of using the APT and DPKG commands, and it applies to both Ubuntu and Debian (and their derivatives). I mentioned where super user privileges are required, the ones without a mention can be executed as normal user. If you're using Ubuntu, precede a command with sudo in order to gain root privileges (and enter your user password); on Debian, type su, enter the root password, and then type in the commands as shown below.
dpkg -L package_name
This command will show what files package_name installed on your computer. Notice that this works only for already installed packages. Example:
embryo@debian:~$ dpkg -L vorbis-tools
/.
/usr
/usr/bin
/usr/bin/ogg123
apt-get build-dep package_name
(needs root privileges)
This is a very useful command, which will install all the development libraries needed by an application. So if you need to compile a newer version of a program than the one included in the repositories, use this command to fetch the dependencies. Notice that the libraries installed will be for the current version coming with the repositories, so you may need to install additional libraries if needed. However, this usually works for most of the applications. Example:
apt-get build-dep wesnoth
This will fetch all the development packages needed for Wesnoth. Keep in mind that your sources repositories must be enabled (they are enabled by default in Ubuntu).
apt-get clean (and apt-get autoclean)
(needs root privileges)
This command will remove the archives installed on your system. Whenever you install a package, it is downloaded and the DEB package is kept inside the /var/cache/apt/archives/ directory. This command removes those packages, freeing up space.
apt-get clean
apt-get autoclean
Regarding apt-get autoclean: this command will remove only the archives which are no longer available in the repositories, and will keep the ones which are currently available. Helpful if you want to get rid of old archives which have been updated, but still want to keep the upgraded ones just in case. To see how much space the archive occupy, use du -h (the -h argument stands for human readable, so it will show sizes in human readable format):
du -h /var/cache/apt/archives/
apt-cache show package_name
Will show information about any package in the repository. You only have to type in the name of it, not the entire name and version. Example:
embryo@debian:~$ apt-cache show vorbis-tools
Package: vorbis-tools
Priority: optional
Section: sound
Installed-Size: 580
...
apt-cache search pattern
Will search and list all the packages which contain pattern in their name or in their description. You can pipe this with grep for more relevant results:
embryo@debian:~$ apt-cache search gnome terminal|grep terminal
gmfsk - MFSK, RTTY and other digital mode terminal for HF/amateur radio
gnome-terminal-data - Data files for the GNOME terminal emulator
gnome-terminal - The GNOME 2 terminal emulator application
apt-get update && apt-get upgrade
(needs root privileges)
This is a one-liner to update your packages list and upgrade your system. Since it requires root privileges, if your distribution is Ubuntu use sudo apt-get update && sudo apt-get upgrade. Notice that the second command (after the double ampersand) is executed only if the first one was successful, so if fetching any of the lists fails, the second command will not be executed. If you're running a testing or beta release, use instead the following:
sudo apt-get update && sudo apt-get dist-upgrade
This will fetch updates even if they depend on newer packages.
dpkg --get-selections
This command will list all the packages installed on a system using the package manager. Example:
embryo@debian:~$ dpkg --get-selections
acpi-support-base install
acpid install
adduser install
akregator install
...
dpkg -S filename
Will list the packages which install filename. Example:
embryo@debian:~$ dpkg -S oggenc
vorbis-tools: /usr/share/man/man1/oggenc.1.gz
vorbis-tools: /usr/bin/oggenc
embryo@debian:~$
apt-get autoremove
(needs root privileges)
This command will remove unnecessary packages (e.g. orphaned packages), which are no longer needed by any of the packages installed in the system. This happens often after you uninstall a certain application, and its dependencies still remain installed on the system. Use this command to get rid of them.
apt-cache dump
This command will list every package in the cache.
apt-cache depends package_name
A very useful command which lists every dependency a package has, including recommended packages.
embryo@debian:~$ apt-cache depends vorbis-tools
vorbis-tools
Depends: libao2
Depends: libc6
Depends: libcurl3-gnutls
...
apt-cache rdepends package_name
Will show dependencies in reversed order, that is, it will list all the packages which depend on the specified package.
apt-cache rdepends mplayer
apt-cache policy package_name
This will list the repository in which a package is located. In Ubuntu, there are four such repositories: main, restricted, universe and multiverse. Debian has main, contrib and non-free. There is a certain policy for each package, and depending on that, the package is included in one of the specified repositories.
apt-cache policy amarok
apt-cache policy sun-java6-jre
apt-cache showsrc package_name
Will show information about a package source.
apt-get -f install
(needs root privileges)
Will try to fix broken dependencies. This usually comes in handy if you try to manually install a DEB package without installing first its dependencies. Run apt-get -f install to fix the missing dependencies and try to install the package again.
apt-cdrom add
(needs root privileges)
Will add a CD ROM to your sources, so you can install packages from it. This command is mostly useful if you have some ISO images, which you don't want to burn to a CD. In order to scan the ISO images, use:
apt-cdrom -d=/cdrom add
This will mount the ISO image inside the /cdrom directory, and then add its contents to the sources.list. Notice that the /cdrom directory has to be empty. You can use any empty directory for this:
apt-cdrom -d=/home/USER/mydir
dpkg -c local_file.deb
The -c argument tells dpkg to list the contents of a DEB package. Example:
embryo@debian:~$ dpkg -c google-chrome-stable_current_i386.deb
...
drwxr-xr-x root/root 0 2010-07-30 23:54 ./usr/share/man/man1/
-rwxr-xr-x root/root 3098 2010-07-30 23:54 ./usr/share/man/man1/google-chrome.1
lrwxrwxrwx root/root 0 2010-07-30 23:54 ./usr/bin/google-chrome -> /opt/google/chrome/google-chrome
dpkg -f local_file.deb
This shows the control file for a binary package. A control file is a file which provides information to the package manager about dependencies, maintainer, homepage, description, and more.
embryo@debian:~$ dpkg -f google-chrome-stable_current_i386.deb
Package: google-chrome-stable
Version: 5.0.375.126-r53802
...
These are the most popular uses of APT and DPKG. Have some more? Please, share them!
dpkg -L package_name
This command will show what files package_name installed on your computer. Notice that this works only for already installed packages. Example:
embryo@debian:~$ dpkg -L vorbis-tools
/.
/usr
/usr/bin
/usr/bin/ogg123
apt-get build-dep package_name
(needs root privileges)
This is a very useful command, which will install all the development libraries needed by an application. So if you need to compile a newer version of a program than the one included in the repositories, use this command to fetch the dependencies. Notice that the libraries installed will be for the current version coming with the repositories, so you may need to install additional libraries if needed. However, this usually works for most of the applications. Example:
apt-get build-dep wesnoth
This will fetch all the development packages needed for Wesnoth. Keep in mind that your sources repositories must be enabled (they are enabled by default in Ubuntu).
apt-get clean (and apt-get autoclean)
(needs root privileges)
This command will remove the archives installed on your system. Whenever you install a package, it is downloaded and the DEB package is kept inside the /var/cache/apt/archives/ directory. This command removes those packages, freeing up space.
apt-get clean
apt-get autoclean
Regarding apt-get autoclean: this command will remove only the archives which are no longer available in the repositories, and will keep the ones which are currently available. Helpful if you want to get rid of old archives which have been updated, but still want to keep the upgraded ones just in case. To see how much space the archive occupy, use du -h (the -h argument stands for human readable, so it will show sizes in human readable format):
du -h /var/cache/apt/archives/
apt-cache show package_name
Will show information about any package in the repository. You only have to type in the name of it, not the entire name and version. Example:
embryo@debian:~$ apt-cache show vorbis-tools
Package: vorbis-tools
Priority: optional
Section: sound
Installed-Size: 580
...
apt-cache search pattern
Will search and list all the packages which contain pattern in their name or in their description. You can pipe this with grep for more relevant results:
embryo@debian:~$ apt-cache search gnome terminal|grep terminal
gmfsk - MFSK, RTTY and other digital mode terminal for HF/amateur radio
gnome-terminal-data - Data files for the GNOME terminal emulator
gnome-terminal - The GNOME 2 terminal emulator application
apt-get update && apt-get upgrade
(needs root privileges)
This is a one-liner to update your packages list and upgrade your system. Since it requires root privileges, if your distribution is Ubuntu use sudo apt-get update && sudo apt-get upgrade. Notice that the second command (after the double ampersand) is executed only if the first one was successful, so if fetching any of the lists fails, the second command will not be executed. If you're running a testing or beta release, use instead the following:
sudo apt-get update && sudo apt-get dist-upgrade
This will fetch updates even if they depend on newer packages.
dpkg --get-selections
This command will list all the packages installed on a system using the package manager. Example:
embryo@debian:~$ dpkg --get-selections
acpi-support-base install
acpid install
adduser install
akregator install
...
dpkg -S filename
Will list the packages which install filename. Example:
embryo@debian:~$ dpkg -S oggenc
vorbis-tools: /usr/share/man/man1/oggenc.1.gz
vorbis-tools: /usr/bin/oggenc
embryo@debian:~$
apt-get autoremove
(needs root privileges)
This command will remove unnecessary packages (e.g. orphaned packages), which are no longer needed by any of the packages installed in the system. This happens often after you uninstall a certain application, and its dependencies still remain installed on the system. Use this command to get rid of them.
apt-cache dump
This command will list every package in the cache.
apt-cache depends package_name
A very useful command which lists every dependency a package has, including recommended packages.
embryo@debian:~$ apt-cache depends vorbis-tools
vorbis-tools
Depends: libao2
Depends: libc6
Depends: libcurl3-gnutls
...
apt-cache rdepends package_name
Will show dependencies in reversed order, that is, it will list all the packages which depend on the specified package.
apt-cache rdepends mplayer
apt-cache policy package_name
This will list the repository in which a package is located. In Ubuntu, there are four such repositories: main, restricted, universe and multiverse. Debian has main, contrib and non-free. There is a certain policy for each package, and depending on that, the package is included in one of the specified repositories.
apt-cache policy amarok
apt-cache policy sun-java6-jre
apt-cache showsrc package_name
Will show information about a package source.
apt-get -f install
(needs root privileges)
Will try to fix broken dependencies. This usually comes in handy if you try to manually install a DEB package without installing first its dependencies. Run apt-get -f install to fix the missing dependencies and try to install the package again.
apt-cdrom add
(needs root privileges)
Will add a CD ROM to your sources, so you can install packages from it. This command is mostly useful if you have some ISO images, which you don't want to burn to a CD. In order to scan the ISO images, use:
apt-cdrom -d=/cdrom add
This will mount the ISO image inside the /cdrom directory, and then add its contents to the sources.list. Notice that the /cdrom directory has to be empty. You can use any empty directory for this:
apt-cdrom -d=/home/USER/mydir
dpkg -c local_file.deb
The -c argument tells dpkg to list the contents of a DEB package. Example:
embryo@debian:~$ dpkg -c google-chrome-stable_current_i386.deb
...
drwxr-xr-x root/root 0 2010-07-30 23:54 ./usr/share/man/man1/
-rwxr-xr-x root/root 3098 2010-07-30 23:54 ./usr/share/man/man1/google-chrome.1
lrwxrwxrwx root/root 0 2010-07-30 23:54 ./usr/bin/google-chrome -> /opt/google/chrome/google-chrome
dpkg -f local_file.deb
This shows the control file for a binary package. A control file is a file which provides information to the package manager about dependencies, maintainer, homepage, description, and more.
embryo@debian:~$ dpkg -f google-chrome-stable_current_i386.deb
Package: google-chrome-stable
Version: 5.0.375.126-r53802
...
These are the most popular uses of APT and DPKG. Have some more? Please, share them!
Sunday, 19 September 2010
How-To: Install Dillo Web Browser in Ubuntu Maverick Beta
Dillo is a simplistic, minimal web browser built using the FLTK2 (Fast Light Toolkit) library, designed especially for a minimal load on resources. It is used successfully by various distributions out there that aim to stay small and fast (the last time I checked it was included in Damn Small Linux for example).
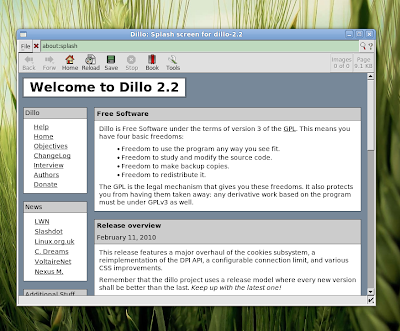
I decided to make a review of Dillo (in the past I reviewed version 2.0 here) but realized that currently Dillo is not included in the Ubuntu Maverick repositories. So this is why I set out to make first a short how-to on how to install it in Maverick. Considering you will also need to compile and install FLTK2 in order to compile Dillo (because the repositories include FLTK 1.1, but not FLTK 2.0), we will use a DEB package to install it. Just follow the steps below.
Download the DEB package from the Dillo PPA archive (direct link) and save it somewhere on your hard disk. Now open a terminal, make sure the currently working directory is the one where you saved it (use the pwd command to print the working directory) and type:
sudo dpkg -i dillo_2.2-0+dillo1~karmic1_i386.deb
That's it! To start Dillo, press Alt+F2 and type dillo in the run box that appears.
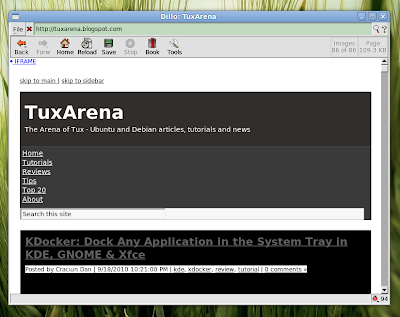
Note: This tutorial probably applies for older Ubuntu releases too.
Dillo 2.2 - the minimalist and fast web browser for Linux

I decided to make a review of Dillo (in the past I reviewed version 2.0 here) but realized that currently Dillo is not included in the Ubuntu Maverick repositories. So this is why I set out to make first a short how-to on how to install it in Maverick. Considering you will also need to compile and install FLTK2 in order to compile Dillo (because the repositories include FLTK 1.1, but not FLTK 2.0), we will use a DEB package to install it. Just follow the steps below.
Download the DEB package from the Dillo PPA archive (direct link) and save it somewhere on your hard disk. Now open a terminal, make sure the currently working directory is the one where you saved it (use the pwd command to print the working directory) and type:
sudo dpkg -i dillo_2.2-0+dillo1~karmic1_i386.deb
That's it! To start Dillo, press Alt+F2 and type dillo in the run box that appears.

Note: This tutorial probably applies for older Ubuntu releases too.
Saturday, 18 September 2010
KDocker: Dock Any Application in the System Tray in KDE, GNOME & Xfce
I bet at one point or another you felt you missed the system tray integration feature in some application, be it xterm, an audio player, a file manager or any other program. Well, KDocker is just the thing which comes to help: a simple, yet practical docking application built for KDE4 (older KDE3 version can be found here), but not only. Let me tell you how to use this program in a productive and useful manner.

KDocker is a docking application for KDE4 which allows you to dock any application in the system tray. The great thing about KDocker is that it works not only in KDE, but also in GNOME, Xfce and other window managers which are compliant with the NET WM standard.
The project is hosted on Launchpad, being actively developed, with the latest version (4.4) released earlier this year, on July 17. To install it in Ubuntu, type in a terminal sudo apt-get install kdocker, then launch it by pressing Alt+F2 and typing kdocker in the run dialogue window that appears.
Here's how to use: first, start it, then select the window which you want to dock. Below is a screenshot of xterm docked in the system tray using KDocker:
Here are several options KDocker provides besides only docking applications:
- it allows to skip the taskbar or the pager (so the application is not shown on the taskbar/pager)
- make the window sticky
- iconify when minimized/obscured or focus is lost or on close
- show a balloon when the window title changes

Now, one of the real uses KDocker provides is the ability to run it as a command, e.g. kdocker application_name and eventually create a desktop shortcut to this command, or make it start at the login. For example, creating a desktop shortcut in KDE to automatically start Konsole and put it in the system tray can be done like this:
First, create a file on the desktop (well, on the Desktop Folder widget actually) called anything.desktop (or whatever name you like, but with the .desktop extension). Put the following content in it:
[Desktop Entry]
Exec=kdocker konsole
Icon=konsole
Name=Konsole (Docked)
Type=Application
Comment=Console

And save the file. Now, you can click that desktop shortcut to launch Konsole in the system tray.

Let's say you want to launch a terminal-based application inside Konsole, which should be docked in the system tray. The example that follows is for Midnight Commander, the powerful file manager with a text user interface:
[Desktop Entry]
Exec=kdocker konsole -e mc
Icon=konsole
Name=Konsole (Docked)
Type=Application
Comment=Console
The -e argument tells Konsole to execute the command mc after starting.

Have some more uses for KDocker? Please share in the comments below.
KDocker 4.3 docking an xterm instance

KDocker is a docking application for KDE4 which allows you to dock any application in the system tray. The great thing about KDocker is that it works not only in KDE, but also in GNOME, Xfce and other window managers which are compliant with the NET WM standard.
The project is hosted on Launchpad, being actively developed, with the latest version (4.4) released earlier this year, on July 17. To install it in Ubuntu, type in a terminal sudo apt-get install kdocker, then launch it by pressing Alt+F2 and typing kdocker in the run dialogue window that appears.
Here's how to use: first, start it, then select the window which you want to dock. Below is a screenshot of xterm docked in the system tray using KDocker:
Here are several options KDocker provides besides only docking applications:
- it allows to skip the taskbar or the pager (so the application is not shown on the taskbar/pager)
- make the window sticky
- iconify when minimized/obscured or focus is lost or on close
- show a balloon when the window title changes
KDocker options

Now, one of the real uses KDocker provides is the ability to run it as a command, e.g. kdocker application_name and eventually create a desktop shortcut to this command, or make it start at the login. For example, creating a desktop shortcut in KDE to automatically start Konsole and put it in the system tray can be done like this:
First, create a file on the desktop (well, on the Desktop Folder widget actually) called anything.desktop (or whatever name you like, but with the .desktop extension). Put the following content in it:
[Desktop Entry]
Exec=kdocker konsole
Icon=konsole
Name=Konsole (Docked)
Type=Application
Comment=Console
Create a .desktop launcher to anything you want to dock

And save the file. Now, you can click that desktop shortcut to launch Konsole in the system tray.

Let's say you want to launch a terminal-based application inside Konsole, which should be docked in the system tray. The example that follows is for Midnight Commander, the powerful file manager with a text user interface:
[Desktop Entry]
Exec=kdocker konsole -e mc
Icon=konsole
Name=Konsole (Docked)
Type=Application
Comment=Console
The -e argument tells Konsole to execute the command mc after starting.
Launching Midnight Commander in Konsole and docking it in the system tray

Have some more uses for KDocker? Please share in the comments below.
Guide to Using Finch - Terminal-Based Chat Client
 Finch is a TUI (text user interface) IM client for Linux which uses libpurple, the same library on which the GNOME IM client Pidgin is based on. Usually, if you have Pidgin installed, you should have Finch too, unless Pidgin was compiled with the text interface option disabled. In addition to this, Finch supports every protocol that Pidgin supports, and even though it is a terminal-based application, it offers enough configuration options, and more can be done using the .gntrc configuration file, which is discussed later in this guide. If not, installing the latest Finch release, even from source, should be easy.
To install it in Ubuntu, open a terminal and type sudo apt-get install finch or use the Ubuntu Software Centre to search for it and install it. On Debian, you can install the older version from the repositories, or use this guide to compile and install the latest version. Yahoo! for example changed its protocol, so the version which comes included in Debian Lenny is not able to connect to it.
A little about installing as a normal user, using a different prefix. I have Pidgin (and Finch for that matter) 2.7.3 installed in Debian Lenny under the /home/embryo/usr prefix, so my binaries are located in /home/embryo/usr/bin/ and the manual pages in /home/embryo/usr/share/man/man1/finch.1/ and /home/embryo/usr/share/man/pidgin.1/ respectively. So in order to launch them I need to include the first path into my $PATH variable. To do so, edit your ~/.bashrc file using a text editor, and add this line at the end:
export PATH=$PATH:/home/USER/usr/bin
Replace USER with your username (and the full path if your prefix was different). Now, I don't know if there is another workaround for this, but i noticed that man finch or man pidgin do not work after installing in a different path than the standard ones. The manual pages for them actually exist, but in the directory /home/embryo/usr/share/man/man1/. So, to access them, use these commands:
man -l /home/USER/usr/share/man/man1/finch.1
man -l /home/USER/usr/share/man/man1pidgin.1
The -l argument tells man to open a manual page (and format it) for a custom file provided by the user.
Now that Finch is properly installed, let's get to work. First, type finch in a console to fire it up:
Navigation
Finch is built using the ncurses toolkit, which is a library designed especially to built text user interfaces. To navigate in a Finch window, use Tab to focus the next widget (option, tickbox, button), Shift+Tab to focus the previous one, Space in order to tick/untick an option, and Enter to 'click' a button. You will also need to press Esc to exit from menus such as the Actions menu.
The first time it starts, Finch automatically opens the accounts window, so you can now select the Add button and press Enter. In the window that appears - New Account - use the arrows to select the desired protocol, and then use Tab to navigate to the next field, fill it in with your data, and so on:
Creating a new Yahoo! account

Next, save your newly created account. Now, to close the Accounts window, press Alt+C. You should be now able to see your contact lists since Finch will try to automatically connect to the protocol you specified.
New mail notification

Now, before moving on to configure Finch, first let me list the most important keyboard shortcuts which are useful to navigate, customize and use this application.
Moving around
Alt+Q - just so you know this quits Finch, getting back to console
Alt+A - opens the Actions menu, which contains everything you need to configure Finch: accounts, buddy lists, file transfers, plugins, sounds, preferences and statuses; use the Esc key to close this menu when you're done
Alt+C - closes the currently opened window
Alt+N - switch to the next window; you will need this to switch between chats, and other openend windows
Alt+P - switch to the previous window
Moving and resizing windows
There are two important shortcuts here, which will help you to:
1. Move windows in Finch
For this, use the Alt+M keyboard shortcut. This will highlight the currently selected window so you will be able to use the arrow keys in order to move it anywhere inside the terminal; use Esc to deselect it when you're done.
2. Resize windows in Finch
Press Alt+R in order to highlight the currently selected window, then use the arrow keys to resize it; press Esc to deselect it when you're done.
Configuring Finch
To configure Finch, press Alt+A, which will open the Actions menu. Here you can edit accounts, enable/disable plugins or configure general Finch preferences. For now we will focus on the the Preferences entry:

As you can see, you can configure the:
- Buddy List - to turn on/off showing idle times or offline buddies
- Conversations - to show timestamps or notify buddies when you are typing them a new message
- Logging - the log format, which can be plain text or HTML (formatted), also which types of events to log
- Idle - which will report idle time based only on the last time you typed something in Finch (anywhere in Finch) or since the last message you send; also the number of minutes before becoming idle
Configure this to your liking. A little more about configuration options: they are kept in the same directory for both Finch and Pidgin, and changes done to one of them affect the other. The configuration files and the logs can be found inside the ~/.purple/ directory, where ~ is your home directory. Notice that .purple is a hidden directory, so make sure that your file manager will list those (or use ls -a in console to view them).
Plugins
Finch comes bundled with several useful plugins, like Buddy Notes, TinyURL or the Log Reader:

To open the above window, press Alt+A and go to the the Plugins entry. Configure those as you wish.
The ~/.gntrc file
This file allows you to configure Finch in more detail, including colors for its interface, re-binding keys, change keys for various Finch actions, and even enable mouse support.
Here's how to enable mouse support. Open up a text editor and edit (or create if it doesn't already exist - and it probably won't) the ~/.gntrc file:
nano ~/.gntrc # or gedit ~/.gntrc
Next, add the following lines in this file, then save it:
[general]
mouse = 1
This is all. Notice that if the file is already created, you should find the section [general] and set the mouse option to 1 (true). Although the manual page says the mouse support is still experimental, I found no issues with it. However, manipulating Finch actually seems harder with a mouse after using it exclusively from the keyboard.
Why use Finch at all?
Well, don't if you want avatars and all the beauty a graphical client offers! Use Pidgin, Empathy, Kopete or something else! But if you need for some reason (speed, lack of memory etc) a terminal-based application for instant messaging, then give Finch a try.
This should be all for today. I hope you'll enjoy Finch as much as I do!
Further reading
Don't forget man finch - it has all the info you need (and more about all the ~/.gntrc file, which couldn't be covered in this guide). The official homepage and guide:
Using Finch
Finch homepage
Thursday, 16 September 2010
Tutorial: Install Clementine Music Player in Kubuntu 10.10 Maverick Beta
 Clementine is a KDE4 port of the beloved music player Amarok 1.4. Although Clementine still needs work done in order to reach Amarok's functionality - like support for scripts, or for example I couldn't get it to add a whole music directory to the playlist - is there a way to do it? - it comes with pretty decent features up to now:
- equalizer
- Last.fm song submission, love/ban buttons
- music library
- file browser
- radio support
- cover manager

Installing Clementine in Kubuntu 10.10 Maverick Meerkat Beta
We will use the packages in the Clementine PPA in order to install it on Maverick. Fire up a terminal and type:
sudo add-apt-repository ppa:riccetn/clementine
This command will add the Clementine PPA repository inside your /etc/apt/sources.list.d/ directory.

Notice that the current version in the PPA is 0.3. If you already have an older version of Clementine installed on your system, it is best to remove it first:
sudo apt-get remove --purge clementine
Now update the packages list:
sudo apt-get update
And finally, install Clementine by typing:
sudo apt-get install clementine
And you're done! To start it up, press Alt+F2 and type clementine followed by Enter.
Cover manager

Clementine Homepage
Clementine at Google Code
Clementine PPA at Launchpad.net
Add GMail in Thunderbird on Linux
Thunderbird is a powerful and popular email client from Mozilla which integrates a full set of great features.
If you want to access your GMail account directly from Thunderbird, follow the steps below.
Fire up Thunderbird, then go to File->New->Mail Account. Fill in the fields with your GMail details:
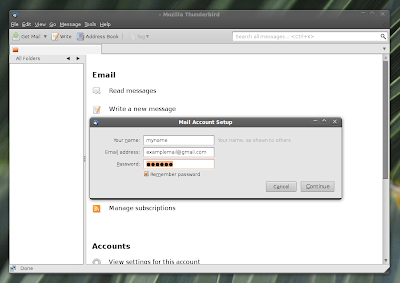
Then click Next. In the following window that appears, you can replace the Incoming and Outgoing servers by pressing the Edit button, and replace them with imap.gmail.com and smtp.gmail.com respectively. Also, make sure the selected protocol is IMAP (under the password field, where the two radio buttons are IMAP and POP).
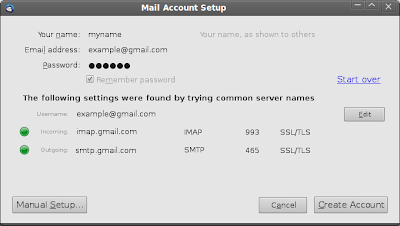
Now click Create Account and this should be it. You can now use Thunderbird to access your GMail account.
If you want to access your GMail account directly from Thunderbird, follow the steps below.
Fire up Thunderbird, then go to File->New->Mail Account. Fill in the fields with your GMail details:

Then click Next. In the following window that appears, you can replace the Incoming and Outgoing servers by pressing the Edit button, and replace them with imap.gmail.com and smtp.gmail.com respectively. Also, make sure the selected protocol is IMAP (under the password field, where the two radio buttons are IMAP and POP).

Now click Create Account and this should be it. You can now use Thunderbird to access your GMail account.
Wednesday, 15 September 2010
Tutorial: Compile and Install GIMP 2.6.10 in Debian 5.0 Lenny
In this tutorial I will show how to compile from source and install in Debian Lenny the latest release of GIMP, the most powerful image manipulation application currently available for Linux.
First of all, Debian Lenny comes with GIMP 2.4.7 in the repositories, so if you have it installed, you should remove it first:
apt-get remove --purge gimp
apt-get autoremove --purge
Next, install the dependencies needed to compile GIMP 2.6.10:
apt-get build-dep gimp
apt-get install libbabl-0.0-0-dev libgegl-0.0-dev
Next, download the GIMP 2.6.10 source tarball from the GIMP FTP site and then uncompress it:
tar -xjf gimp-2.6.10.tar.bz2
Now change the working directory to gimp-2.6.10 and issue these commands:
./configure
make
make install
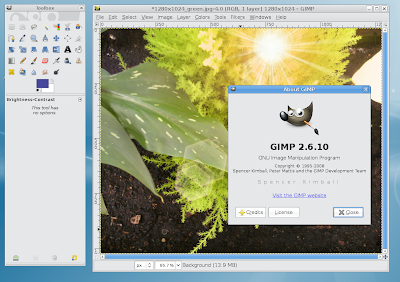
The last one as root. If you want to install GIMP as a normal user, specify a different prefix to the configure script:
./configure --prefix=/home/USER/usr
make
make install
There is no need to be root when issuing make install this time.
First of all, Debian Lenny comes with GIMP 2.4.7 in the repositories, so if you have it installed, you should remove it first:
apt-get remove --purge gimp
apt-get autoremove --purge
Next, install the dependencies needed to compile GIMP 2.6.10:
apt-get build-dep gimp
apt-get install libbabl-0.0-0-dev libgegl-0.0-dev
Next, download the GIMP 2.6.10 source tarball from the GIMP FTP site and then uncompress it:
tar -xjf gimp-2.6.10.tar.bz2
Now change the working directory to gimp-2.6.10 and issue these commands:
./configure
make
make install
GIMP 2.6.10 in Debian Lenny

The last one as root. If you want to install GIMP as a normal user, specify a different prefix to the configure script:
./configure --prefix=/home/USER/usr
make
make install
There is no need to be root when issuing make install this time.
Monday, 13 September 2010
How-To: Set Up KMail With GMail and IMAP
According to Wikipedia, IMAP (Internet Message Access Protocol), together with POP is one of the most popular protocols for email retrieval. In this short tutorial I will show you how to set up KMail (the default email client in KDE4 and also most - if not all - distributions which ship it, like Kubuntu) with a GMail account, using IMAP as a protocol.
Here are a few steps easy to follow:
1. Login to the GMail account
After logging in to GMail, click on Settings on the upper-right corner, and then click on the Forwarding and POP/IMAP tab. Tick the Enable IMAP option in the IMAP Access section, and then click the Save Changes button.
2. Fire up KMail
Press Alt+F2 and type kmail in the run box that appears. KMail should start, so if a first-run wizard appears, just close it.
3. Configure KMail to use IMAP settings for your GMail account
In KMail, go to Settings->Configure KMail... and click on the Accounts tab.
In the Receiving tab, click the Add... button on the right and then tick the IMAP option in the pop-up window that appears. Next click OK:
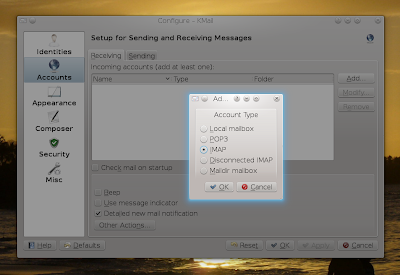
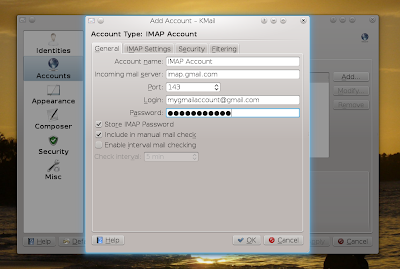
Now, a window with IMAP details should appear. Enter the following data:
Account name: you can leave this to the default value, IMAP Account
Incoming mail server: imap.gmail.com
Port: leave this to the default port 143
Login: your GMail account (e.g. myemail@gmail.com)
Password: your email (GMail) password
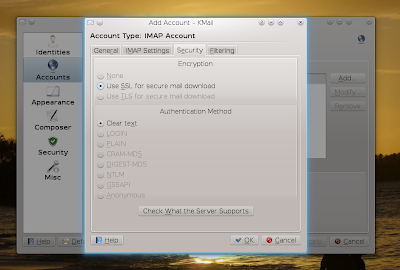
Do not close this window for now. Go to the Security tab and select the Use SSL for secure mail download radio button. This will use encryption for transferring your emails. Click OK, then Apply in the main configuration window.
This should be all. This part takes care about incoming emails via your GMail account.
For outgoing email, go again to Settings->Configure KMail... and then click on the Sending tab. Next, click Add..., check the SMTP account type in the window that appears, give it a name and click the Create and Configure button. Fill in the Outgoing mail server field with smtp.gmail.com and then click OK:
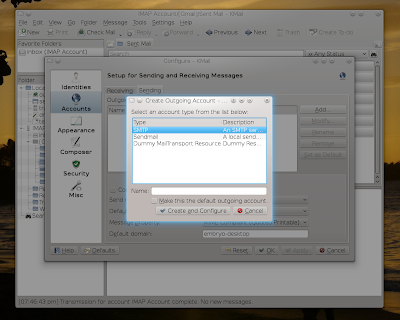
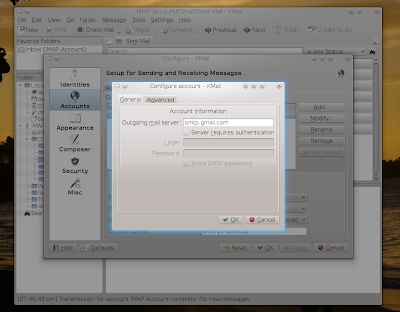
Here are a few steps easy to follow:
1. Login to the GMail account
After logging in to GMail, click on Settings on the upper-right corner, and then click on the Forwarding and POP/IMAP tab. Tick the Enable IMAP option in the IMAP Access section, and then click the Save Changes button.
2. Fire up KMail
Press Alt+F2 and type kmail in the run box that appears. KMail should start, so if a first-run wizard appears, just close it.
3. Configure KMail to use IMAP settings for your GMail account
In KMail, go to Settings->Configure KMail... and click on the Accounts tab.
In the Receiving tab, click the Add... button on the right and then tick the IMAP option in the pop-up window that appears. Next click OK:

Now, a window with IMAP details should appear. Enter the following data:
Account name: you can leave this to the default value, IMAP Account
Incoming mail server: imap.gmail.com
Port: leave this to the default port 143
Login: your GMail account (e.g. myemail@gmail.com)
Password: your email (GMail) password

Do not close this window for now. Go to the Security tab and select the Use SSL for secure mail download radio button. This will use encryption for transferring your emails. Click OK, then Apply in the main configuration window.

This should be all. This part takes care about incoming emails via your GMail account.
For outgoing email, go again to Settings->Configure KMail... and then click on the Sending tab. Next, click Add..., check the SMTP account type in the window that appears, give it a name and click the Create and Configure button. Fill in the Outgoing mail server field with smtp.gmail.com and then click OK:


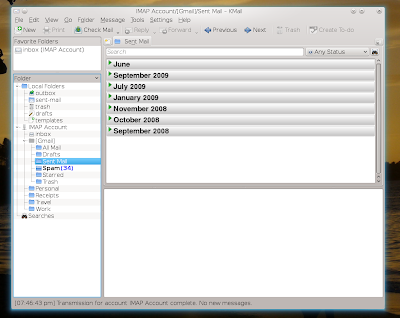
Your GMail account is now synchronized and you can now access it directly in KMail

Wednesday, 27 January 2010
How-To: Install Finch 2.6.5 in Debian Lenny
 Finch is a powerful text user interface instant messaging client based on libpurple, and it comes included in the Pidgin source, the popular GNOME IM client. Finch supports various protocols, including AIM, ICQ, MSN, Yahoo and IRC.
The version which ships in Debian Lenny is rather old (2.4.3), so in order to install the latest release of Finch in Debian Lenny (which, at the time of writing is 2.6.5), just follow the next steps:
Make sure the sources repositories are enabled, so that the needed development libraries are available. That is, a line like the following should be available in the /etc/apt/sources.list file:
deb-src http://ftp.fi.debian.org/debian/ lenny main contrib non-free
As root, update the packages list:
apt-get update
And install the development libraries:
apt-get build-dep finch
Next, download the Pidgin source code (which also includes Finch source) from the official website (direct link here), uncompress it:
tar -xjf pidgin-2.6.5.tar.bz2
Change the current working directory to pidgin-2.6.5 and compile and install it using:
./configure --disable-gtkui --disable-vv --disable-nm
The --disable-gtkui switch will not build the GTK interface, and the other two will disable voice/video support and NetworkManager support.
Now issue the usual:
make
make install
The last one as root. Alternately, you can install Finch as a local user, by specifying an install prefix:
./configure --prefix=/home/USER/usr --disable-gtkui --disable-vv --disable-nm
make
make install
In this case, make install should be run as normal user. Replace USER with your username and make sure /home/USER/usr/bin is included in your $PATH variable. Run Finch by typing finch at the command-line.
Pidgin 2.6.5 running in a terminal

Friday, 22 January 2010
How-To: Install Firefox 3.6 in Ubuntu 9.10 Karmic
Firefox 3.6 was released yesterday, after over six months since the last major release, version 3.5. Firefox 3.6 ships with versions for over 70 languages, support for Personas, an add-on allowing you to change the appearance of the tab bar and choose from thousands of themes, improvements to the open video support (like the fullscreen mode), improved JavaScript performance and start-up time, support for the new DOM and HTML5 specs.
This is a short tutorial which will show how to install Firefox 3.6 in Ubuntu 9.10 Karmic Koala from the Mozilla Daily PPA.
First, open the terminal and add the necessary repository addresses to your /etc/apt/sources.list file:
sudo nano /etc/apt/sources.list
Or, for a GUI editor:
gksudo gedit /etc/apt/sources.list
Add the following two lines:
deb http://ppa.launchpad.net/ubuntu-mozilla-daily/ppa/ubuntu karmic main
deb-src http://ppa.launchpad.net/ubuntu-mozilla-daily/ppa/ubuntu karmic main
Notice that the second line is only needed if you plan to fetch the source code for Firefox. Make sure to save the file and proceed to the next step.
Now, add the trusted key for this repository:
sudo apt-key adv --keyserver keyserver.ubuntu.com --recv-keys 247510BE
Update your packages list:
sudo apt-get update
Remove the current Firefox installation:
sudo apt-get remove --purge firefox
And now install version 3.6:
sudo apt-get install firefox-3.6
Now you may want to create a new profile for the new 3.6 version. To do this, run Firefox with the -P parameter:
firefox -P
To run two different instances of Firefox and different profiles you can use:
firefox --no-remote -P
This is a short tutorial which will show how to install Firefox 3.6 in Ubuntu 9.10 Karmic Koala from the Mozilla Daily PPA.
First, open the terminal and add the necessary repository addresses to your /etc/apt/sources.list file:
sudo nano /etc/apt/sources.list
Or, for a GUI editor:
gksudo gedit /etc/apt/sources.list
Add the following two lines:
deb http://ppa.launchpad.net/ubuntu-mozilla-daily/ppa/ubuntu karmic main
deb-src http://ppa.launchpad.net/ubuntu-mozilla-daily/ppa/ubuntu karmic main
Notice that the second line is only needed if you plan to fetch the source code for Firefox. Make sure to save the file and proceed to the next step.
Now, add the trusted key for this repository:
sudo apt-key adv --keyserver keyserver.ubuntu.com --recv-keys 247510BE
Update your packages list:
sudo apt-get update
Remove the current Firefox installation:
sudo apt-get remove --purge firefox
And now install version 3.6:
sudo apt-get install firefox-3.6
Now you may want to create a new profile for the new 3.6 version. To do this, run Firefox with the -P parameter:
firefox -P
To run two different instances of Firefox and different profiles you can use:
firefox --no-remote -P
Saturday, 26 December 2009
How-To: Install RSSOwl 2.0.1 in Ubuntu 9.10 Karmic
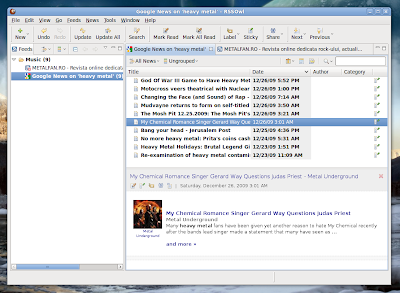
RSSOwl is a feature-rich RSS feed reader written in Java. To install the latest release in Ubuntu 9.10, follow the instructions below:
Edit your /etc/apt/sources.list:
sudo nano /etc/apt/sources.list
And add the following line:
deb http://packages.rssowl.org/ubuntu karmic main
Save the file (Ctrl+O), exit (Ctrl+X) and then add this repository's key to the trusted keys:
wget -q http://packages.rssowl.org/project/rene.moser.pubkey -O- | sudo apt-key add -
Update the packages list:
sudo apt-get update
And install RSSOwl:
sudo apt-get install rssowl
This is it. To remove RSSOwl from your Ubuntu box use:
sudo apt-get remove --purge rssowl
RSSOwl 2.0.1 running in Ubuntu

Edit your /etc/apt/sources.list:
sudo nano /etc/apt/sources.list
And add the following line:
deb http://packages.rssowl.org/ubuntu karmic main
Save the file (Ctrl+O), exit (Ctrl+X) and then add this repository's key to the trusted keys:
wget -q http://packages.rssowl.org/project/rene.moser.pubkey -O- | sudo apt-key add -
Update the packages list:
sudo apt-get update
And install RSSOwl:
sudo apt-get install rssowl
This is it. To remove RSSOwl from your Ubuntu box use:
sudo apt-get remove --purge rssowl
How-To: Install Flash Player 10.1 Beta 2 in Ubuntu 9.10 Karmic Koala
Adobe Flash Player 10.1 Beta 2 was released earlier this year, on December 17 at the Adobe MAX 2009. This release comes with several new features and numerous bug fixes.
To install Flash Player 10.1 Beta 2 in Ubuntu 9.10, just follow the steps below:
First, remove your existing Flash plugin. Do this depending on whether you installed Flash from the repositories or manually. If you installed Flash from the Ubuntu repositories, typing:
sudo apt-get remove --purge flashplugin-installer
should remove your current installation of Flash. If Flash was installed manually, the plugin should be located in the ~/.mozilla/plugins directory, where ~ is the home directory. So, to remove it:
rm -f ~/.mozilla/plugins/libflashplayer.so
Next, download the archive for the new Flash player from here (direct link here), or alternately you can type in a terminal:
wget http://download.macromedia.com/pub/labs/flashplayer10/flashplayer10_1_p2_linux_121709.tar.gz
Make sure the current working directory is the one where you saved the archive and uncompress it:
tar -xzf flashplayer10_1_p2_linux_121709.tar.gz
Next, create the ~/.mozilla/plugins directory (if it doesn't already exist):
mkdir -p ~/.mozilla/plugins
And copy the plugin inside it:
cp install_flash_player_10_linux/libflashplayer.so ~/.mozilla/plugins
Now restart Firefox and this should be all.
To install Flash Player 10.1 Beta 2 in Ubuntu 9.10, just follow the steps below:
First, remove your existing Flash plugin. Do this depending on whether you installed Flash from the repositories or manually. If you installed Flash from the Ubuntu repositories, typing:
sudo apt-get remove --purge flashplugin-installer
should remove your current installation of Flash. If Flash was installed manually, the plugin should be located in the ~/.mozilla/plugins directory, where ~ is the home directory. So, to remove it:
rm -f ~/.mozilla/plugins/libflashplayer.so
Next, download the archive for the new Flash player from here (direct link here), or alternately you can type in a terminal:
wget http://download.macromedia.com/pub/labs/flashplayer10/flashplayer10_1_p2_linux_121709.tar.gz
Make sure the current working directory is the one where you saved the archive and uncompress it:
tar -xzf flashplayer10_1_p2_linux_121709.tar.gz
Next, create the ~/.mozilla/plugins directory (if it doesn't already exist):
mkdir -p ~/.mozilla/plugins
And copy the plugin inside it:
cp install_flash_player_10_linux/libflashplayer.so ~/.mozilla/plugins
Now restart Firefox and this should be all.
How-To: Post to Twitter from Command-Line
This is a short tutorial explaining how to post to Twitter using command-line in Linux, without needing to even open up your web browser.
First, install the curl package:
sudo apt-get install curl
Next, create a script anywhere in your $PATH, for example twitter.sh inside ~/bin, where ~ is your home directory (make sure ~/bin is included in your $PATH variable, in case echo $PATH doesn't return it, edit ~/.bashrc and add a line like this: export PATH=/home/USER/bin/:$PATH).
The script twitter.sh should contain the following:
#!/bin/bash
curl -u USER:PASS -d status="$*" http://twitter.com/statuses/update.xml > /dev/null
echo "Message sent!"
Replace USER and PASS with your Twitter username and password, and then make the script executable:
chmod 755 ~/bin/twitter.sh
And now test it:
twitter.sh Hello, world! This is a test.
So just use it as:
twitter.sh YOUR MESSAGE
This should be all. Have a look at the screenshots below:


First, install the curl package:
sudo apt-get install curl
Next, create a script anywhere in your $PATH, for example twitter.sh inside ~/bin, where ~ is your home directory (make sure ~/bin is included in your $PATH variable, in case echo $PATH doesn't return it, edit ~/.bashrc and add a line like this: export PATH=/home/USER/bin/:$PATH).
The script twitter.sh should contain the following:
#!/bin/bash
curl -u USER:PASS -d status="$*" http://twitter.com/statuses/update.xml > /dev/null
echo "Message sent!"
Replace USER and PASS with your Twitter username and password, and then make the script executable:
chmod 755 ~/bin/twitter.sh
And now test it:
twitter.sh Hello, world! This is a test.
So just use it as:
twitter.sh YOUR MESSAGE
This should be all. Have a look at the screenshots below:
Running the twitter.sh script


Friday, 25 December 2009
10 Useful Linux Commands
Here's a list of 10 commands which may come handy when using the command line in Linux:
Search for all files modified in the last N days containing a specific text in their name
find DIR -mtime -N -name "*TEXT*"
For example:
find ~ -mtime -5 -name "*log*"
Will display all the files modified in the past 5 days which include the text 'log' in their filename.
Determine which processes use the most memory
ps aux | sort -nk 4 | tail
Will show the first 10 processes which use the most memory, using ascendant sorting. Alternately:
ps aux | sort -nrk 4 | head
Will show the first 10 processes using most memory, using descendent sorting.

Display the username which is currently logged in
whoami
Show date using format modifiers
date +"%H:%M:%S"
Will output time in format HOUR:MINUTE:SECOND. You can use any format specifiers explained in the man page. The double quotes are required in case you need to use spaces.

Show info about a specific user
finger $USER

Show disk usage separately for each partition
df -h
The -h switch will tell df to show human-readable sizes (KB, MB and GB when it is the case)
df -B 1K
Will show sizes in kilobytes.
Show which modules are loaded
lsmod
Add or remove a module to/from the Linux kernel
Insert a module:
modprobe MODULE
Remove a module:
modprobe -r MODULE
Search for a file using locate
locate FILENAME
Will search the locate database (created with updatedb) for any path or file which contains FILENAME.
Change the encoding of a text file
iconv -f INITIAL_ENCODING -t DESIRED_ENCODING filename
For example:
iconv -f ISO-8859-16 -t UTF-8 myfile.txt
Will change the encoding of myfile.txt from ISO-8859-16 (Romanian) to UTF-8.
Search for all files modified in the last N days containing a specific text in their name
find DIR -mtime -N -name "*TEXT*"
For example:
find ~ -mtime -5 -name "*log*"
Will display all the files modified in the past 5 days which include the text 'log' in their filename.
Determine which processes use the most memory
ps aux | sort -nk 4 | tail
Will show the first 10 processes which use the most memory, using ascendant sorting. Alternately:
ps aux | sort -nrk 4 | head
Will show the first 10 processes using most memory, using descendent sorting.
Output of ps aux | sort -nrk 4 | head

Display the username which is currently logged in
whoami
Show date using format modifiers
date +"%H:%M:%S"
Will output time in format HOUR:MINUTE:SECOND. You can use any format specifiers explained in the man page. The double quotes are required in case you need to use spaces.
Showing date in format month, day year

Show info about a specific user
finger $USER
Output of finger $USER

Show disk usage separately for each partition
df -h
The -h switch will tell df to show human-readable sizes (KB, MB and GB when it is the case)
df -B 1K
Will show sizes in kilobytes.
Show which modules are loaded
lsmod
Add or remove a module to/from the Linux kernel
Insert a module:
modprobe MODULE
Remove a module:
modprobe -r MODULE
Search for a file using locate
locate FILENAME
Will search the locate database (created with updatedb) for any path or file which contains FILENAME.
Change the encoding of a text file
iconv -f INITIAL_ENCODING -t DESIRED_ENCODING filename
For example:
iconv -f ISO-8859-16 -t UTF-8 myfile.txt
Will change the encoding of myfile.txt from ISO-8859-16 (Romanian) to UTF-8.
Tuesday, 22 December 2009
How-To: Change GRUB Splash Image (For GRUB Legacy)
Although GRUB 2 replaced the older GRUB 0.9x (currently known as 'GRUB Legacy'), the latter still is the default boot loader on some distributions, like Debian 5.0 for example.
The splash screen for GRUB Legacy is an XPM image which appears as a background when you select which OS to boot. For those who are tired of the default splash screen, here is a short tutorial on how to change it.
First, download some splash screens from here (or Google some). Each splash screen comes as an XPM image archived as a Gzip file. Once you downloaded the desired splash images, copy them inside the /boot/ directory, or create symbolic links in this directory which will point to the actual location of the files. For example, if you downloaded the file tenerife.xpm.gz inside your home directory, you can type as root (and replace USER with the actual username):
cp /home/USER/tenerife.xpm.gz /boot/
Or, to create a symbolic link to it:
ln -s /home/USER/tenerife.xpm.gz /boot/grub/tenerife.xpm.gz
In Ubuntu (pre-Karmic releases, since Karmic uses GRUB 2 by default), use one of those, with the user password:
sudo cp ~/tenerife.xpm.gz /boot/grub/
Or:
sudo ln -s ~/tenerife.xpm.gz /boot/grub/tenerife.xpm.gz
The next step is to edit the /boot/grub/menu.lst file, and tell it to use the newly downloaded splash image. For this, add a line which looks like this inside the file mentioned earlier (don't forget to edit it with root privileges):
splashimage (hd0,0)/boot/tenerife.xpm.gz
This will tell GRUB to search for the file tenerife.xpm.gz on the first partition of the first hard drive. Save the file and restart the computer.
The splash screen for GRUB Legacy is an XPM image which appears as a background when you select which OS to boot. For those who are tired of the default splash screen, here is a short tutorial on how to change it.
First, download some splash screens from here (or Google some). Each splash screen comes as an XPM image archived as a Gzip file. Once you downloaded the desired splash images, copy them inside the /boot/ directory, or create symbolic links in this directory which will point to the actual location of the files. For example, if you downloaded the file tenerife.xpm.gz inside your home directory, you can type as root (and replace USER with the actual username):
cp /home/USER/tenerife.xpm.gz /boot/
Or, to create a symbolic link to it:
ln -s /home/USER/tenerife.xpm.gz /boot/grub/tenerife.xpm.gz
In Ubuntu (pre-Karmic releases, since Karmic uses GRUB 2 by default), use one of those, with the user password:
sudo cp ~/tenerife.xpm.gz /boot/grub/
Or:
sudo ln -s ~/tenerife.xpm.gz /boot/grub/tenerife.xpm.gz
The next step is to edit the /boot/grub/menu.lst file, and tell it to use the newly downloaded splash image. For this, add a line which looks like this inside the file mentioned earlier (don't forget to edit it with root privileges):
splashimage (hd0,0)/boot/tenerife.xpm.gz
This will tell GRUB to search for the file tenerife.xpm.gz on the first partition of the first hard drive. Save the file and restart the computer.
Friday, 11 September 2009
How-To: Install Exaile 3.0.1 in Ubuntu 9.04 Jaunty Jackalope
Exaile 3.0.1 was released on 6 September and it is a bugfix for the stable 3.0 series. To get it in Ubuntu Jaunty, follow the steps below:
Edit /etc/apt/sources.list and add the following two lines (the second one is needed only if you want the sources too):
deb http://ppa.launchpad.net/exaile-devel/ppa/ubuntu jaunty main
deb-src http://ppa.launchpad.net/exaile-devel/ppa/ubuntu jaunty main
Make sure to save the file and add the trusted key:
sudo apt-key adv --keyserver keyserver.ubuntu.com --recv-keys 43CBFCC0
Next, update the source packages:
sudo apt-get update
To install Exaile 3.0.1, issue the following command in a terminal application:
sudo apt-get install exaile
This should be all. Run Exaile by typing Alt+F2 and entering exaile in the run box that appears.
Edit /etc/apt/sources.list and add the following two lines (the second one is needed only if you want the sources too):
deb http://ppa.launchpad.net/exaile-devel/ppa/ubuntu jaunty main
deb-src http://ppa.launchpad.net/exaile-devel/ppa/ubuntu jaunty main
Make sure to save the file and add the trusted key:
sudo apt-key adv --keyserver keyserver.ubuntu.com --recv-keys 43CBFCC0
Next, update the source packages:
sudo apt-get update
To install Exaile 3.0.1, issue the following command in a terminal application:
sudo apt-get install exaile
This should be all. Run Exaile by typing Alt+F2 and entering exaile in the run box that appears.
Sunday, 6 September 2009
How-To: Install Amarok 2.2 Beta 1 from the Kubuntu Beta Backports

The first beta of Amarok 2.2, codenamed 'Crystal Clear', was released on September 4 and packages are available for Kubuntu 9.04 Jaunty from the Kubuntu Beta Backports.
Amarok 2.2 Beta 1 comes with a huge number of bug fixes and many improvements and new features. To list some of them:
- new videoclip applet
- new photo applet
- improved browser layout to the left
- widgets can now be arranged differently from default
- ratings
- support for audio CDs
- the playlist offers multi-level sorting now
Those are only the highlights though, to see the full announcement and changelog read this.
To install Amarok 2.2 Beta 1 in Kubuntu/Ubuntu 9.04 Jaunty Jackalope just follow the instructions below:
First, edit the /etc/apt/sources.list file with your favourite text editor, e.g.:
sudo nano /etc/apt/sources.list
Or:
kdesudo kate /etc/apt/sources.list
Next, add the following two lines:
deb http://ppa.launchpad.net/kubuntu-ppa/beta/ubuntu karmic main
deb-src http://ppa.launchpad.net/kubuntu-ppa/beta/ubuntu karmic main
Make sure to save the file and then add the trusted key for this repository:
sudo apt-key adv --keyserver keyserver.ubuntu.com --recv-keys 8AC93F7A
Now update your package lists:
sudo apt-get update
Eventually, remove your existing Amarok installation:
sudo apt-get remove --purge amarok
sudo apt-get autoremove --purge
And now install the latest Amarok:
sudo apt-get install amarok
This should be all. Run Amarok 2.2 Beta 1 by pressing Alt+F2 and typing amarok in KRunner.
Saturday, 5 September 2009
How-To: Install OpenOffice.org 3.1.1 in Ubuntu 9.04 Jaunty Jackalope
OpenOffice.org 3.1.1 was released a few days ago, bringing many bug fixes to the stable 3.1 series. One of the ways to get it on Jaunty is to use the Launchpad.net PPA for OpenOffice.org Scribblers which recently packaged it for Ubuntu Jaunty and included it in their repositories.
To install the latest release using command-line, just use the instructions below:
First, edit the /etc/apt/sources.list file and enter your user password:
sudo nano /etc/apt/sources.list
Add the following two lines (the second one is not necessary, unless you want the sources to be available too):
deb http://ppa.launchpad.net/openoffice-pkgs/ppa/ubuntu jaunty main
deb-src http://ppa.launchpad.net/openoffice-pkgs/ppa/ubuntu jaunty main
Add the trusted key for these repositories:
sudo apt-key adv --keyserver keyserver.ubuntu.com --recv-keys 247D1CFF
Update the packages lists:
sudo apt-get update
You can eventually remove your existing OpenOffice installation by using the following two commands:
sudo apt-get remove --purge openoffice.org
sudo apt-get autoremove --purge
This will also remove system-wide configuration files.
Now, install OpenOffice.org 3.1.1:
sudo apt-get install openoffice.org
This should be all. You can run it by pressing Alt+F2 and typing openoffice in the run box.
To install the latest release using command-line, just use the instructions below:
First, edit the /etc/apt/sources.list file and enter your user password:
sudo nano /etc/apt/sources.list
Add the following two lines (the second one is not necessary, unless you want the sources to be available too):
deb http://ppa.launchpad.net/openoffice-pkgs/ppa/ubuntu jaunty main
deb-src http://ppa.launchpad.net/openoffice-pkgs/ppa/ubuntu jaunty main
Add the trusted key for these repositories:
sudo apt-key adv --keyserver keyserver.ubuntu.com --recv-keys 247D1CFF
Update the packages lists:
sudo apt-get update
You can eventually remove your existing OpenOffice installation by using the following two commands:
sudo apt-get remove --purge openoffice.org
sudo apt-get autoremove --purge
This will also remove system-wide configuration files.
Now, install OpenOffice.org 3.1.1:
sudo apt-get install openoffice.org
This should be all. You can run it by pressing Alt+F2 and typing openoffice in the run box.
Monday, 24 August 2009
How-To: Install Pidgin 2.6.1 in Ubuntu 9.04 Jaunty from a Launchpad PPA
Pidgin 2.6.0 was made available a few days ago, on August 19, 2009, and today Pidgin 2.6.1 was released as a bug fix version to the new stable 2.6 series. Among the features and improvements which come with 2.6.0 are:
- several changes and bug fixes in libpurple, the library used by Pidgin for its various chat protocols
- various DNS fixes
- AIM and ICQ fixes
- Gadu-Gadu fixes
- MSN new features, like support for receiving audio clips, support for receiving handwritten messages, many other fixes
- lots of XMPP fixes and improvements, like voice and video support with Jingle or the Service Discovery Browser plugin
- Yahoo! fixes and improvements
- Finch and the Pidgin GTK+ Theme control plugin also received improvements
To install Pidgin 2.6.1 in Ubuntu 9.04 Jaunty Jackalope from the Pidgin developers PPA on Launchpad, just follow the instructions below:
First of all, edit the /etc/apt/sources.list file with your favourite text editor (e.g. sudo nano /etc/apt/sources.list or gksudo gedit /etc/apt/sources.list) and add the following two lines:
deb http://ppa.launchpad.net/pidgin-developers/ppa/ubuntu jaunty main
deb-src http://ppa.launchpad.net/pidgin-developers/ppa/ubuntu jaunty main
Next, make sure to save the file (Ctrl+O followed by Ctrl+X in Nano) and add the trusted key for this repository:
gpg --keyserver http://keyserver.ubuntu.com --recv-keys A1F196A8
gpg --export A1F196A8 | sudo apt-key add -
Now, update the packages lists:
sudo apt-get update
The next step is to uninstall your currently Pidgin installation:
sudo apt-get remove --purge pidgin
And the next step is just to install Pidgin 2.6.1 from the newly added repositories:
sudo apt-get install pidgin
This should be all.
- several changes and bug fixes in libpurple, the library used by Pidgin for its various chat protocols
- various DNS fixes
- AIM and ICQ fixes
- Gadu-Gadu fixes
- MSN new features, like support for receiving audio clips, support for receiving handwritten messages, many other fixes
- lots of XMPP fixes and improvements, like voice and video support with Jingle or the Service Discovery Browser plugin
- Yahoo! fixes and improvements
- Finch and the Pidgin GTK+ Theme control plugin also received improvements
To install Pidgin 2.6.1 in Ubuntu 9.04 Jaunty Jackalope from the Pidgin developers PPA on Launchpad, just follow the instructions below:
First of all, edit the /etc/apt/sources.list file with your favourite text editor (e.g. sudo nano /etc/apt/sources.list or gksudo gedit /etc/apt/sources.list) and add the following two lines:
deb http://ppa.launchpad.net/pidgin-developers/ppa/ubuntu jaunty main
deb-src http://ppa.launchpad.net/pidgin-developers/ppa/ubuntu jaunty main
Next, make sure to save the file (Ctrl+O followed by Ctrl+X in Nano) and add the trusted key for this repository:
gpg --keyserver http://keyserver.ubuntu.com --recv-keys A1F196A8
gpg --export A1F196A8 | sudo apt-key add -
Now, update the packages lists:
sudo apt-get update
The next step is to uninstall your currently Pidgin installation:
sudo apt-get remove --purge pidgin
And the next step is just to install Pidgin 2.6.1 from the newly added repositories:
sudo apt-get install pidgin
This should be all.
Subscribe to:
Posts (Atom)