This is a guide containing the most popular and useful ways of using the APT and DPKG commands, and it applies to both Ubuntu and Debian (and their derivatives). I mentioned where super user privileges are required, the ones without a mention can be executed as normal user. If you're using Ubuntu, precede a command with sudo in order to gain root privileges (and enter your user password); on Debian, type su, enter the root password, and then type in the commands as shown below.
dpkg -L package_name
This command will show what files package_name installed on your computer. Notice that this works only for already installed packages. Example:
embryo@debian:~$ dpkg -L vorbis-tools
/.
/usr
/usr/bin
/usr/bin/ogg123
apt-get build-dep package_name
(needs root privileges)
This is a very useful command, which will install all the development libraries needed by an application. So if you need to compile a newer version of a program than the one included in the repositories, use this command to fetch the dependencies. Notice that the libraries installed will be for the current version coming with the repositories, so you may need to install additional libraries if needed. However, this usually works for most of the applications. Example:
apt-get build-dep wesnoth
This will fetch all the development packages needed for Wesnoth. Keep in mind that your sources repositories must be enabled (they are enabled by default in Ubuntu).
apt-get clean (and apt-get autoclean)
(needs root privileges)
This command will remove the archives installed on your system. Whenever you install a package, it is downloaded and the DEB package is kept inside the /var/cache/apt/archives/ directory. This command removes those packages, freeing up space.
apt-get clean
apt-get autoclean
Regarding apt-get autoclean: this command will remove only the archives which are no longer available in the repositories, and will keep the ones which are currently available. Helpful if you want to get rid of old archives which have been updated, but still want to keep the upgraded ones just in case. To see how much space the archive occupy, use du -h (the -h argument stands for human readable, so it will show sizes in human readable format):
du -h /var/cache/apt/archives/
apt-cache show package_name
Will show information about any package in the repository. You only have to type in the name of it, not the entire name and version. Example:
embryo@debian:~$ apt-cache show vorbis-tools
Package: vorbis-tools
Priority: optional
Section: sound
Installed-Size: 580
...
apt-cache search pattern
Will search and list all the packages which contain pattern in their name or in their description. You can pipe this with grep for more relevant results:
embryo@debian:~$ apt-cache search gnome terminal|grep terminal
gmfsk - MFSK, RTTY and other digital mode terminal for HF/amateur radio
gnome-terminal-data - Data files for the GNOME terminal emulator
gnome-terminal - The GNOME 2 terminal emulator application
apt-get update && apt-get upgrade
(needs root privileges)
This is a one-liner to update your packages list and upgrade your system. Since it requires root privileges, if your distribution is Ubuntu use sudo apt-get update && sudo apt-get upgrade. Notice that the second command (after the double ampersand) is executed only if the first one was successful, so if fetching any of the lists fails, the second command will not be executed. If you're running a testing or beta release, use instead the following:
sudo apt-get update && sudo apt-get dist-upgrade
This will fetch updates even if they depend on newer packages.
dpkg --get-selections
This command will list all the packages installed on a system using the package manager. Example:
embryo@debian:~$ dpkg --get-selections
acpi-support-base install
acpid install
adduser install
akregator install
...
dpkg -S filename
Will list the packages which install filename. Example:
embryo@debian:~$ dpkg -S oggenc
vorbis-tools: /usr/share/man/man1/oggenc.1.gz
vorbis-tools: /usr/bin/oggenc
embryo@debian:~$
apt-get autoremove
(needs root privileges)
This command will remove unnecessary packages (e.g. orphaned packages), which are no longer needed by any of the packages installed in the system. This happens often after you uninstall a certain application, and its dependencies still remain installed on the system. Use this command to get rid of them.
apt-cache dump
This command will list every package in the cache.
apt-cache depends package_name
A very useful command which lists every dependency a package has, including recommended packages.
embryo@debian:~$ apt-cache depends vorbis-tools
vorbis-tools
Depends: libao2
Depends: libc6
Depends: libcurl3-gnutls
...
apt-cache rdepends package_name
Will show dependencies in reversed order, that is, it will list all the packages which depend on the specified package.
apt-cache rdepends mplayer
apt-cache policy package_name
This will list the repository in which a package is located. In Ubuntu, there are four such repositories: main, restricted, universe and multiverse. Debian has main, contrib and non-free. There is a certain policy for each package, and depending on that, the package is included in one of the specified repositories.
apt-cache policy amarok
apt-cache policy sun-java6-jre
apt-cache showsrc package_name
Will show information about a package source.
apt-get -f install
(needs root privileges)
Will try to fix broken dependencies. This usually comes in handy if you try to manually install a DEB package without installing first its dependencies. Run apt-get -f install to fix the missing dependencies and try to install the package again.
apt-cdrom add
(needs root privileges)
Will add a CD ROM to your sources, so you can install packages from it. This command is mostly useful if you have some ISO images, which you don't want to burn to a CD. In order to scan the ISO images, use:
apt-cdrom -d=/cdrom add
This will mount the ISO image inside the /cdrom directory, and then add its contents to the sources.list. Notice that the /cdrom directory has to be empty. You can use any empty directory for this:
apt-cdrom -d=/home/USER/mydir
dpkg -c local_file.deb
The -c argument tells dpkg to list the contents of a DEB package. Example:
embryo@debian:~$ dpkg -c google-chrome-stable_current_i386.deb
...
drwxr-xr-x root/root 0 2010-07-30 23:54 ./usr/share/man/man1/
-rwxr-xr-x root/root 3098 2010-07-30 23:54 ./usr/share/man/man1/google-chrome.1
lrwxrwxrwx root/root 0 2010-07-30 23:54 ./usr/bin/google-chrome -> /opt/google/chrome/google-chrome
dpkg -f local_file.deb
This shows the control file for a binary package. A control file is a file which provides information to the package manager about dependencies, maintainer, homepage, description, and more.
embryo@debian:~$ dpkg -f google-chrome-stable_current_i386.deb
Package: google-chrome-stable
Version: 5.0.375.126-r53802
...
These are the most popular uses of APT and DPKG. Have some more? Please, share them!
Showing posts with label apt. Show all posts
Showing posts with label apt. Show all posts
Monday, 20 September 2010

Monday, 10 August 2009
How-To: Install APT Support for Iceweasel in Debian
aptlinex is a package included in Debian Lenny repositories which will allow browsers like Konqueror or Firefox (Iceweasel in Debian) to install DEB packages only by clicking them in the web browser. With aptlinex, all the links starting with apt:// will automatically download that respective package and perform the installation on your Debian system.
To set this up, first install the aptlinex package as root:
su
apt-get install aptlinex
Next, open Iceweasel and type about:config in the location bar. Click the I'll be careful, I promise! button and create the following four entries by right-clicking anywhere in the window:
These two should be created as New -> String values:
network.protocol-handler.app.apt and enter the value /usr/bin/gambas-apt.gambas
network.protocol-handler.app.apt+http and enter the value /usr/bin/gambas-apt.gambas

The following two should be boolean values (can take either values of either true or false):
network.protocol-handler.warn-external.apt and enter the value true
network.protocol-handler.warn-external.apt+http and enter the value true

Next, you will need to click on a link which starts with apt:// and select the default application to open these links.


This is it.
To set this up, first install the aptlinex package as root:
su
apt-get install aptlinex
Next, open Iceweasel and type about:config in the location bar. Click the I'll be careful, I promise! button and create the following four entries by right-clicking anywhere in the window:
These two should be created as New -> String values:
network.protocol-handler.app.apt and enter the value /usr/bin/gambas-apt.gambas
network.protocol-handler.app.apt+http and enter the value /usr/bin/gambas-apt.gambas
Here is how the entries above should look like:

The following two should be boolean values (can take either values of either true or false):
network.protocol-handler.warn-external.apt and enter the value true
network.protocol-handler.warn-external.apt+http and enter the value true
Here is how the two entries above should look like:

Next, you will need to click on a link which starts with apt:// and select the default application to open these links.
The first time you click on an apt:// link, you will be prompt with this window:

Choose the /usr/bin/gambas-apt.gambas application to open these links

Finally, provide the root password in order to start installing the DEB package

This is it.
Thursday, 9 July 2009
5 Simple APT Tips for Debian and Ubuntu, Part II
Several months ago I created an article with 5 APT (Advanced Packaging Tool) tips for both Debian and Ubuntu available here. APT is the package manager in Debian and Debian-based distributions, like Ubuntu. Here's part two of that article, with 5 more tips and tricks for APT.
Notice: I specified which commands need root privileges. In Debian, type su, followed by your root password, while in Ubuntu just precede each command which needs root privileges with sudo. Notice that by default there is no feedback when entering the password, so you won't be able to see it, but it goes in. Just press Enter when you're done.
Add repositories from a CD or DVD
If you need an offline repository for packages, you can download all the ISO images for your distribution, eventually burn them on CDs/DVDs and add them manually to the /etc/apt/sources.list file using apt-cdrom (as root):
apt-cdrom add
Enter the CD/DVD in the drive and let APT scan for packages.
Another great solution is to not even burn the ISO images to CD, just mount them and add them to your sources.list this way. Here's what you have to do:
First, type:
apt-cdrom -d=/cdrom add
Or replace /cdrom with some empty directory of your choice, that's where the ISO images will be mounted. I use here /mnt/iso0, /mnt/iso1 etc. Just make sure the directory is empty. The output of the above command looks something like this:
# apt-cdrom -d=/cdrom add
Using CD-ROM mount point /cdrom/
Unmounting CD-ROM
Waiting for disc...
Please insert a Disc in the drive and press enter
Now don't press Enter, instead open another terminal session and mount the image in that directory (as root):
mount -o loop /path/to/iso/file.iso /cdrom
Then return to the shell where you started apt-cdrom and press Enter. It should scan the directory where the ISO image was mounted. I'm not very sure this is the only method, but this worked very well for me. If you mount the ISO the first time and then execute apt-cdrom, it first umounts it and then it fails with the message E: Failed to mount the cdrom.
Use dpkg -S to search for a specific file
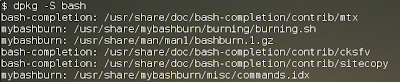
dpkg -S filename will search for filename in all the packages available and return all the packages which have a file (or the path to that file) with the same name. Notice that the name can also be included in the found files. For example, typing dpkg -S bash will return all the packages which contain the name 'bash' in their files, including mybashburn, bash and several other packages. On the other hand, searching for dpkg -S /bin/bash will only return package bash, since dpkg will match the whole path to the bash binary. See the screenshots below for examples:

Use apt-file to search for files in packages
This is a tool which creates a cache with info about all the packages available in the repositories, and it allows to search for specific files in a package and show what files a package will install (including packages which are not already installed). To get it, type as root:
sudo apt-get install apt-file
Next, update its cache:
sudo apt-file update
Use it like this:
apt-file search filename
Or:
apt-file search file_path
This will also return paths which include the name file_path. To show what files a package will install, use:
apt-file show package_name
Here's a more comprehensive tutorial I wrote a while ago about apt-file.
Remove unnecessary packages
This was a feature which existed for while in aptitude, but not in apt. Once you remove an application, it may be possible that some libraries on which that application depended to remain installed in the system. In order to get rid of those too, use:
apt-get autoremove --purge
Notice that this command will only remove packages which are not needed any more by some other application or that are not marked as 'installed manually'. This means packages which you did not specifically installed yourself.
List files in a package
Just use dpkg -L package_name for this one. Example:
dpkg -L amarok
dpkg -L bash
...
This will list all the packages installed by the respective package. Notice that it won't list anything if the specified package is not installed.
Hope this will be useful. Have some more, or maybe something wrong in the article? Please share other APT-related tips and tricks in the comments below.
Notice: I specified which commands need root privileges. In Debian, type su, followed by your root password, while in Ubuntu just precede each command which needs root privileges with sudo. Notice that by default there is no feedback when entering the password, so you won't be able to see it, but it goes in. Just press Enter when you're done.
Add repositories from a CD or DVD
If you need an offline repository for packages, you can download all the ISO images for your distribution, eventually burn them on CDs/DVDs and add them manually to the /etc/apt/sources.list file using apt-cdrom (as root):
apt-cdrom add
Enter the CD/DVD in the drive and let APT scan for packages.
Another great solution is to not even burn the ISO images to CD, just mount them and add them to your sources.list this way. Here's what you have to do:
First, type:
apt-cdrom -d=/cdrom add
Or replace /cdrom with some empty directory of your choice, that's where the ISO images will be mounted. I use here /mnt/iso0, /mnt/iso1 etc. Just make sure the directory is empty. The output of the above command looks something like this:
# apt-cdrom -d=/cdrom add
Using CD-ROM mount point /cdrom/
Unmounting CD-ROM
Waiting for disc...
Please insert a Disc in the drive and press enter
Now don't press Enter, instead open another terminal session and mount the image in that directory (as root):
mount -o loop /path/to/iso/file.iso /cdrom
Then return to the shell where you started apt-cdrom and press Enter. It should scan the directory where the ISO image was mounted. I'm not very sure this is the only method, but this worked very well for me. If you mount the ISO the first time and then execute apt-cdrom, it first umounts it and then it fails with the message E: Failed to mount the cdrom.
Use dpkg -S to search for a specific file
dpkg -S filename will search for filename in all the packages available and return all the packages which have a file (or the path to that file) with the same name. Notice that the name can also be included in the found files. For example, typing dpkg -S bash will return all the packages which contain the name 'bash' in their files, including mybashburn, bash and several other packages. On the other hand, searching for dpkg -S /bin/bash will only return package bash, since dpkg will match the whole path to the bash binary. See the screenshots below for examples:


Use apt-file to search for files in packages
This is a tool which creates a cache with info about all the packages available in the repositories, and it allows to search for specific files in a package and show what files a package will install (including packages which are not already installed). To get it, type as root:
sudo apt-get install apt-file
Next, update its cache:
sudo apt-file update
Use it like this:
apt-file search filename
Or:
apt-file search file_path
This will also return paths which include the name file_path. To show what files a package will install, use:
apt-file show package_name
Here's a more comprehensive tutorial I wrote a while ago about apt-file.
Remove unnecessary packages
This was a feature which existed for while in aptitude, but not in apt. Once you remove an application, it may be possible that some libraries on which that application depended to remain installed in the system. In order to get rid of those too, use:
apt-get autoremove --purge
Notice that this command will only remove packages which are not needed any more by some other application or that are not marked as 'installed manually'. This means packages which you did not specifically installed yourself.
List files in a package
Just use dpkg -L package_name for this one. Example:
dpkg -L amarok
dpkg -L bash
...
This will list all the packages installed by the respective package. Notice that it won't list anything if the specified package is not installed.
Hope this will be useful. Have some more, or maybe something wrong in the article? Please share other APT-related tips and tricks in the comments below.
Saturday, 18 April 2009
Several Nice Linux Easter Eggs
Although some of this stuff is old, here are some funny Easter eggs I bumped into over time.
In APT
Fire up a terminal and type the following, one command at a time:
aptitude moo
aptitude -v moo
aptitude -v -v moo
aptitude -v -v -v moo
aptitude -v -v -v -v moo
aptitude -v -v -v -v -v moo
aptitude -v -v -v -v -v -v moo
Here's a screenshot:

Here's another one. Open a terminal and type apt-get moo:

Easter egg in Firefox 3
Open up Firefox 3 and type into the location bar: about:robots

Another one: In OpenOffice.org Calc, typing =STARCALCTEAM() in any cell will bring up a picture of the Star Calc team:

In APT
Fire up a terminal and type the following, one command at a time:
aptitude moo
aptitude -v moo
aptitude -v -v moo
aptitude -v -v -v moo
aptitude -v -v -v -v moo
aptitude -v -v -v -v -v moo
aptitude -v -v -v -v -v -v moo
Here's a screenshot:

Here's another one. Open a terminal and type apt-get moo:

Easter egg in Firefox 3
Open up Firefox 3 and type into the location bar: about:robots

Another one: In OpenOffice.org Calc, typing =STARCALCTEAM() in any cell will bring up a picture of the Star Calc team:

Monday, 27 October 2008
5 Simple APT Tricks for Debian and Ubuntu
Here are five simple tricks for APT, the Advanced Packaging Tool used on Debian and Debian-based distributions like Ubuntu.
View all the packages installed on a system
The easiest way to do it is:
dpkg --get-selections
It does not require to be root, and will display all the packages installed via APT. For example, the first lines may look something like:
dpkg --get-selections > installed_packages.txt
Then read this file with a text editor or using less installed_packages.txt.
List files which get installed by a package
-L is a handy parameter to dpkg which will show you what files a package will install.
dpkg -L package_name
For example:
dpkg -L amarok
Will show all the files which are going to be installed by package amarok. You don't have to be root to run it.
Upgrade your system using a one-liner
Type as root:
apt-get update && apt-get dist-upgrade
This command will update your list of packages, and if its return status is successful, it will proceed to the next command, apt-get dist-upgrade, which will upgrade all of your packages and will install new dependencies if needed. Use dist-upgrade when you want all of your packages to be installed, and no package left as being kept back.
Install the dependencies of an application
Sometimes you need to compile from source a newer version of an application which is already included in the repositories. For example, to install the development libraries for BasKet, you would run as root:
apt-get build-dep basket
And then you can proceed to compile your application. Note that sometimes newer versions of applications may depend on newer libraries or other packages than you do not have in the repositories, so this won't always work.
Remove unused package files
When you install software using APT, the DEB packages are kept inside the /var/cache/apt/archives directory. In time, the size of it could get very large. To see what is the size of that directory, you can use:
apt-get clean
This command will remove all the packages except files which are locked. There is another command, apt-get autoclean, which will remove all the packages which are no longer available in the repository (older versions of packages which can't be downloaded any more).
View all the packages installed on a system
The easiest way to do it is:
dpkg --get-selections
It does not require to be root, and will display all the packages installed via APT. For example, the first lines may look something like:
$ dpkg --get-selections | headYou can also put the entire list in a text file by redirecting the output, like this:
acetoneiso2 install
acidrip install
acpi-support-base install
acpid install
adduser install
akregator install
alien install
alsa-base install
alsa-oss install
alsa-utils install
dpkg --get-selections > installed_packages.txt
Then read this file with a text editor or using less installed_packages.txt.
List files which get installed by a package
-L is a handy parameter to dpkg which will show you what files a package will install.
dpkg -L package_name
For example:
dpkg -L amarok
Will show all the files which are going to be installed by package amarok. You don't have to be root to run it.
Upgrade your system using a one-liner
Type as root:
apt-get update && apt-get dist-upgrade
This command will update your list of packages, and if its return status is successful, it will proceed to the next command, apt-get dist-upgrade, which will upgrade all of your packages and will install new dependencies if needed. Use dist-upgrade when you want all of your packages to be installed, and no package left as being kept back.
Install the dependencies of an application
Sometimes you need to compile from source a newer version of an application which is already included in the repositories. For example, to install the development libraries for BasKet, you would run as root:
apt-get build-dep basket
And then you can proceed to compile your application. Note that sometimes newer versions of applications may depend on newer libraries or other packages than you do not have in the repositories, so this won't always work.
Remove unused package files
When you install software using APT, the DEB packages are kept inside the /var/cache/apt/archives directory. In time, the size of it could get very large. To see what is the size of that directory, you can use:
$ du -h /var/cache/apt/archives/In order to clean up all these packages you can use, as root:
4.0K /var/cache/apt/archives/partial
956M /var/cache/apt/archives/
apt-get clean
This command will remove all the packages except files which are locked. There is another command, apt-get autoclean, which will remove all the packages which are no longer available in the repository (older versions of packages which can't be downloaded any more).
Subscribe to:
Posts (Atom)