A new version of Skype for Linux was released the other day, bringing new features and a lot of improvements and bug fixes. Skype 2.1.0.47 comes packaged for distributions like Ubuntu (both 8.04 and 8.10), Debian Lenny, Fedora Core 9 and 10+ and openSUSE. Dynamically and statically linked binaries are also available from the official website.
Among the new features Skype 2.1.0.47 comes with are:
- PulseAudio support
- SILK audio codec
- SMS sending support
- high quality video support
- contact groups
- chat picture for group conversations
- contact labels and tags
- many bug fixes and improvements
To install Skype in Ubuntu or in Debian just follow the instructions in this article.
Monday, 31 August 2009
Sunday, 30 August 2009
7 Reasons to Use Debian

1. Stable
Any application needs time to be used and tested enough time in order to make it stable. One of the greatest goals of Debian is stability. It's released when it's ready and applications included in the repositories have enough time to be tested through.
2. Debian offers stable, old stable, testing, *and* sid
Why should this be an advantage? First, because there is a stable release, which will fit both desktops and servers. Since Debian stable releases happen rarely, software can get a little old. So any can get to choose 'testing', which is tagged that way because applications are tested more but they are still usable. Sid is bleeding edge, which means applications get in usually as soon as they are released, so you get the newest software only by installing a testing weekly snapshot and upgrading. Considering the stable and old stable offer software which has been tested and stripped for critical bugs, testing usually proves to be the perfect alternative for a user who wants to use up-to-date tools and applications, which include the latest features.
3. The DFSG
Maybe this doesn't say much just when you see it, but Debian has been around since 1993 and it still is as it was. Although the social contract changed a little over the years, it still retained it's originality. It's open, it's free, it follows the GPL entirely, it respects the community needs.
4. Debian is one of the oldest distributions
Although this doesn't necessarily make you wise, take a look at Debian: it's been up for over 15 years and there are a lot of distributions out there who take and eventually expand Debian's work, take Ubuntu or DSL for example.
5. Very rich documentation
Except for the official documentation, there are hundreds of respectable websites which provide Debian tutorials and general documentation. There is usually no problem which can't be solved in Debian or at least which hasn't somewhere an answer.
6. Many distributions are based on Debian
Debian offers a solid base and a powerful system of managing software. Distributions like Ubuntu and DSL use the APT packaging system, which was invented by Debian for easier management of installed software. In turn, everything user-friendly or useful from Ubuntu will get eventually into Debian.
7. Great community
Being one of the oldest distributions out there, Debian has a strong community. Take the IRC channels, both on Freenode and OFTC, take all the Debian-dedicated forums or the mailing lists, consider that there are gurus out there who worked with Debian for years and they will usually offer support and share knowledge.
ChatZilla: Powerful IRC Client for Firefox
ChatZilla is an IRC client built as a Firefox add-on and providing enough features to use it just like any other standalone IRC client. ChatZilla will fit best as an IRC client when you don't want to use a separate application for getting on IRC.

The interface resembles the classic user list and chat window appearance, making it intuitive and using the usual Firefox shortcuts for common tasks like switching tabs or closing the current chat window.
The first time it starts, ChatZilla will offer the basic information to start using it, like the needed commands to get help, links to get started with IRC, a FAQ and links to connect directly to one of the many popular networks like Freenode, QuakeNet, EFNet, IRCNet, Dalnet or Undernet.
ChatZilla provides direct support to essential IRC commands for talking with the IRC server and it comes with detailed help for each and every command. Aliases are also supported in ChatZilla so you can define your own shortcut for any command and ease common tasks like a login command or sending a specific message to a channel or a private conversation. DCC is also supported and file transfers are possible in ChatZilla just like in any other IRC client.
Regarding configurability, ChatZilla offers all the friendly-client options, like automatic reconnecting, rejoin when kicked, character encoding, quit message, proxy type, enabled automatically by Firefox, away message, default usermode when connecting, logs. Except for specific IRC settings, ChatZilla also allows to configure appearance settings like fonts or showing a header, add custom aliases, automatically load any custom created Java scripts, text formatting and support for mIRC colours.

Considering most of the time we're using a web browser, using ChatZilla over some other IRC client should be OK, especially if you don't want to open some additional application. Although not by far as powerful as standalone clients like Irssi or XChat, ChatZilla will make the perfect choice for getting and using IRC, especially when working with Firefox all the time is needed.
ChatZilla homepage
Install ChatZilla from the Firefox add-ons page
ChatZilla 0.9.85

The interface resembles the classic user list and chat window appearance, making it intuitive and using the usual Firefox shortcuts for common tasks like switching tabs or closing the current chat window.
The first time it starts, ChatZilla will offer the basic information to start using it, like the needed commands to get help, links to get started with IRC, a FAQ and links to connect directly to one of the many popular networks like Freenode, QuakeNet, EFNet, IRCNet, Dalnet or Undernet.
ChatZilla provides direct support to essential IRC commands for talking with the IRC server and it comes with detailed help for each and every command. Aliases are also supported in ChatZilla so you can define your own shortcut for any command and ease common tasks like a login command or sending a specific message to a channel or a private conversation. DCC is also supported and file transfers are possible in ChatZilla just like in any other IRC client.
Regarding configurability, ChatZilla offers all the friendly-client options, like automatic reconnecting, rejoin when kicked, character encoding, quit message, proxy type, enabled automatically by Firefox, away message, default usermode when connecting, logs. Except for specific IRC settings, ChatZilla also allows to configure appearance settings like fonts or showing a header, add custom aliases, automatically load any custom created Java scripts, text formatting and support for mIRC colours.
ChatZilla preferences

Considering most of the time we're using a web browser, using ChatZilla over some other IRC client should be OK, especially if you don't want to open some additional application. Although not by far as powerful as standalone clients like Irssi or XChat, ChatZilla will make the perfect choice for getting and using IRC, especially when working with Firefox all the time is needed.
ChatZilla homepage
Install ChatZilla from the Firefox add-ons page
Monday, 24 August 2009
Top 7 Xfce Applications
Over the years Xfce gained a reputation of being a lightweight alternative for the two major desktop environments on Linux, KDE and GNOME. This comes from the fact that Xfce usually uses less resources, comes with applications which offer basic functionality and clean, simple interfaces, and the general performance of Xfce is better, at least when it comes to memory cost, than both KDE or GNOME. Xubuntu uses Xfce and very often it is recommended for older hardware which can't handle the latest releases of Ubuntu or Kubuntu.

In this article I will overview 7 essential applications for the Xfce desktop environment, including screenshots, most popular features, strong and weak points.
1. File manager: Thunar (full review here)
Thunar is the default file manager in Xfce. It comes with a simple interface (just like any other Xfce application), side panel, configurable location selector (if you want the typical location bar to appear in the toolbar), possibility to sort items, zoom in/out, three view modes (icons, detailed list, compact list), and image previews. Thunar is simpler than Nautilus, but in turn it will consume less resources. It offers basic configuration options but it will get the job done, especially if you only need to do basic file browsing and management.

2. Web browser: Midori
I think trying Midori for the first time will give the exact same feeling as trying Epiphany. It features the usual interface of simple browser, offering enough options to make it a simple, yet useful web browser. Midori uses the powerful WebKit rendering engine, so it will successfully support any web page out there that WebKit supports. Midori comes with extension support, bookmarks, history, encodings, zooming web pages in or out, source viewer and fullscreen mode. It also supports tabs (a must have) and it includes a speed dial page by default when opening a new tab for fast access to your favourite web pages.

Regarding configurability, Midori is pretty rich in options: except for the usual ones like homepage or start-up routine, it allows spell-checking, enabling/disabling showing images, scripts, interface, external applications, proxy, privacy and even appearance settings.
3. CD/DVD burner: Xfburn
The burning application in Xfce offers quite the usual features basic GNOME burners have. It provides a drag and drop interface using a tree file viewer and a file browser, it supports burning CDs, DVDs, ISO images, creation of audio CDs and that's all there is to it. Very simple and easy-to-use, without any additional options. Xfburn is very well suited if you're looking for a minimal, less resource-hungry application for burning discs.

4. Audio & video player: Xfmedia
Xfmedia is the default media player which comes with Xfce, based on the Xine engine and capable of playing any audio or video format that Xine supports. Xfmedia offers a basic interface which is best fit for playing audio files, but Xine makes it possible to play videos and movies too.
5. Image viewer: Ristretto
Ristretto comes with one of the most simple interfaces an image viewer could have, dividing the interface into two places: a widget showing the image (in full size or zoomed in or out) and a thumbnail preview bar, which can be relocated or hidden on demand via the View -> Thumbnail Viewer menu entry. Preferences window allows the user to customise the slideshow options, image cache size, background colour and scaling. Fullscreen mode and rotating images is also available.

6. Text editor: Mousepad
In the same fashion as the other Xfce applications, Mousepad offers a basic text editor, stripped from advanced features like syntax highlighting, spell-checking or any of the features advanced text editors have. Mousepad, as the name suggests, is just a simple text editor, fast to edit configuration files or any other text file. The features it provides are font selection, line number, auto-indent and word wrap.

7. Terminal application: Xfce Terminal
Since any productive Linux user will need the terminal for making things faster, the Xfce Terminal will prove a good replacement for applications like xterm, Konsole or GNOME Terminal, especially if you strive for simplicity. The Xfce4 Terminal allows you to configure its appearance, background image, font, colours, shortcuts. It even supports tabs, which is very useful when you need more than one instance opened.

Xfce 4.6.1 desktop environment

In this article I will overview 7 essential applications for the Xfce desktop environment, including screenshots, most popular features, strong and weak points.
1. File manager: Thunar (full review here)
Thunar is the default file manager in Xfce. It comes with a simple interface (just like any other Xfce application), side panel, configurable location selector (if you want the typical location bar to appear in the toolbar), possibility to sort items, zoom in/out, three view modes (icons, detailed list, compact list), and image previews. Thunar is simpler than Nautilus, but in turn it will consume less resources. It offers basic configuration options but it will get the job done, especially if you only need to do basic file browsing and management.
Thunar 1.0.1

2. Web browser: Midori
I think trying Midori for the first time will give the exact same feeling as trying Epiphany. It features the usual interface of simple browser, offering enough options to make it a simple, yet useful web browser. Midori uses the powerful WebKit rendering engine, so it will successfully support any web page out there that WebKit supports. Midori comes with extension support, bookmarks, history, encodings, zooming web pages in or out, source viewer and fullscreen mode. It also supports tabs (a must have) and it includes a speed dial page by default when opening a new tab for fast access to your favourite web pages.
Midori 0.1.9

Regarding configurability, Midori is pretty rich in options: except for the usual ones like homepage or start-up routine, it allows spell-checking, enabling/disabling showing images, scripts, interface, external applications, proxy, privacy and even appearance settings.
3. CD/DVD burner: Xfburn
The burning application in Xfce offers quite the usual features basic GNOME burners have. It provides a drag and drop interface using a tree file viewer and a file browser, it supports burning CDs, DVDs, ISO images, creation of audio CDs and that's all there is to it. Very simple and easy-to-use, without any additional options. Xfburn is very well suited if you're looking for a minimal, less resource-hungry application for burning discs.
Xfburn 0.4.2

4. Audio & video player: Xfmedia
Xfmedia is the default media player which comes with Xfce, based on the Xine engine and capable of playing any audio or video format that Xine supports. Xfmedia offers a basic interface which is best fit for playing audio files, but Xine makes it possible to play videos and movies too.
5. Image viewer: Ristretto
Ristretto comes with one of the most simple interfaces an image viewer could have, dividing the interface into two places: a widget showing the image (in full size or zoomed in or out) and a thumbnail preview bar, which can be relocated or hidden on demand via the View -> Thumbnail Viewer menu entry. Preferences window allows the user to customise the slideshow options, image cache size, background colour and scaling. Fullscreen mode and rotating images is also available.
Ristretto 0.0.22

6. Text editor: Mousepad
In the same fashion as the other Xfce applications, Mousepad offers a basic text editor, stripped from advanced features like syntax highlighting, spell-checking or any of the features advanced text editors have. Mousepad, as the name suggests, is just a simple text editor, fast to edit configuration files or any other text file. The features it provides are font selection, line number, auto-indent and word wrap.
Mousepad 0.2.16

7. Terminal application: Xfce Terminal
Since any productive Linux user will need the terminal for making things faster, the Xfce Terminal will prove a good replacement for applications like xterm, Konsole or GNOME Terminal, especially if you strive for simplicity. The Xfce4 Terminal allows you to configure its appearance, background image, font, colours, shortcuts. It even supports tabs, which is very useful when you need more than one instance opened.
Xfce4 Terminal 0.4.0

How-To: Install Pidgin 2.6.1 in Ubuntu 9.04 Jaunty from a Launchpad PPA
Pidgin 2.6.0 was made available a few days ago, on August 19, 2009, and today Pidgin 2.6.1 was released as a bug fix version to the new stable 2.6 series. Among the features and improvements which come with 2.6.0 are:
- several changes and bug fixes in libpurple, the library used by Pidgin for its various chat protocols
- various DNS fixes
- AIM and ICQ fixes
- Gadu-Gadu fixes
- MSN new features, like support for receiving audio clips, support for receiving handwritten messages, many other fixes
- lots of XMPP fixes and improvements, like voice and video support with Jingle or the Service Discovery Browser plugin
- Yahoo! fixes and improvements
- Finch and the Pidgin GTK+ Theme control plugin also received improvements
To install Pidgin 2.6.1 in Ubuntu 9.04 Jaunty Jackalope from the Pidgin developers PPA on Launchpad, just follow the instructions below:
First of all, edit the /etc/apt/sources.list file with your favourite text editor (e.g. sudo nano /etc/apt/sources.list or gksudo gedit /etc/apt/sources.list) and add the following two lines:
deb http://ppa.launchpad.net/pidgin-developers/ppa/ubuntu jaunty main
deb-src http://ppa.launchpad.net/pidgin-developers/ppa/ubuntu jaunty main
Next, make sure to save the file (Ctrl+O followed by Ctrl+X in Nano) and add the trusted key for this repository:
gpg --keyserver http://keyserver.ubuntu.com --recv-keys A1F196A8
gpg --export A1F196A8 | sudo apt-key add -
Now, update the packages lists:
sudo apt-get update
The next step is to uninstall your currently Pidgin installation:
sudo apt-get remove --purge pidgin
And the next step is just to install Pidgin 2.6.1 from the newly added repositories:
sudo apt-get install pidgin
This should be all.
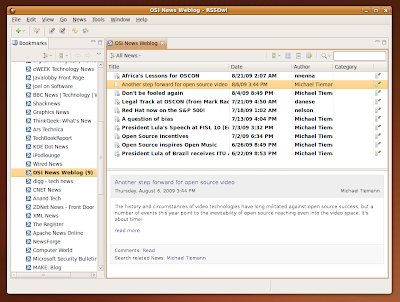
How-To: Install RSSOwl 2.0 in Ubuntu 9.10 Karmic and 9.04 Jaunty
RSSOwl is a powerful feed reader application for Linux licensed under the Eclipse Public License and written in Java. To get it up and running in Ubuntu, all you have to do is follow the few steps below:
Install the unzip and sun-java6-bin packages:
sudo apt-get install unzip sun-java6-bin
With your user password. Next, download the .zip package from the official website (direct link here). Unzip it either graphically from Nautilus or issuing the command below in a terminal, making sure the current working directory is the one where you saved the rssowl-2.0-M9.linux.gtk.x86.zip file:
unzip rssowl-2.0-M9.linux.gtk.x86.zip
What you have now is an rssowl directory, which you can copy anywhere in your home directory.
To run RSSOwl, just run the script RSSOwl inside the rssowl directory:
./RSSOwl
Alternately, you can make a desktop shortcut to it. That's all.
Sunday, 23 August 2009
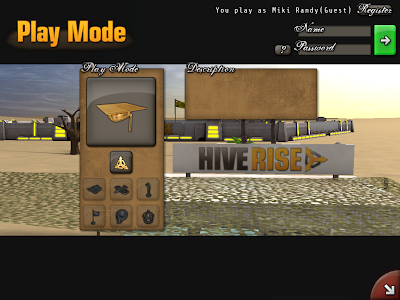
Install Hive Rise in Ubuntu - Free RTS Game for Linux
I recently bumped into a cool RTS (real time strategy) game for Linux called Hive Rise. Although the game is not open-source, it offers a free Linux download as a RUN file which can easily be installed on your Ubuntu box.
To install it in Ubuntu, you only need to follow these steps:
First, download the .run file from the official website (direct link here). After the download is finished, open the terminal, make sure the current working directory is the one where you saved the installhiverise.run file and make it executable:
chmod 755 installhiverise.run # or chmod +x installhiverise.run
Alternately, in Nautilus you can right-click on it, go to Properties, then the Permissions tab and tick the Allow executing file as program checkbox. Now, install it (either double-click the installhiverise.run file or from terminal issue):
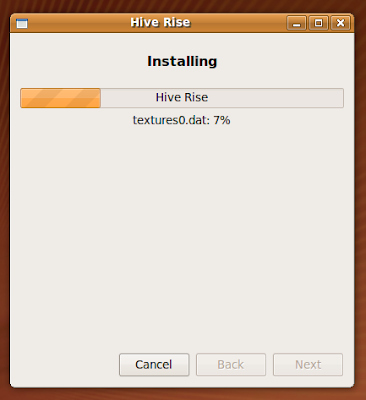
./installhiverise.run
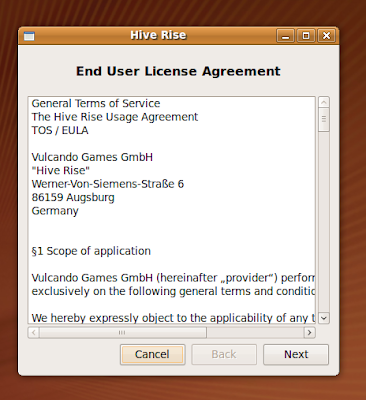
Accept the license agreement:
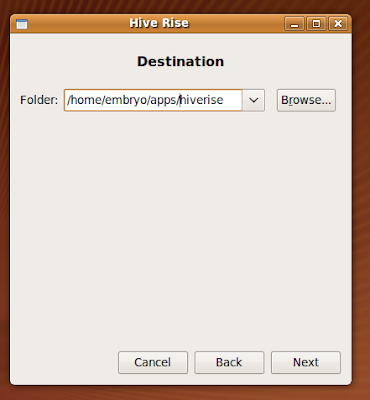
Select a destination for the installation. I used here /home/embryo/apps/hiverise, but you can choose any other directory you have access to (the default /home/USER/hiverise should be fine too).
After the installation is over, go to the directory where you installed Hive Rise and run the hiverise script:
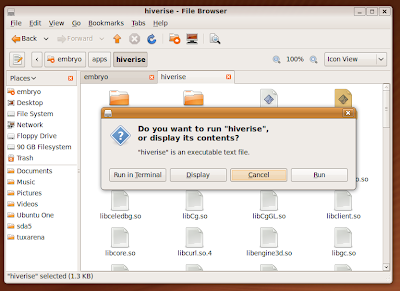
This should be all.

To install it in Ubuntu, you only need to follow these steps:
First, download the .run file from the official website (direct link here). After the download is finished, open the terminal, make sure the current working directory is the one where you saved the installhiverise.run file and make it executable:
chmod 755 installhiverise.run # or chmod +x installhiverise.run
Alternately, in Nautilus you can right-click on it, go to Properties, then the Permissions tab and tick the Allow executing file as program checkbox. Now, install it (either double-click the installhiverise.run file or from terminal issue):
./installhiverise.run
Accept the license agreement:

Select a destination for the installation. I used here /home/embryo/apps/hiverise, but you can choose any other directory you have access to (the default /home/USER/hiverise should be fine too).


After the installation is over, go to the directory where you installed Hive Rise and run the hiverise script:

This should be all.
How-To: Compile and Install Wine 1.1.28 in Debian Lenny
 Wine 1.1.28 was released on August 21 and it comes with new features and improvements like support for IRDA protocol, faster wineprefix creation, more image formats in WindowsCodecs and various other bug fixes.
To get Wine 1.1.28 in Debian Lenny, follow the next steps:
1. Enable the sources repositories
Edit your /etc/apt/sources.list file as root and make sure you have a line which starts with deb-src, like in the example below:
deb-src ftp://ftp.fi.debian.org/debian/ lenny main contrib non-free
If not, add it, replacing the TLD (top level domain) with your own country TLD (in the example above the TLD is ftp.fi.debian.org - Finland).
2. Update the package lists
As root, type:
apt-get update
3. Install the needed dependencies
As root, type the following commands in a terminal window:
apt-get install build-essential
apt-get build-dep wine
The first command will get build-essential (which is a meta package including tools needed for the compilation, like gcc) and the second will fetch the Wine development libraries.
3. Get the source tarball
Download the source tarball from here (direct link here) and uncompress it:
tar -xjf wine-1.1.28.tar.bz2
4. Compile and install Wine
Make sure the current working directory is wine-1.1.28 and type the following commands:
./configure
make depend && make
make install
The last command (make install) with root privileges. Alternately, you can install Wine as normal user by specifying a prefix:
./configure --prefix=/home/USER/usr/
make depend && make
make install
In which case you don't need to run make install as root, but as normal user only.
After the installation is complete, run:
winecfg
And that's it. Wine should be now properly installed. Run any Windows application using:
wine executable_file.exe
World of Padman: Open-Source First-Person Shooter Game for Linux
World of Padman is an open-source, cartoon-style first-person shooter game available for Linux too, besides Windows and Mac. It is a wonderful standalone game based upon the Quake 3 engine.

World of Padman (or WoP for short) features a cartoon-style approach, with maps, characters, weapons and sounds all based upon the Padman animation series. For example, the weapons include Punchy, a funny puppet used for close combat (which will also allow you to move faster), the Bubble G, which shoots bubble gums, or the Splasher, a sniper-equivalent from other games. World of Padman also includes four different player models, each with several other colour customisations.
One of the drawback is that currently (as of patch 1.2) single player mode hasn't been implemented yet, instead WoP servers are usually crowded and you can get playing online in seconds.
The gameplay is somewhat similar to the one of Quake 3, and there are well-known mods like TDM (team deathmatch) or FFA (free for all) available.
Regarding graphics, the visual detail is awesome for a game based on Quake 3, maps featuring colorful, visually-appealing textures.

The official website offers downloads for Linux, Windows and Mac. For Linux, all you have to do is download the (currently) files worldofpadman.run and wop_patch_1_2.run, make them executables:
chmod 755 worldofpadman.run
chmod 755 wop_patch_1_2.run
Then run them to install the game. First run worldofpadman.run to install:
./worldofpadman.run
And next, install the 1.2 patch too:
./wop_patch_1_2.run
WoP can be installed as normal user or as root. Notice that the configuration directory is ~/.WoPadman (W is uppercase), where ~ is your home directory.

One of the few drawbacks (well, except lack of single player) was the fact that when running or bunny-hopping, pressing the right/left keys won't make the character dodge in that direction, so controlling your character may be a little different than in other Quake 3 based games and may need a little time to adjust. I don't know if there is a reason for this (so maybe it's meant this way) or not.
World of Padman can be really addictive and I can warmly recommend it to any Linux gamers who like FPS games and are looking for something new.
Homepage
Download World of Padman
Forum
5 RSS Feed Readers for Linux
Here are 5 of the most popular, standalone feed reader applications for Linux. I didn't include feed readers which come with applications like Firefox, Opera or Thunderbird for example, but these can also be considered a viable alternative to the ones below.
Akregator
Akregator is the default KDE feed reader, offering a highly configurable application, support for RSS and Atom feeds, very good integration with KDE, tabs for the internal browser and feed management. Akregator comes with system tray integration, feeds notifications, interval fetching, ability to keep feeds, browser cache, font customisability for the internal browser, tabs, external browser can be changed from the default. Akregator is included in the kdepim package which comes with KDE4.

Importing OPML or XML feeds also works in Akregator, and feeds can be marked as important.
Akregator offers three view modes too: normal, widescreen and combined views. For KDE users, Akregator should be one of the best choices.

Liferea
Liferea (Linux Feed Reader) is one of the most popular feed readers for the GNOME desktop environment. It has a usual interface for an RSS reader, reminding of Akregator from KDE, with the feeds list to the left and the news and the internal browser occupying most of the rest of the main window. Liferea allows you to manage feeds, open links in a selected external browser, configure the font size, change the number of feeds to display, integrate it in the system tray, change the default download manager.

Liferea features three different view modes: normal (the default view), wide and combined views. Here's a screenshot of the combined view mode:

Offering support for both RSS and Atom feeds, Liferea is definitely one of the best choices out there for GNOME users.
Blam
Blam is yet another GTK feed reader but it is intended for those who need minimum features and it provides a minimal, clean and simple to use interface. The only drawbacks I could catch was that (at least in the version I tested - 1.8.6), fetched feeds are not remembered at the restart of the application and the system tray does not provide a context menu for quitting the application. For those who are looking for something minimal and basic, Blam should be a good choice, especially if you are a GNOME user.

News Plasma Widget
This is an awesome, tiny news widget for Plasma, which comes by default with KDE4. It supports adding more than one feed, show timestamps, configure the update interval. This is great if you want your favourite news directly on your desktop, without the need of using a separate application.

Straw
I'd describe Straw as in-between Blam and Liferea. It has enough features to make up a good RSS reader to please any normal user. It uses GTK, it is easy-to-use and it has a clean interface, offering support for both RSS and Atom feeds. Straw provides a system for managing and sorting feeds, time-based refreshes, and importing of OPML feed files.
As a conclusion, try them all and see which one fits. For a pretentious KDE user, I'd go with Akregator, but if you need only basic functionality and direct access from your desktop, try the News Plasma widget. In GNOME, Liferea is the most complex and feature-rich, while Straw offers enough functionality for a more lightweight application and Blam is very minimalist.
Tip of the Day: Run a C Program Directly
For this short tip you'll need tcc, the Tiny C Compiler, which comes with most distributions out there, including Debian and Ubuntu. tcc is a small ANSI C compiler which offers the ability to run the program after compiling it, unlike GCC, which (as far as I know) doesn't offer this option. To install tcc in Debian and Ubuntu:
In Debian, as root:
apt-get install tcc
In Ubuntu, use:
sudo apt-get install tcc
Now let's test this. First, create your C source file, e.g.:
#!/usr/bin/tcc -run
#include <stdio.h>
int main ()
{
printf ("Hello, world!\n");
return 0;
}
Now, save this file as example.c or some other name and make it executable:
chmod 755 example.c # or chmod +x example.c
And the next step is just to run it!
./example.c
tcc will compile the source and run it automatically.
How-To: Install Simon Speech Recognition Application in Ubuntu 9.04 Jaunty Jackalope
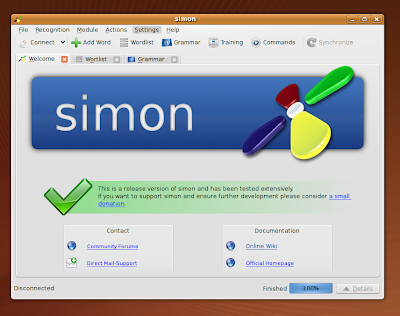
Simon is a very nice KDE4 project with the goal of developing a speech recognition application and it currently works pretty well by letting the user record certain words and execute various commands given via a microphone. Since currently it is not included in the Ubuntu repositories, here are instructions on getting it up and running in Jaunty.
First of all, open up Konsole or GNOME Terminal and install the package flex, needed by simon:
sudo apt-get install flex
Next, download the Ubuntu DEB package from kde-apps.org page and install it as:
sudo dpkg -i simon-0.2-Linux_i386.deb
Or whatever version you downloaded. This should be it, run simon by typing Alt+F2 and typing simon followed by Enter.
Audacious 2.1 Review - Powerful Audio Replacement for XMMS
Audacious is a powerful audio player for Linux which resembles the older XMMS, only using GTK2 toolkit for its interface. It supports XMMS and implicitly Winamp 2.x skins, coming with support for various audio formats, including MP3, Ogg Vorbis, FLAC (Free Lossless Audio Codec) or WMA (Windows Media Audio).

Audacious was forked from Beep Media Player, which was also based on XMMS but development was discontinued in 2006. Audacious is currently maintained and the latest version was released in July this year. For a tutorial on installing the latest release in Ubuntu 9.04, check out this tutorial I've put up a while ago.
The version I used for this review is 2.1 as it comes included currently in the Ubuntu 9.10 Karmic repositories. Audacious comes with the typical, simple interface some of you are used from XMMS. It includes a main window with regular play/pause/stop and volume buttons, a 10-band equalizer and the playlist itself.
The playlist can be arranged easily to display various fields, like only the artist, album, song title and duration, but it can also be sorted by title, album, artist, filename, path, date, track number or (the default) playlist entry. Adding a large collection of music to the playlist can take a very long time, but once they're loaded, Audacious will prove very fast.
Aside from skins and equalizer, this player really comes bundled with a lot of features: visualizations, simple tag editor, a playlist manager, but the true power of Audacious is support for plugins. It comes with a huge number of plugins, which include Last.fm song submission, alarm, GNOME shortcuts, global shortcuts, status icon for Pidgin, and not only those. Plugins really turn it into a more useful, powerful experience. Local cover art fetching should not be forgotten either.

Regarding configurability, Audacious is very rich. It allows you to select which output plugin it will use, configure the replay gain, customise its appearance by installing new skins, configure playback, also offering a rich variety of options for the playlist.

Audacious is a wonderful player, and it will fit those who like XMMS or users who switched from Windows and are used to Winamp. Also, it takes a different approach than players who share a common interface like Rhythmbox, Banshee or Exaile.
Saturday, 22 August 2009
OpenOffice 3.1.1 RC2 Available for Download
OpenOffice 3.1.1 Release Candidate 2 was released a few hours ago, and you can grab a download from the official website.
OpenOffice 3.1.1 RC2 comes with numerous bug fixes to the 3.1 stable series and will install as version 3.1.1. Repositories for Ubuntu 9.04 should be soon available via this Launchpad PPA.
OpenOffice 3.1.1 RC2 comes with numerous bug fixes to the 3.1 stable series and will install as version 3.1.1. Repositories for Ubuntu 9.04 should be soon available via this Launchpad PPA.
How-To: Install OpenOffice 3.1 in Debian 5.0 Lenny
 Debian Lenny comes by default with OpenOffice 2.6.4, but in the meantime OpenOffice 3.1 was released. You can easily install it on your Debian box by using the Debian Lenny backports repository, which is a repository including newer versions of applications than the ones which come by default with Lenny. Just follow the steps below:
Add the backports repositories
To add the Lenny backports repositories, just edit as root your /etc/apt/sources.list file and add the following line:
deb http://www.backports.org/debian lenny-backports main contrib non-free
Make sure to save the file (Ctrl+O followed by Ctrl+X in Nano) and proceed to the next step.
Install the Debian backports keyring
As root, type:
apt-get install debian-backports-keyring
This will install the debian-backports-keyring package, adding the key to your trusted repository keys.
Update the package lists
Now, update the package lists as root:
apt-get update
And install OpenOffice.org:
apt-get -t lenny-backports install openoffice.org

This should be all. OpenOffice.org 3.1.0 should be now installed properly on your Debian box, and you can run it by typing openoffice.org in a Run box or opening a terminal application and typing openoffice.org.
How-To: Compile and Install GIMP 2.7.0 in Ubuntu 9.04 Jaunty Jackalope

Ubuntu Jaunty comes by default with GIMP 2.6 included in the repositories, but you can try the latest development version available, which is 2.7.0. This last release is a step forward the next stable GIMP version and contains a lot of user interface improvements and changes, GEGL migration, two new plug-ins to mention the major ones. To compile and install it in Ubuntu, just follow the steps below:
1. Make sure to have the sources repositories enabled
Notice that you can skip this step if you haven't deleted or commented lines out of your /etc/apt/sources.list file.
Edit as root the /etc/apt/sources.list file and make sure to have a line which starts with deb-src, like in the example below (if not, add it and save the file):
deb-src http://ro.archive.ubuntu.com/ubuntu/ karmic-updates main restricted
Again, this should be enabled by default. Next, update the package lists:
sudo apt-get update
2. Install the development libraries
Open a terminal and type:
sudo apt-get build-dep gimp
This command will fetch and install both the development libraries and the build-essential package needed for the compilation.
3. Get the GIMP source tarball
Download the source code from here, make sure the working directory is the one where you saved it and uncompress it:
tar -xjf gimp-2.7.0.tar.bz2
4. Compile and install GIMP
In the gimp-2.7.0 directory, issue the commands:
./configure
make
sudo make install
The last one with your user password. Notice that you can install it as normal user too, by specifying a prefix in your home directory for example and including the bin directory in your $PATH variable:
./configure --prefix=/home/USER/usr
make
make install
No root privileges needed in this case.
Tip of the Day: Prevent Exiting a Shell with Ctrl+D
A normal Bash shell with exit the current session when pressing ^D (Ctrl+D), but this can be avoided by editing the ~/.bashrc file and adding the following line:
export IGNOREEOF=1
This command will set the $IGNOREEOF variable to true, preventing a single combination of ^D to exit. In order to close the session, you can still use exit or double ^D.
export IGNOREEOF=1
This command will set the $IGNOREEOF variable to true, preventing a single combination of ^D to exit. In order to close the session, you can still use exit or double ^D.
Tip of the Day: Resize Images from CLI Using ImageMagick
ImageMagick is a powerful set of tools used to perform various operations on images directly from the command-line. To install it in Debian type as root:
apt-get install imagemagick
Or in Ubuntu:
sudo apt-get install imagemagick
With the user password.
Resize images using convert
The tool we're going to need for this is convert, which is included in the imagemagick package. Here's one easy way to do it:
convert -sample 50%x50% input_image.png output_image.png
This will resize the input_image.png and make it half the original image.
Another tool which does the same thing is mogrify, with the exception that it will overwrite the original image:
mogrify -resize 320 filename.jpg
This will resize filename.jpg using a width of 320 and keeping the aspect ratio intact.
Friday, 21 August 2009
Kubuntu 9.10 Karmic Koala (Alpha 4) Overview & Screenshots
The fourth alpha of Ubuntu 9.10 was released a few days ago and since I covered it earlier in this article, here I'll briefly overview Kubuntu, the KDE-based distribution of Ubuntu. All the screenshots were taken after a complete dist-upgrade, so the software should be completely up-to-date as of today.

The new Karmic currently comes with Linux kernel 2.6.31, KDE 4.3, Amarok 2.1.1 as the audio player, Dragon Player as the default video player. In one of my previous articles I pointed out some of the new features in KDE 4.3, some of which are implicitly included in Karmic, like the new Plasma look, called Air, or the new KRunner.
Konqueror is a hell of a browser, with countless features and ease of use for those who are already used to it. These are not all, but it comes with web shortcuts, enabled AdBlock filters, profiles, plugins, shortcut to various web page translations, user agent switching and so on. There was a time when Konqueror was very unstable, but now I encountered no crashes, with Flash enabled. On the other hand it was always mature regarding features and usability, since the KDE3 days. YouTube works fine also, but I had to manually install the Flash plugin, although package flashplugin-nonfree was already installed.


Compared to the current stable Kubuntu, this one seems to be more responsive and faster, although resizing windows with desktop effects enabled can still be slow, but I tested this on my older GeForce 7600. Compositing works very well in KDE 4.3, at least that was my experience with it, and all the KDE applications interact good enough, but Firefox or GTK applications for example may be a little choppy (for example when using the Magic Lamp desktop effect). Of course, this is an alpha.

Some windows still have simple size issues, they are either too small or too big and need resizing.
One thing that bothers me at Konsole is that it still doesn't include a right-click context menu to close separate tabs, instead this functionality is available using Ctrl+Shift+W.

For some reason the Save as dialogue in KSnapshot won't show certain files, although their extension is the same selected in the dialogue. I noticed this happens only when saving on partitions mounted manually. This seems to happen at random.

Amarok 2.1.1

Since this is an alpha, there are still bugs and most of them come in applications which are not included in KDE, for example in Amarok 2. Also, the sound system doesn't seem to work, although this is a KDE problem I think, because on Ubuntu it does work.
Overall, this looks promising. The developers will have enough time to polish it until October, and KDE 4.3 really behaves very nice, not to mention the look.
Overall, this looks promising. The developers will have enough time to polish it until October, and KDE 4.3 really behaves very nice, not to mention the look.
Wednesday, 12 August 2009
5 Simple Bash Tips, Part III
This is the third article in the Bash tips series, you can find the other two here and here.
1. Use cd - to go to the previous working directory
cd - is the same as cd $OLDPWD, where the $OLDPWD variable holds the previous working directory. You can also alias this to something like:
alias back='cd -' # or alias back='cd $OLDPWD'
If you've just opened a new Bash session or sourced .bashrc, the $OLDPWD variable will be unset. Also, follow this discussion on reddit which is a great resource on this matter.
2. Make copies of files easier
This one is especially useful for creating backup files, but not only. To fasten up rename commands like mv file1 file1bak you can use something like:
mv file1{,bak}
Here, Bash will expand this command into mv file1 file1bak and execute it afterwards.
3. Search history backward or forward
This one is very popular due to its usefulness. Add the following two lines inside your .bashrc file:
bind '"\e[A"':history-search-backward
bind '"\e[B"':history-search-forward
Now type a command, for example ls, and then press the Up or Down arrows. You will see how it autocompletes the last ls commands. This will not change the default behaviour of Ctrl+P and Ctrl+N.
4. Use grep -e "-pattern" to search man pages for entries starting with -
This one is not necessarily a Bash tip, but you can use it to search man pages for entries that start with characters like -
man gcc | grep -e "-Wall"
5. Change the Bash prompt colour
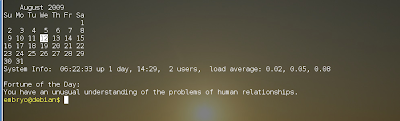
You can customise your Bash prompt the way you like, including colours and what to display. Here's a simple example, just add this line at the end of .bashrc:
PS1="\[\033[1;33m\]$USER@$HOSTNAME$ \[\033[0m\]"
This will offer a nice yellow prompt like in the screenshot below:
1. Use cd - to go to the previous working directory
cd - is the same as cd $OLDPWD, where the $OLDPWD variable holds the previous working directory. You can also alias this to something like:
alias back='cd -' # or alias back='cd $OLDPWD'
If you've just opened a new Bash session or sourced .bashrc, the $OLDPWD variable will be unset. Also, follow this discussion on reddit which is a great resource on this matter.
2. Make copies of files easier
This one is especially useful for creating backup files, but not only. To fasten up rename commands like mv file1 file1bak you can use something like:
mv file1{,bak}
Here, Bash will expand this command into mv file1 file1bak and execute it afterwards.
3. Search history backward or forward
This one is very popular due to its usefulness. Add the following two lines inside your .bashrc file:
bind '"\e[A"':history-search-backward
bind '"\e[B"':history-search-forward
Now type a command, for example ls, and then press the Up or Down arrows. You will see how it autocompletes the last ls commands. This will not change the default behaviour of Ctrl+P and Ctrl+N.
4. Use grep -e "-pattern" to search man pages for entries starting with -
This one is not necessarily a Bash tip, but you can use it to search man pages for entries that start with characters like -
man gcc | grep -e "-Wall"
5. Change the Bash prompt colour
You can customise your Bash prompt the way you like, including colours and what to display. Here's a simple example, just add this line at the end of .bashrc:
PS1="\[\033[1;33m\]$USER@$HOSTNAME$ \[\033[0m\]"
This will offer a nice yellow prompt like in the screenshot below:

How-To: Compile and Install Latest VLC in Debian Lenny
This tutorial will show how to compile and install the latest VLC from source in Debian Lenny in several steps. The current version at the time of writing is VLC 1.0.1, so the tutorial should work successfully for it.
1. Install the development packages
As root, type the following two commands:
apt-get install build-essential
apt-get install libassa3.5-5-dev libv4l-ruby1.8 debhelper dh-buildinfo gettext quilt nasm yasm libxul-dev liba52-0.7.4-dev libaa1-dev libasound2-dev libcaca-dev libcdio-dev libdca-dev libdvbpsi4-dev libaudiofile-dev libavahi-client-dev libavcodec-dev libdvdnav-dev libdvdread-dev libesd0-dev libfaad-dev libflac-dev libfreetype6-dev libfribidi-dev libggi2-dev libgl1-mesa-dev libglib2.0-0 libgnutls-dev libhal-dev libid3tag0-dev libidl0 libimlib2-dev libjack-dev liblircclient-dev liblivemedia-dev liblua5.1-0-dev libmad0-dev libmatroska-dev libmodplug-dev libmpcdec-dev libmpeg2-4-dev libncursesw5-dev libnotify-dev libogg-dev libpng12-dev libpostproc-dev libpulse-dev libqt4-dev libschroedinger-dev libsdl-image1.2-dev libsdl1.2-dev libvcdinfo-dev libvorbis-dev libx11-dev libx264-dev libxext-dev libxml2-dev libxpm-dev libxt-dev libxv-dev pkg-config qt4-dev-tools zlib1g-dev
The first one will install the meta package build-essential, which depends on compilation tools, while the latter will install development libraries needed to compile VLC.
3. Make a symbolic link in /usr/lib
Make a symbolic link in /usr/lib/ which will point to the libGL library. This may depend on which driver you have installed. You may not need to do this step. For example, I used here:
ln -s /usr/lib/libGL.so.173.14.09 /usr/lib/libGL.so
2. Download the source code
Download the VLC source tarball from the official website (direct link here) and uncompress it:
tar -xjf vlc-1.0.1.tar.bz2
4. Compile and install
Now make sure the current working directory is vlc-1.0.1 and issue the following commands:
./configure --disable-nls --disable-mozilla --disable-live555
make
make install
The last command as root. Without the switches --disable-nls and --disable-mozilla I got the error configure: error: Buggy GNU/libc (version 2.5 - 2.7) present. VLC would crash; there is no viable work-around for this. so I had to disable them.
Finally, run ldconfig as root:
ldconfig
This should be all. Run VLC by typing vlc in a terminal or hitting Alt+F2 and typing vlc in the run box that appears.
You can also install as normal user by changing the installation prefix, e.g.:
./configure --prefix=/home/USER/usr --disable-nls --disable-mozilla --disable-live555
make
make install
Just make sure to replace USER with your username and include /home/USER/usr/bin in your $PATH variable.
Tuesday, 11 August 2009
1 Year Ago: Amarok 1.4.10 Review [Oldies but Goldies]
Almost one year ago, on August 13, 2008, the last version of Amarok 1.4 for KDE3 was released. Since Amarok 2 for KDE4 was launched, bringing a completely redesigned interface and changing mostly all the major design concepts, users of this great player divided into two groups, the ones who still like 1.4 better and the ones who look forward for a complete Amarok 2.x (which still lacks many features from the old 1.4).

Edit: This is by no means an Amarok 2.x critique, you can see I barely mentioned it here. It's just a nostalgic review of a great audio player.
Amarok is the most popular audio player on Linux, no doubt about that. Amarok 1.4 reached a level of maturity and completion which few (if any!) audio players ever reached. It had any possible feature available, it was easy to use and, once the codecs were installed, it could handle any audio file type.
Features in 1.4 - countless
One of the strongest points of Amarok was the powerful and complete music collection management, which allowed the users to easily organise their music using the default SQLite database, or MySQL or Postgresql for large collections, since the latter two are faster. Amarok 1.4.10 included a cover manager, automatically fetching of covers from Amazon.com, lyrics fetching, Wikipedia information, various playlists (including smart playlists), support for podcasts, Internet radio, tags, Last.fm song submission, scripts, powerful and fast playlist, file browser, drag-and-drop, OSD (on-screen display), themes, font customisation, Last.fm streams, support for audio CDs, support for iPods and other MP3 devices, Magnatune integration, statistics, equalizer, visualizations, ratings, update and rescan collection options, real-time file watcher, global shortcuts, system tray integration and... did I mention all of them? I'm sure I missed a few.
Interface
The interface was basically divided into two widgets:
- the playlist, which offered plenty of sorting fields, including artist, album, track number, bitrate, filename, location, play count; all of these could be arranged in any order and you could choose which of them to be displayed and which not
- the side panel, which included tabs for the current playing track, lyrics, Wikipedia; a collection tab which could show the music collection sorted by several rules (for example by Artist/Year - Album); the playlists, files, devices and Magnatune tabs were also available here
Playlist
At the bottom of the playlist the usual Play/Pause, Stop, Next and Previous Track buttons were available. You could also change the volume and the analyzer type from here. Repeating the album, track, or entire playlist was also available, and the playlist could be shuffled at any time. You could also undo changes to the playlist.

Music collection
Amarok 1.4 used by default the SQLite database for managing the music collection, but the Wiki also offered a detailed guide on how to simply enable support for MySQL or Postgresql databases. Amarok offered the possibility to scan specific music directories and keep track of any changes in these. You could set ratings for every song, save lyrics, show only songs played in the last few days or weeks, view the music in the Collection tab using the flat, tree or iPod view modes, and including options to sort them using a specific order. Besides those, Amarok 1.4 also had a statistics system implemented, which would show what are the favourite tracks or albums, what are the most played tracks, newest items and favourite artists.
Cover manager
The cover manager could fetch all the covers from Amazon.com or browse in the song's directory for files with names like cover.png or front.jpg.

Script manager
Amarok supported scripts in languages like Python or even Bash, some of those being the popular WikiLyrics or the playlist2html ones. I once wrote a (rather CPU intensive, but that's not the point) simple script to dcop Kopete to change the avatar's picture using the currently cover of the album playing in Amarok. And that was in Bash, in a few lines.

Powerful and productive tag editor
Amarok introduced an awesome tag editor, which allowed the user to edit the tags for several tracks at once. For example, if you had an album you could edit all the artist, album and year fields in one command, instead of for each track individually.

File browser, iPod support, Magnatune and Last.fm integration
Amarok 1.4 had an integrated file browser from which you could drag and drop audio files to the playlist and instantly play them. There was even a Konqueror sidebar available for Amarok. One of the great features for those who needed to synchronise their music with their MP3 player was device support. Magnatune integration (a music shop for free music) was another plus, and the Last.fm radio and Last.fm song submission really made it an even more awesome experience.
Lyrics and Wikipedia
There were several scripts for fetching lyrics from various websites and show them in the Lyrics tab. There was even a script called ConTEXT, which could retrieve album reviews, HTML and TXT files from the local folder and display all that info inside Amarok. Wikipedia integration was also a great addition, finding info about your favourite artist, album or song being one click away.
10-band Equalizer
Amarok's equalizer included 10 bands and presets, so you could instantly choose default presets like Full bass, Treble, Reggae, Pop, Rock, Party etc.
Configuration
Amarok 1.4 allowed to tweak its interface by using themes, changing the colours and fonts. It also offered the option to enable/disable scores and ratings; use song crossfading and fadeout; resume playing when starting Amarok; a highly configurable OSD, configuration of the sound system and media device handling.
I think to cover all of the Amarok 1.4 features in detail would take a 50-page book, which is not the scope of this article. Amarok 1.4 was probably the best player ever created, at least for the Linux platform. Looking forward to 2.x, which takes big steps towards implementing all the features his older brother had.
Take Full Screenshots of Web Pages in Firefox with ScreenGrab
Screengrab is a useful Firefox add-on which will take a screenshot of a web page, no matter if the web page is longer than the actual screen area. Screengrab will create an image from the entire web page in either PNG or JPG format.

The latest version is Screengrab 0.96.1, which works on Firefox 3.0.x as well as on the latest stable Firefox, 3.5.x. Screengrab allows you to save screenshots either as PNG or JPG, and include the timestamp in the resulted filename. It offers the possibility to capture the complete web page, visible portion, selection or window and to use it just right-click anywhere on the web page and go to the ScreenGrab! -> Save... menu entry.

Here is how nice a screenshot of TuxArena website looks like after using Screengrab:

Install Screengrab from the Mozilla add-ons page
Screengrab homepage
Shutter - Powerful Screenshot Tool for Linux
GNOME has a basic screenshot application called gnome-screenshot, KDE has an advanced one called KSnapshot, which includes options to take screenshots of selected regions, fullscreen, or window under cursor, with or without a time delay (for taking screenshots of menus for example). But neither one of them compares to Shutter, a complex screenshot tool with many features, and the possibility to edit and apply effects directly from within it.

Shutter allows you to take screenshots of the fullscreen, a specified window, a section of window or just a screen region. It will save all the screenshots taken in the current session and will allow you to either save them to the local hard drive, supporting many formats, including PNG and JPG, or to directly upload them to imageshack.us, imagebanana.com or ubuntu-pics.de. Even FTP uploads are alowed.
The nice powerful features of Shutter include the ability to edit and perform various effects on the screenshot. For example, some of the effects plugins it comes with are:
- 3D rotate, rotate the image offering a 3D effect
- negate, replaces every pixel with its complementary colour
- sepia, colour your screenshot using the sepia effect
- PDF export, to export your screenshot to PDF
And many more are available too. You can even print to PDF or PostScript, and Shutter will also allow taking screenshots of web pages.

The Preferences window will allow to customise various aspect of Shutter, like the name and format of the saved image, actions, capture delay (which is important if you want to take screenshots of menus), include or not window border, tray integration, global shortcut for taking screenshots in GNOME, upload services and plugins.
Shutter is an awesome tool, and if you take screenshots a lot, it will surely prove more useful than the default application GNOME comes with.
Shutter 0.80.1

Shutter allows you to take screenshots of the fullscreen, a specified window, a section of window or just a screen region. It will save all the screenshots taken in the current session and will allow you to either save them to the local hard drive, supporting many formats, including PNG and JPG, or to directly upload them to imageshack.us, imagebanana.com or ubuntu-pics.de. Even FTP uploads are alowed.
The nice powerful features of Shutter include the ability to edit and perform various effects on the screenshot. For example, some of the effects plugins it comes with are:
- 3D rotate, rotate the image offering a 3D effect
- negate, replaces every pixel with its complementary colour
- sepia, colour your screenshot using the sepia effect
- PDF export, to export your screenshot to PDF
And many more are available too. You can even print to PDF or PostScript, and Shutter will also allow taking screenshots of web pages.

The Preferences window will allow to customise various aspect of Shutter, like the name and format of the saved image, actions, capture delay (which is important if you want to take screenshots of menus), include or not window border, tray integration, global shortcut for taking screenshots in GNOME, upload services and plugins.
Shutter is an awesome tool, and if you take screenshots a lot, it will surely prove more useful than the default application GNOME comes with.
Subscribe to:
Posts (Atom)