In this short tutorial I'll show how to take a screenshot in Linux using the command-line utility import.
import is a tool included in the ImageMagick suite, which you can install in Ubuntu by typing sudo apt-get install imagemagick in a terminal. import lets you take a snapshot of your entire screen, a single window or a region of the screen.
For example, to take a screenshot of a single window, you would type in a terminal:
import filename.png
And then move the mouse cursor and click the desired window. This will not include the window borders, so in order to take a snapshot of a window including its border, use:
import -border filename.png
You can use various extensions for your output image by specifying them in the output file parameter (e.g. import output_file.jpg or import output_file.bmp).
To take a screenshot of the entire screen or a region, type:
import filename.png
And then select with your mouse the region which you want to save.
For arguments which can be passed to import, read man import or the help on the official website.
Showing posts with label tips. Show all posts
Showing posts with label tips. Show all posts
Tuesday, 14 September 2010

Wednesday, 23 December 2009
Tip of the Day: Format C Code Using Indent
Indent is a powerful application developed by the GNU project, designed to format and change the appearance of C code. Indent will insert or delete whitespace characters to make your C code easier to read. It supports several code styles, including:
- GNU indent style (which is the default, or indent -gnu)
- Kernighan & Ritchie indent style (invoked with indent -kr)
- original Berkeley indent style (invoked with indent -orig)
Thus, to indent a C source file using the Kernighan & Ritchie style, one would use:
indent -kr source.c
Have a look at the screenshots below:


Notice that indent is developed to work with C code, not C++; also, it will try to cope with invalid code too.
- GNU indent style (which is the default, or indent -gnu)
- Kernighan & Ritchie indent style (invoked with indent -kr)
- original Berkeley indent style (invoked with indent -orig)
Thus, to indent a C source file using the Kernighan & Ritchie style, one would use:
indent -kr source.c
Have a look at the screenshots below:
Original, wrongfully formatted source code

Same code, formatted using indent source.c (using default GNU style)

Same code, formatted with the Kernighan & Ritchie style (with indent -kr source.c)

Notice that indent is developed to work with C code, not C++; also, it will try to cope with invalid code too.
Saturday, 22 August 2009
Tip of the Day: Prevent Exiting a Shell with Ctrl+D
A normal Bash shell with exit the current session when pressing ^D (Ctrl+D), but this can be avoided by editing the ~/.bashrc file and adding the following line:
export IGNOREEOF=1
This command will set the $IGNOREEOF variable to true, preventing a single combination of ^D to exit. In order to close the session, you can still use exit or double ^D.
export IGNOREEOF=1
This command will set the $IGNOREEOF variable to true, preventing a single combination of ^D to exit. In order to close the session, you can still use exit or double ^D.
Tip of the Day: Resize Images from CLI Using ImageMagick
ImageMagick is a powerful set of tools used to perform various operations on images directly from the command-line. To install it in Debian type as root:
apt-get install imagemagick
Or in Ubuntu:
sudo apt-get install imagemagick
With the user password.
Resize images using convert
The tool we're going to need for this is convert, which is included in the imagemagick package. Here's one easy way to do it:
convert -sample 50%x50% input_image.png output_image.png
This will resize the input_image.png and make it half the original image.
Another tool which does the same thing is mogrify, with the exception that it will overwrite the original image:
mogrify -resize 320 filename.jpg
This will resize filename.jpg using a width of 320 and keeping the aspect ratio intact.
apt-get install imagemagick
Or in Ubuntu:
sudo apt-get install imagemagick
With the user password.
Resize images using convert
The tool we're going to need for this is convert, which is included in the imagemagick package. Here's one easy way to do it:
convert -sample 50%x50% input_image.png output_image.png
This will resize the input_image.png and make it half the original image.
Another tool which does the same thing is mogrify, with the exception that it will overwrite the original image:
mogrify -resize 320 filename.jpg
This will resize filename.jpg using a width of 320 and keeping the aspect ratio intact.
Wednesday, 12 August 2009
5 Simple Bash Tips, Part III
This is the third article in the Bash tips series, you can find the other two here and here.
1. Use cd - to go to the previous working directory
cd - is the same as cd $OLDPWD, where the $OLDPWD variable holds the previous working directory. You can also alias this to something like:
alias back='cd -' # or alias back='cd $OLDPWD'
If you've just opened a new Bash session or sourced .bashrc, the $OLDPWD variable will be unset. Also, follow this discussion on reddit which is a great resource on this matter.
2. Make copies of files easier
This one is especially useful for creating backup files, but not only. To fasten up rename commands like mv file1 file1bak you can use something like:
mv file1{,bak}
Here, Bash will expand this command into mv file1 file1bak and execute it afterwards.
3. Search history backward or forward
This one is very popular due to its usefulness. Add the following two lines inside your .bashrc file:
bind '"\e[A"':history-search-backward
bind '"\e[B"':history-search-forward
Now type a command, for example ls, and then press the Up or Down arrows. You will see how it autocompletes the last ls commands. This will not change the default behaviour of Ctrl+P and Ctrl+N.
4. Use grep -e "-pattern" to search man pages for entries starting with -
This one is not necessarily a Bash tip, but you can use it to search man pages for entries that start with characters like -
man gcc | grep -e "-Wall"
5. Change the Bash prompt colour
You can customise your Bash prompt the way you like, including colours and what to display. Here's a simple example, just add this line at the end of .bashrc:
PS1="\[\033[1;33m\]$USER@$HOSTNAME$ \[\033[0m\]"
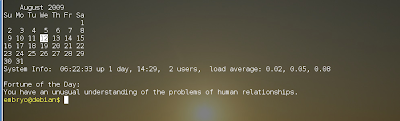
This will offer a nice yellow prompt like in the screenshot below:
1. Use cd - to go to the previous working directory
cd - is the same as cd $OLDPWD, where the $OLDPWD variable holds the previous working directory. You can also alias this to something like:
alias back='cd -' # or alias back='cd $OLDPWD'
If you've just opened a new Bash session or sourced .bashrc, the $OLDPWD variable will be unset. Also, follow this discussion on reddit which is a great resource on this matter.
2. Make copies of files easier
This one is especially useful for creating backup files, but not only. To fasten up rename commands like mv file1 file1bak you can use something like:
mv file1{,bak}
Here, Bash will expand this command into mv file1 file1bak and execute it afterwards.
3. Search history backward or forward
This one is very popular due to its usefulness. Add the following two lines inside your .bashrc file:
bind '"\e[A"':history-search-backward
bind '"\e[B"':history-search-forward
Now type a command, for example ls, and then press the Up or Down arrows. You will see how it autocompletes the last ls commands. This will not change the default behaviour of Ctrl+P and Ctrl+N.
4. Use grep -e "-pattern" to search man pages for entries starting with -
This one is not necessarily a Bash tip, but you can use it to search man pages for entries that start with characters like -
man gcc | grep -e "-Wall"
5. Change the Bash prompt colour
You can customise your Bash prompt the way you like, including colours and what to display. Here's a simple example, just add this line at the end of .bashrc:
PS1="\[\033[1;33m\]$USER@$HOSTNAME$ \[\033[0m\]"
This will offer a nice yellow prompt like in the screenshot below:

Sunday, 5 July 2009
Tip of the Day: Convert MKV to AVI Using mencoder
This is useful when you need to convert some high resolution MKV video into an AVI file, in order to save space at the cost of quality. Say you have a Matroska video file, my_video.mkv. To convert it to AVI you can use mencoder (the command below is only one line):
mencoder my_video.mkv -ffourcc xvid -ovc lavc -lavcopts vcodec=xvid:vhq:vbitrate=1800 -oac mp3lame -lameopts vbr=5 -o output_video.avi
The resulted AVI file will be output_video.avi, located in the same directory as the source, and will have about 35% the size of the source file.
mencoder my_video.mkv -ffourcc xvid -ovc lavc -lavcopts vcodec=xvid:vhq:vbitrate=1800 -oac mp3lame -lameopts vbr=5 -o output_video.avi
The resulted AVI file will be output_video.avi, located in the same directory as the source, and will have about 35% the size of the source file.
Saturday, 20 June 2009
Tip of the Day: Rip DVDs With Thoggen
Thoggen is a DVD ripping application built in GTK, featuring a simple and easy-to-use interface and allowing the creation of Ogg Theora video files. That's the nice thing about Thoggen: it creates videos using a completely free video codec.
Thoggen can work with DVDs, but it also supports opening DVD ISO images or reading a DVD directory which contains the VIDEO_TS folder. Notice that for encrypted DVDs you may need libdvdcss2. To install this library on Debian you can use the debian-multimedia.org repositories, and on Ubuntu you can use the repositories provided by Medibuntu.

The latest release of Thoggen is 0.7.1 and you can install it using:
- in Ubuntu, with your user password:
sudo apt-get install thoggen
- in Debian, with root password:
su
apt-get install thoggen
Thoggen will allow you to select the size of the desired output file or its video bitrate, you can edit the Title and Comment tags and will also allow to resize the video. Very simple but efficient. It doesn't support subtitles though, so if you need a more powerful ripper, use dvd::rip (or K9Copy in KDE).


Thoggen can work with DVDs, but it also supports opening DVD ISO images or reading a DVD directory which contains the VIDEO_TS folder. Notice that for encrypted DVDs you may need libdvdcss2. To install this library on Debian you can use the debian-multimedia.org repositories, and on Ubuntu you can use the repositories provided by Medibuntu.
Select which titles you want to rip (each title will be placed in a separate output file)

The latest release of Thoggen is 0.7.1 and you can install it using:
- in Ubuntu, with your user password:
sudo apt-get install thoggen
- in Debian, with root password:
su
apt-get install thoggen
Thoggen will allow you to select the size of the desired output file or its video bitrate, you can edit the Title and Comment tags and will also allow to resize the video. Very simple but efficient. It doesn't support subtitles though, so if you need a more powerful ripper, use dvd::rip (or K9Copy in KDE).
Available settings for the output file

Ripping can take a while

Monday, 4 May 2009
Tip of the Day: Convert OGV to FLV Using ffmpeg
In today's tip of the day I'll show how to easily convert an OGV (Theora video) file to FLV (Flash video), for uploading to YouTube or other websites. You will need the ffmpeg audio and video encoder.
To convert an OGV file created by recordMyDesktop for example, all you have to do is issue a command like this:
ffmpeg -i input_file.ogv output_file.flv
You can shrink the size of the output file using something like this:
ffmpeg -i input_file.ogv -s 640x512 output_file.flv
This also reduces the size of the Flash video file.
To select a certain audio codec you can use something which goes like this:
ffmpeg -i input_file.ogv -acodec libmp3lame output_file.flv
To convert an OGV file created by recordMyDesktop for example, all you have to do is issue a command like this:
ffmpeg -i input_file.ogv output_file.flv
You can shrink the size of the output file using something like this:
ffmpeg -i input_file.ogv -s 640x512 output_file.flv
This also reduces the size of the Flash video file.
To select a certain audio codec you can use something which goes like this:
ffmpeg -i input_file.ogv -acodec libmp3lame output_file.flv
Saturday, 2 May 2009
Tip of the Day: Add an Existing User to an Existing Group
For this task we'll use the usermod command. From the manual page, modifies a user account. In the following example we add the user embryo to the group vboxusers (you have to be root in order to use usermod):
usermod -a -G vboxusers embryo
Notice that you can also add the user to several groups in one command:
usermod -a -G group0 group1 group2 embryo
Which will add user embryo to groups group0, group1 and group2.
The -a switch is used only with -G and means 'append the user to supplemental groups'. The -G switch specifies a list of supplemental groups to add the user to.
usermod -a -G vboxusers embryo
Notice that you can also add the user to several groups in one command:
usermod -a -G group0 group1 group2 embryo
Which will add user embryo to groups group0, group1 and group2.
The -a switch is used only with -G and means 'append the user to supplemental groups'. The -G switch specifies a list of supplemental groups to add the user to.
Friday, 1 May 2009
Tip of the Day: Auto-Complete Web Addresses in Firefox
Firefox comes with with 3 keyboard shortcuts which will help you auto-complete the .com, .org and .net addresses in the location bar without the need of typing them. These are:
Ctrl+Enter - auto-complete .com address
Ctrl+Shift+Enter - auto-complete .org address
Shift+Enter - auto-complete .net address
For example, type google in the address bar, then Ctrl+Enter. Both www. and .com parts will be auto-completed.
Ctrl+Enter - auto-complete .com address
Ctrl+Shift+Enter - auto-complete .org address
Shift+Enter - auto-complete .net address
For example, type google in the address bar, then Ctrl+Enter. Both www. and .com parts will be auto-completed.
Saturday, 4 April 2009
Tip of the Day: Replace the KMenu Icon in KDE 4.2
In this short how-to I will show how to easily replace the default KMenu from KDE 4.2 using some other icons, from kde-look.org for example.
First of all, the KMenu icons can be found under the name start-here-kde.png and are located by default in the following directories (for the Oxygen theme):
$ find /usr -name *start-here-kde*
/usr/share/icons/oxygen/128x128/places/start-here-kde.png
/usr/share/icons/oxygen/64x64/places/start-here-kde.png
/usr/share/icons/oxygen/48x48/places/start-here-kde.png
/usr/share/icons/oxygen/22x22/places/start-here-kde.png
/usr/share/icons/oxygen/16x16/places/start-here-kde.png
/usr/share/icons/oxygen/32x32/places/start-here-kde.png
If you have some other theme selected, replace oxygen with it. Next, download a set of KMenu icons, for example you can try with this one from kde-look.org.
Then, replace all the start-here-kde.png icons inside those directories I mentioned above.
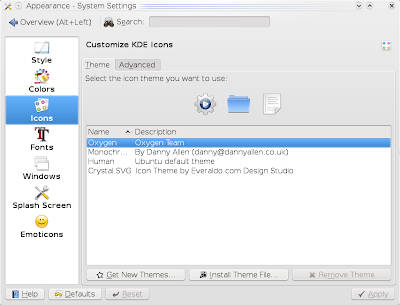
Next, open System Settings, go to Appearance and select the Icons tab. Change the icon theme to something else, then change it back. The KMenu should be now replaced.
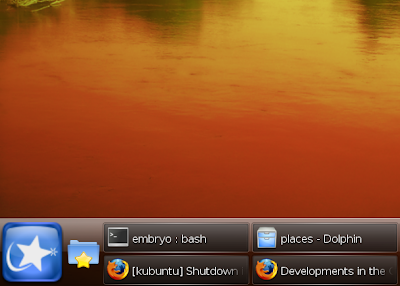
Here's how the KMenu looks now:
First of all, the KMenu icons can be found under the name start-here-kde.png and are located by default in the following directories (for the Oxygen theme):
$ find /usr -name *start-here-kde*
/usr/share/icons/oxygen/128x128/places/start-here-kde.png
/usr/share/icons/oxygen/64x64/places/start-here-kde.png
/usr/share/icons/oxygen/48x48/places/start-here-kde.png
/usr/share/icons/oxygen/22x22/places/start-here-kde.png
/usr/share/icons/oxygen/16x16/places/start-here-kde.png
/usr/share/icons/oxygen/32x32/places/start-here-kde.png
If you have some other theme selected, replace oxygen with it. Next, download a set of KMenu icons, for example you can try with this one from kde-look.org.
Then, replace all the start-here-kde.png icons inside those directories I mentioned above.
Next, open System Settings, go to Appearance and select the Icons tab. Change the icon theme to something else, then change it back. The KMenu should be now replaced.
Change the theme to something else, then switch it back so the changes to KMenu will be visible

Here's how the KMenu looks now:
Mandriva KMenu in KDE 4.2

Tuesday, 31 March 2009
Tip of the Day: Get Rid of the Annoying System Beep in Ubuntu
If you don't like the PC speaker (also known as system beep), you can easily disable it:
sudo modprobe -r pcspkr
Next, edit the /etc/modprobe.d/blacklist file (if it does not exist, create it):
sudo nano /etc/modprobe.d/blacklist
(Or you can issue gksudo gedit /etc/modprobe.d/blacklist or kdesu kate /etc/modprobe.d/blacklist for a graphical text editor - the first one for GNOME, which is the default desktop environment in Ubuntu, and the second for KDE, which is the default in Kubuntu.)
And add the following line:
blacklist pcspkr
The first command, sudo modprobe -r pcspkr will remove the pcspkr module from the kernel, so the beeps will stop immediately after issuing this command. The line blacklist pcspkr will prevent the kernel from loading this particular module when the computer boots up.
Now, the PC speaker functionality is disabled not only in the desktop environment, but also when in command-line.
sudo modprobe -r pcspkr
Next, edit the /etc/modprobe.d/blacklist file (if it does not exist, create it):
sudo nano /etc/modprobe.d/blacklist
(Or you can issue gksudo gedit /etc/modprobe.d/blacklist or kdesu kate /etc/modprobe.d/blacklist for a graphical text editor - the first one for GNOME, which is the default desktop environment in Ubuntu, and the second for KDE, which is the default in Kubuntu.)
And add the following line:
blacklist pcspkr
The first command, sudo modprobe -r pcspkr will remove the pcspkr module from the kernel, so the beeps will stop immediately after issuing this command. The line blacklist pcspkr will prevent the kernel from loading this particular module when the computer boots up.
Now, the PC speaker functionality is disabled not only in the desktop environment, but also when in command-line.
Tip of the Day: Easily Start a Dedicated Urban Terror Server
Here is an example for starting a dedicated Urban Terror server:

/usr/local/games/ioquake3/ioq3ded.i386 +set fs_game q3ut4 +set dedicated 2 +set net_IP <IP> +set net_port 27960 +set com_hunkmegs 256 +set sv_maxclients 12 +exec server.cfg
Don't forget to replace <IP> with the machine's IP. You will also have to configure your server.cfg file (more details in the official documentation, here). Once everything is in place the server should be listed in the in-game Internet server browser.

/usr/local/games/ioquake3/ioq3ded.i386 +set fs_game q3ut4 +set dedicated 2 +set net_IP <IP> +set net_port 27960 +set com_hunkmegs 256 +set sv_maxclients 12 +exec server.cfg
Don't forget to replace <IP> with the machine's IP. You will also have to configure your server.cfg file (more details in the official documentation, here). Once everything is in place the server should be listed in the in-game Internet server browser.
Thursday, 26 March 2009
Tip of the Day: Convert AC3 to WAV Using MPlayer
Say you have an audio AC3 file and you want to convert it to WAV in order to work with it in Audacity or some other audio manipulation application. One of the methods is to use mplayer, included in the Debian Multimedia repositories.
The command to convert the desired file to WAV is:
mplayer -ao pcm:file=output_file.wav input_file.ac3
This command will convert input_file.ac3 to output_file.wav, using the PCM audio output driver.
The command to convert the desired file to WAV is:
mplayer -ao pcm:file=output_file.wav input_file.ac3
This command will convert input_file.ac3 to output_file.wav, using the PCM audio output driver.
Wednesday, 25 March 2009
Tip of the Day: Create an ISO Image from a Directory Using CLI
For this tip we'll be using genisoimage, a command-line tool which allows the creation of ISO9660 filesystems with Rock Ridge attributes (which provide support for file permissions and ownership).
To install it, type in the terminal the following command as root:
apt-get install genisoimage
The simplest way to create an ISO image is like this:
genisoimage -o cd.iso directory_name
This command will create an ISO image with directory_name being the root directory. If you want to include more than one file (or directory) inside the image (without having a single root directory), you can run it like this:
genisoimage -o cd.iso filename_1 filename_2 filename_3
If you need the Rock Ridge extensions, then issue:
genisoimage -o cd.iso -R directory_name
To install it, type in the terminal the following command as root:
apt-get install genisoimage
The simplest way to create an ISO image is like this:
genisoimage -o cd.iso directory_name
This command will create an ISO image with directory_name being the root directory. If you want to include more than one file (or directory) inside the image (without having a single root directory), you can run it like this:
genisoimage -o cd.iso filename_1 filename_2 filename_3
If you need the Rock Ridge extensions, then issue:
genisoimage -o cd.iso -R directory_name
Tuesday, 24 March 2009
Tip of the Day: Easily Get Audio from DVD .VOB Files
Notice: This tip should work for both Debian and Ubuntu, except for the way of installing mplayer which differs (in Ubuntu you should use Medibuntu, while in Debian you have the debian-multimedia.org repositories).
This is usually useful when you only need some audio recording from a live performance DVD or some other recording of some kind. If you have a DVD image and you need to mount it, you can do so by typing as root:
mkdir /mnt/iso0
mount -o loop /path/to/dvd/image.iso /mnt/iso0
You can choose any empty directory for mounting the image, in the above example I chose /mnt/iso0. It's also a good idea to eventually concatenate the VOB files you want to extract audio from, e.g.:
cat /mnt/iso0/VIDEO_TS/VTS_01_[1-3].VOB > ~/my_vob.vob
This will concatenate files VTS_01_1.VOB, VTS_01_2.VOB and VTS_01_1.VOB into one single VOB file, my_vob.vob, inside the home directory. The same can be accomplished using, for example:
cd /mnt/iso0/VIDEO_TS/
cat VTS_01_1.VOB VTS_01_2.VOB VTS_01_3.VOB > ~/my_vob.vob
Next, install mplayer (read here for instructions to get it from debian-multimedia.org repositories - after adding it, type as root apt-get install mplayer) and issue the following command inside the directory where the my_vob.vob file is located:
mplayer my_vob.vob -aid ${AID} -dumpaudio -dumpfile my_audio.ac3
Notice that you will have to replace ${AID} with a number corresponding to the audio channel, for VOB + AC3 that number is between 128-159. So our command should look like this:
mplayer my_vob.vob -aid 128 -dumpaudio -dumpfile my_audio.ac3
And there you go, the extracted audio file is my_audio.ac3.
This is usually useful when you only need some audio recording from a live performance DVD or some other recording of some kind. If you have a DVD image and you need to mount it, you can do so by typing as root:
mkdir /mnt/iso0
mount -o loop /path/to/dvd/image.iso /mnt/iso0
You can choose any empty directory for mounting the image, in the above example I chose /mnt/iso0. It's also a good idea to eventually concatenate the VOB files you want to extract audio from, e.g.:
cat /mnt/iso0/VIDEO_TS/VTS_01_[1-3].VOB > ~/my_vob.vob
This will concatenate files VTS_01_1.VOB, VTS_01_2.VOB and VTS_01_1.VOB into one single VOB file, my_vob.vob, inside the home directory. The same can be accomplished using, for example:
cd /mnt/iso0/VIDEO_TS/
cat VTS_01_1.VOB VTS_01_2.VOB VTS_01_3.VOB > ~/my_vob.vob
Next, install mplayer (read here for instructions to get it from debian-multimedia.org repositories - after adding it, type as root apt-get install mplayer) and issue the following command inside the directory where the my_vob.vob file is located:
mplayer my_vob.vob -aid ${AID} -dumpaudio -dumpfile my_audio.ac3
Notice that you will have to replace ${AID} with a number corresponding to the audio channel, for VOB + AC3 that number is between 128-159. So our command should look like this:
mplayer my_vob.vob -aid 128 -dumpaudio -dumpfile my_audio.ac3
And there you go, the extracted audio file is my_audio.ac3.
Tip of the Day: Easily Convert Lossless WMA to Ogg Vorbis
One easy and fast method to convert WMA to Ogg Vorbis is to use the dir2ogg script included in the repositories. To install it, type as root:
apt-get install dir2ogg
Then use it like:
dir2ogg file.wma
Or, if you have several WMA files in a directory:
dir2ogg *.wma
Notice that it is not a good idea to convert lossy WMA audio to Ogg since the quality will degrade, it's better to use this on WMA lossless only.
apt-get install dir2ogg
Then use it like:
dir2ogg file.wma
Or, if you have several WMA files in a directory:
dir2ogg *.wma
Notice that it is not a good idea to convert lossy WMA audio to Ogg since the quality will degrade, it's better to use this on WMA lossless only.
Wednesday, 4 February 2009
Tip of the Day: Split APE Files Using a CUE File
APE is a lossless audio format also known as Monkey's Audio. In order to split a big APE file using the information provided in a CUE file, all you will have to do is first to convert it to WAV, and then split the WAV file.
First, install the monkeys-audio package as root:
apt-get install monkeys-audio
This package contains the mac utility, a frontend to the APE codec. Once you installed it, you can use the following command:
mac audio_file.ape audio_file.wav -d
This will decompress audio_file.ape and the result will be a WAV file, audio_file.wav. If you have more than one APE files in the directory and you want to decompress them all, use the commands below:
for i in *.ape; do mac "$i" "$i.wav" -d; done
Next, install the shntool and cuetools packages:
apt-get install shntool cuetools
To split the WAV file, use:
cuebreakpoints audio_file.cue | shnsplit audio_file.wav
That's it. You should now have the desired files splitted and ready to convert them to FLAC or Ogg Vorbis if you want.
Related articles
Split FLAC or WAV Files Using a CUE File
Rip FLAC and WAV to Ogg Vorbis
First, install the monkeys-audio package as root:
apt-get install monkeys-audio
This package contains the mac utility, a frontend to the APE codec. Once you installed it, you can use the following command:
mac audio_file.ape audio_file.wav -d
This will decompress audio_file.ape and the result will be a WAV file, audio_file.wav. If you have more than one APE files in the directory and you want to decompress them all, use the commands below:
for i in *.ape; do mac "$i" "$i.wav" -d; done
Next, install the shntool and cuetools packages:
apt-get install shntool cuetools
To split the WAV file, use:
cuebreakpoints audio_file.cue | shnsplit audio_file.wav
That's it. You should now have the desired files splitted and ready to convert them to FLAC or Ogg Vorbis if you want.
Related articles
Split FLAC or WAV Files Using a CUE File
Rip FLAC and WAV to Ogg Vorbis
Friday, 23 January 2009
Tip of the Day: Google Is a Calculator
This is not new, but Google can also be used as a calculator. For example, try 5! or 5*5 or 1+1 for example. See this link.


Monday, 19 January 2009
Tip of the Day: Easily Close a Port in Linux
You can easily see what are the ports in use with the command:
nmap localhost
Or:
nmap <YOUR_IP>
The output can be something like:
$ nmap localhost
Starting Nmap 4.62 ( http://nmap.org ) at 2009-01-19 23:45 EET
Interesting ports on localhost (127.0.0.1):
Not shown: 1711 closed ports
PORT STATE SERVICE
25/tcp open smtp
80/tcp open http
111/tcp open rpcbind
113/tcp open auth
Nmap done: 1 IP address (1 host up) scanned in 0.066 seconds
To close a port, you can use the following command as root:
fuser -k 80/tcp
Which will close port 80 (used by the web server).
nmap localhost
Or:
nmap <YOUR_IP>
The output can be something like:
$ nmap localhost
Starting Nmap 4.62 ( http://nmap.org ) at 2009-01-19 23:45 EET
Interesting ports on localhost (127.0.0.1):
Not shown: 1711 closed ports
PORT STATE SERVICE
25/tcp open smtp
80/tcp open http
111/tcp open rpcbind
113/tcp open auth
Nmap done: 1 IP address (1 host up) scanned in 0.066 seconds
To close a port, you can use the following command as root:
fuser -k 80/tcp
Which will close port 80 (used by the web server).
Subscribe to:
Posts (Atom)