This is a guide containing the most popular and useful ways of using the APT and DPKG commands, and it applies to both Ubuntu and Debian (and their derivatives). I mentioned where super user privileges are required, the ones without a mention can be executed as normal user. If you're using Ubuntu, precede a command with sudo in order to gain root privileges (and enter your user password); on Debian, type su, enter the root password, and then type in the commands as shown below.
dpkg -L package_name
This command will show what files package_name installed on your computer. Notice that this works only for already installed packages. Example:
embryo@debian:~$ dpkg -L vorbis-tools
/.
/usr
/usr/bin
/usr/bin/ogg123
apt-get build-dep package_name
(needs root privileges)
This is a very useful command, which will install all the development libraries needed by an application. So if you need to compile a newer version of a program than the one included in the repositories, use this command to fetch the dependencies. Notice that the libraries installed will be for the current version coming with the repositories, so you may need to install additional libraries if needed. However, this usually works for most of the applications. Example:
apt-get build-dep wesnoth
This will fetch all the development packages needed for Wesnoth. Keep in mind that your sources repositories must be enabled (they are enabled by default in Ubuntu).
apt-get clean (and apt-get autoclean)
(needs root privileges)
This command will remove the archives installed on your system. Whenever you install a package, it is downloaded and the DEB package is kept inside the /var/cache/apt/archives/ directory. This command removes those packages, freeing up space.
apt-get clean
apt-get autoclean
Regarding apt-get autoclean: this command will remove only the archives which are no longer available in the repositories, and will keep the ones which are currently available. Helpful if you want to get rid of old archives which have been updated, but still want to keep the upgraded ones just in case. To see how much space the archive occupy, use du -h (the -h argument stands for human readable, so it will show sizes in human readable format):
du -h /var/cache/apt/archives/
apt-cache show package_name
Will show information about any package in the repository. You only have to type in the name of it, not the entire name and version. Example:
embryo@debian:~$ apt-cache show vorbis-tools
Package: vorbis-tools
Priority: optional
Section: sound
Installed-Size: 580
...
apt-cache search pattern
Will search and list all the packages which contain pattern in their name or in their description. You can pipe this with grep for more relevant results:
embryo@debian:~$ apt-cache search gnome terminal|grep terminal
gmfsk - MFSK, RTTY and other digital mode terminal for HF/amateur radio
gnome-terminal-data - Data files for the GNOME terminal emulator
gnome-terminal - The GNOME 2 terminal emulator application
apt-get update && apt-get upgrade
(needs root privileges)
This is a one-liner to update your packages list and upgrade your system. Since it requires root privileges, if your distribution is Ubuntu use sudo apt-get update && sudo apt-get upgrade. Notice that the second command (after the double ampersand) is executed only if the first one was successful, so if fetching any of the lists fails, the second command will not be executed. If you're running a testing or beta release, use instead the following:
sudo apt-get update && sudo apt-get dist-upgrade
This will fetch updates even if they depend on newer packages.
dpkg --get-selections
This command will list all the packages installed on a system using the package manager. Example:
embryo@debian:~$ dpkg --get-selections
acpi-support-base install
acpid install
adduser install
akregator install
...
dpkg -S filename
Will list the packages which install filename. Example:
embryo@debian:~$ dpkg -S oggenc
vorbis-tools: /usr/share/man/man1/oggenc.1.gz
vorbis-tools: /usr/bin/oggenc
embryo@debian:~$
apt-get autoremove
(needs root privileges)
This command will remove unnecessary packages (e.g. orphaned packages), which are no longer needed by any of the packages installed in the system. This happens often after you uninstall a certain application, and its dependencies still remain installed on the system. Use this command to get rid of them.
apt-cache dump
This command will list every package in the cache.
apt-cache depends package_name
A very useful command which lists every dependency a package has, including recommended packages.
embryo@debian:~$ apt-cache depends vorbis-tools
vorbis-tools
Depends: libao2
Depends: libc6
Depends: libcurl3-gnutls
...
apt-cache rdepends package_name
Will show dependencies in reversed order, that is, it will list all the packages which depend on the specified package.
apt-cache rdepends mplayer
apt-cache policy package_name
This will list the repository in which a package is located. In Ubuntu, there are four such repositories: main, restricted, universe and multiverse. Debian has main, contrib and non-free. There is a certain policy for each package, and depending on that, the package is included in one of the specified repositories.
apt-cache policy amarok
apt-cache policy sun-java6-jre
apt-cache showsrc package_name
Will show information about a package source.
apt-get -f install
(needs root privileges)
Will try to fix broken dependencies. This usually comes in handy if you try to manually install a DEB package without installing first its dependencies. Run apt-get -f install to fix the missing dependencies and try to install the package again.
apt-cdrom add
(needs root privileges)
Will add a CD ROM to your sources, so you can install packages from it. This command is mostly useful if you have some ISO images, which you don't want to burn to a CD. In order to scan the ISO images, use:
apt-cdrom -d=/cdrom add
This will mount the ISO image inside the /cdrom directory, and then add its contents to the sources.list. Notice that the /cdrom directory has to be empty. You can use any empty directory for this:
apt-cdrom -d=/home/USER/mydir
dpkg -c local_file.deb
The -c argument tells dpkg to list the contents of a DEB package. Example:
embryo@debian:~$ dpkg -c google-chrome-stable_current_i386.deb
...
drwxr-xr-x root/root 0 2010-07-30 23:54 ./usr/share/man/man1/
-rwxr-xr-x root/root 3098 2010-07-30 23:54 ./usr/share/man/man1/google-chrome.1
lrwxrwxrwx root/root 0 2010-07-30 23:54 ./usr/bin/google-chrome -> /opt/google/chrome/google-chrome
dpkg -f local_file.deb
This shows the control file for a binary package. A control file is a file which provides information to the package manager about dependencies, maintainer, homepage, description, and more.
embryo@debian:~$ dpkg -f google-chrome-stable_current_i386.deb
Package: google-chrome-stable
Version: 5.0.375.126-r53802
...
These are the most popular uses of APT and DPKG. Have some more? Please, share them!
Showing posts with label debian. Show all posts
Showing posts with label debian. Show all posts
Monday, 20 September 2010

Sunday, 19 September 2010
What Makes Debian One of the Most Popular Distros Out There: 5 Good Reasons
Debian is one of the oldest and most popular distributions among the Linux users. There are probably hundreds of distributions which are based on Debian, or others which are based on distributions which in turn are based on Debian. Although I'm not a Debian developer, I use it for over two years or so, and slowly got to love this OS.
This is not a 'Debian is better than X' article, it's just about Debian alone. So, let's proceed and see what makes Debian so popular and loved among the Linux users.
Stability. I know as a Debian or Ubuntu (or why not, some other distribution) user you probably heard this a million times. But yes, stability. Debian is renowned for the fact that its 'stable' version is always released only if all known critical bugs have been fixed and it's been stripped from most of the ones with a lower priority. When you install Debian stable you have the certitude that it will not give you a headache, that it is secure and that all the tools and daemons will work the right way. There is a reason for which Debian is used by so many web hosting companies as their preferred Linux distribution for their servers.
Huge community. From a user's point of view, especially a tech-oriented one, having enough persons from which at least one will know the answer is a blessing. There are the Debian mailing lists, the IRC channels (both the official OFTC one and the Freenode one), the forums. And why not say it, UbuntuForums.org does a great job too in helping Debian. How's that?, you may ask. Well, Ubuntu is so popular and used by so many people that on the online forums you can get a straight, good answer to a question in minutes. And since Ubuntu is based on Debian, over 90% of the questions which apply for Ubuntu will apply for Debian too.
Good documentation. I'm talking here books and books of official online documentation. We have the Debian Wiki, we have powerful manuals written by professionals, and to list some, here are the New Maintainers' Guide, the Debian Policy Manual or the Debian Packing Manual.To say nothing about all the third-party help sites, news sites, blogs and articles referring to Debian. This makes Debian a very rich-documented distribution, and knowing help is out there if you do a little reading is a key aspect for any user.
Debian Free Software Guidelines. The social contract is a major aspect which affected how Debian developed and continues to be developed. Debian is one of the distributions which follow a very specific code from which there is no straying. Debian will always be 100% free, it will be open, it will fulfill the community needs and it will respect the free software standards.
Debian fits perfectly both as desktop or as web server. With high security and stability standards, Debian makes the perfect fit for a web server. But Debian comes with over 17,000 from which a huge amount is made by GUI applications, desktop environments and many other user-friendly tools.
And the list goes on. The true power of Debian lies not only in the few points I listed here, but in its users and mentality. Software done this way will always be there, because it relies on an entire community to survive, and as long as the community is there, then so is Debian. A proof to this is that Debian has been around almost since the beginning of Linux, in 1993, when Ian Murdock, founder of Debian, announced the availability of Debian on August 16, and together with Slackware or Red Hat, it is at the top of the pyramid regarding tradition in the Linux world.
This is not a 'Debian is better than X' article, it's just about Debian alone. So, let's proceed and see what makes Debian so popular and loved among the Linux users.
Stability. I know as a Debian or Ubuntu (or why not, some other distribution) user you probably heard this a million times. But yes, stability. Debian is renowned for the fact that its 'stable' version is always released only if all known critical bugs have been fixed and it's been stripped from most of the ones with a lower priority. When you install Debian stable you have the certitude that it will not give you a headache, that it is secure and that all the tools and daemons will work the right way. There is a reason for which Debian is used by so many web hosting companies as their preferred Linux distribution for their servers.
Huge community. From a user's point of view, especially a tech-oriented one, having enough persons from which at least one will know the answer is a blessing. There are the Debian mailing lists, the IRC channels (both the official OFTC one and the Freenode one), the forums. And why not say it, UbuntuForums.org does a great job too in helping Debian. How's that?, you may ask. Well, Ubuntu is so popular and used by so many people that on the online forums you can get a straight, good answer to a question in minutes. And since Ubuntu is based on Debian, over 90% of the questions which apply for Ubuntu will apply for Debian too.
Good documentation. I'm talking here books and books of official online documentation. We have the Debian Wiki, we have powerful manuals written by professionals, and to list some, here are the New Maintainers' Guide, the Debian Policy Manual or the Debian Packing Manual.To say nothing about all the third-party help sites, news sites, blogs and articles referring to Debian. This makes Debian a very rich-documented distribution, and knowing help is out there if you do a little reading is a key aspect for any user.
Debian Free Software Guidelines. The social contract is a major aspect which affected how Debian developed and continues to be developed. Debian is one of the distributions which follow a very specific code from which there is no straying. Debian will always be 100% free, it will be open, it will fulfill the community needs and it will respect the free software standards.
Debian fits perfectly both as desktop or as web server. With high security and stability standards, Debian makes the perfect fit for a web server. But Debian comes with over 17,000 from which a huge amount is made by GUI applications, desktop environments and many other user-friendly tools.
And the list goes on. The true power of Debian lies not only in the few points I listed here, but in its users and mentality. Software done this way will always be there, because it relies on an entire community to survive, and as long as the community is there, then so is Debian. A proof to this is that Debian has been around almost since the beginning of Linux, in 1993, when Ian Murdock, founder of Debian, announced the availability of Debian on August 16, and together with Slackware or Red Hat, it is at the top of the pyramid regarding tradition in the Linux world.
Wednesday, 15 September 2010
Tutorial: Compile and Install GIMP 2.6.10 in Debian 5.0 Lenny
In this tutorial I will show how to compile from source and install in Debian Lenny the latest release of GIMP, the most powerful image manipulation application currently available for Linux.
First of all, Debian Lenny comes with GIMP 2.4.7 in the repositories, so if you have it installed, you should remove it first:
apt-get remove --purge gimp
apt-get autoremove --purge
Next, install the dependencies needed to compile GIMP 2.6.10:
apt-get build-dep gimp
apt-get install libbabl-0.0-0-dev libgegl-0.0-dev
Next, download the GIMP 2.6.10 source tarball from the GIMP FTP site and then uncompress it:
tar -xjf gimp-2.6.10.tar.bz2
Now change the working directory to gimp-2.6.10 and issue these commands:
./configure
make
make install
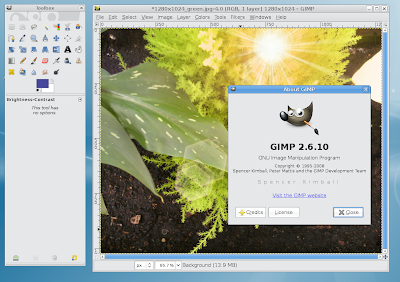
The last one as root. If you want to install GIMP as a normal user, specify a different prefix to the configure script:
./configure --prefix=/home/USER/usr
make
make install
There is no need to be root when issuing make install this time.
First of all, Debian Lenny comes with GIMP 2.4.7 in the repositories, so if you have it installed, you should remove it first:
apt-get remove --purge gimp
apt-get autoremove --purge
Next, install the dependencies needed to compile GIMP 2.6.10:
apt-get build-dep gimp
apt-get install libbabl-0.0-0-dev libgegl-0.0-dev
Next, download the GIMP 2.6.10 source tarball from the GIMP FTP site and then uncompress it:
tar -xjf gimp-2.6.10.tar.bz2
Now change the working directory to gimp-2.6.10 and issue these commands:
./configure
make
make install
GIMP 2.6.10 in Debian Lenny

The last one as root. If you want to install GIMP as a normal user, specify a different prefix to the configure script:
./configure --prefix=/home/USER/usr
make
make install
There is no need to be root when issuing make install this time.
Wednesday, 27 January 2010
How-To: Install Finch 2.6.5 in Debian Lenny
 Finch is a powerful text user interface instant messaging client based on libpurple, and it comes included in the Pidgin source, the popular GNOME IM client. Finch supports various protocols, including AIM, ICQ, MSN, Yahoo and IRC.
The version which ships in Debian Lenny is rather old (2.4.3), so in order to install the latest release of Finch in Debian Lenny (which, at the time of writing is 2.6.5), just follow the next steps:
Make sure the sources repositories are enabled, so that the needed development libraries are available. That is, a line like the following should be available in the /etc/apt/sources.list file:
deb-src http://ftp.fi.debian.org/debian/ lenny main contrib non-free
As root, update the packages list:
apt-get update
And install the development libraries:
apt-get build-dep finch
Next, download the Pidgin source code (which also includes Finch source) from the official website (direct link here), uncompress it:
tar -xjf pidgin-2.6.5.tar.bz2
Change the current working directory to pidgin-2.6.5 and compile and install it using:
./configure --disable-gtkui --disable-vv --disable-nm
The --disable-gtkui switch will not build the GTK interface, and the other two will disable voice/video support and NetworkManager support.
Now issue the usual:
make
make install
The last one as root. Alternately, you can install Finch as a local user, by specifying an install prefix:
./configure --prefix=/home/USER/usr --disable-gtkui --disable-vv --disable-nm
make
make install
In this case, make install should be run as normal user. Replace USER with your username and make sure /home/USER/usr/bin is included in your $PATH variable. Run Finch by typing finch at the command-line.
Pidgin 2.6.5 running in a terminal

Sunday, 30 August 2009
7 Reasons to Use Debian

1. Stable
Any application needs time to be used and tested enough time in order to make it stable. One of the greatest goals of Debian is stability. It's released when it's ready and applications included in the repositories have enough time to be tested through.
2. Debian offers stable, old stable, testing, *and* sid
Why should this be an advantage? First, because there is a stable release, which will fit both desktops and servers. Since Debian stable releases happen rarely, software can get a little old. So any can get to choose 'testing', which is tagged that way because applications are tested more but they are still usable. Sid is bleeding edge, which means applications get in usually as soon as they are released, so you get the newest software only by installing a testing weekly snapshot and upgrading. Considering the stable and old stable offer software which has been tested and stripped for critical bugs, testing usually proves to be the perfect alternative for a user who wants to use up-to-date tools and applications, which include the latest features.
3. The DFSG
Maybe this doesn't say much just when you see it, but Debian has been around since 1993 and it still is as it was. Although the social contract changed a little over the years, it still retained it's originality. It's open, it's free, it follows the GPL entirely, it respects the community needs.
4. Debian is one of the oldest distributions
Although this doesn't necessarily make you wise, take a look at Debian: it's been up for over 15 years and there are a lot of distributions out there who take and eventually expand Debian's work, take Ubuntu or DSL for example.
5. Very rich documentation
Except for the official documentation, there are hundreds of respectable websites which provide Debian tutorials and general documentation. There is usually no problem which can't be solved in Debian or at least which hasn't somewhere an answer.
6. Many distributions are based on Debian
Debian offers a solid base and a powerful system of managing software. Distributions like Ubuntu and DSL use the APT packaging system, which was invented by Debian for easier management of installed software. In turn, everything user-friendly or useful from Ubuntu will get eventually into Debian.
7. Great community
Being one of the oldest distributions out there, Debian has a strong community. Take the IRC channels, both on Freenode and OFTC, take all the Debian-dedicated forums or the mailing lists, consider that there are gurus out there who worked with Debian for years and they will usually offer support and share knowledge.
Sunday, 23 August 2009
How-To: Compile and Install Wine 1.1.28 in Debian Lenny
 Wine 1.1.28 was released on August 21 and it comes with new features and improvements like support for IRDA protocol, faster wineprefix creation, more image formats in WindowsCodecs and various other bug fixes.
To get Wine 1.1.28 in Debian Lenny, follow the next steps:
1. Enable the sources repositories
Edit your /etc/apt/sources.list file as root and make sure you have a line which starts with deb-src, like in the example below:
deb-src ftp://ftp.fi.debian.org/debian/ lenny main contrib non-free
If not, add it, replacing the TLD (top level domain) with your own country TLD (in the example above the TLD is ftp.fi.debian.org - Finland).
2. Update the package lists
As root, type:
apt-get update
3. Install the needed dependencies
As root, type the following commands in a terminal window:
apt-get install build-essential
apt-get build-dep wine
The first command will get build-essential (which is a meta package including tools needed for the compilation, like gcc) and the second will fetch the Wine development libraries.
3. Get the source tarball
Download the source tarball from here (direct link here) and uncompress it:
tar -xjf wine-1.1.28.tar.bz2
4. Compile and install Wine
Make sure the current working directory is wine-1.1.28 and type the following commands:
./configure
make depend && make
make install
The last command (make install) with root privileges. Alternately, you can install Wine as normal user by specifying a prefix:
./configure --prefix=/home/USER/usr/
make depend && make
make install
In which case you don't need to run make install as root, but as normal user only.
After the installation is complete, run:
winecfg
And that's it. Wine should be now properly installed. Run any Windows application using:
wine executable_file.exe
Saturday, 22 August 2009
How-To: Install OpenOffice 3.1 in Debian 5.0 Lenny
 Debian Lenny comes by default with OpenOffice 2.6.4, but in the meantime OpenOffice 3.1 was released. You can easily install it on your Debian box by using the Debian Lenny backports repository, which is a repository including newer versions of applications than the ones which come by default with Lenny. Just follow the steps below:
Add the backports repositories
To add the Lenny backports repositories, just edit as root your /etc/apt/sources.list file and add the following line:
deb http://www.backports.org/debian lenny-backports main contrib non-free
Make sure to save the file (Ctrl+O followed by Ctrl+X in Nano) and proceed to the next step.
Install the Debian backports keyring
As root, type:
apt-get install debian-backports-keyring
This will install the debian-backports-keyring package, adding the key to your trusted repository keys.
Update the package lists
Now, update the package lists as root:
apt-get update
And install OpenOffice.org:
apt-get -t lenny-backports install openoffice.org

This should be all. OpenOffice.org 3.1.0 should be now installed properly on your Debian box, and you can run it by typing openoffice.org in a Run box or opening a terminal application and typing openoffice.org.
Wednesday, 12 August 2009
How-To: Compile and Install Latest VLC in Debian Lenny
This tutorial will show how to compile and install the latest VLC from source in Debian Lenny in several steps. The current version at the time of writing is VLC 1.0.1, so the tutorial should work successfully for it.
1. Install the development packages
As root, type the following two commands:
apt-get install build-essential
apt-get install libassa3.5-5-dev libv4l-ruby1.8 debhelper dh-buildinfo gettext quilt nasm yasm libxul-dev liba52-0.7.4-dev libaa1-dev libasound2-dev libcaca-dev libcdio-dev libdca-dev libdvbpsi4-dev libaudiofile-dev libavahi-client-dev libavcodec-dev libdvdnav-dev libdvdread-dev libesd0-dev libfaad-dev libflac-dev libfreetype6-dev libfribidi-dev libggi2-dev libgl1-mesa-dev libglib2.0-0 libgnutls-dev libhal-dev libid3tag0-dev libidl0 libimlib2-dev libjack-dev liblircclient-dev liblivemedia-dev liblua5.1-0-dev libmad0-dev libmatroska-dev libmodplug-dev libmpcdec-dev libmpeg2-4-dev libncursesw5-dev libnotify-dev libogg-dev libpng12-dev libpostproc-dev libpulse-dev libqt4-dev libschroedinger-dev libsdl-image1.2-dev libsdl1.2-dev libvcdinfo-dev libvorbis-dev libx11-dev libx264-dev libxext-dev libxml2-dev libxpm-dev libxt-dev libxv-dev pkg-config qt4-dev-tools zlib1g-dev
The first one will install the meta package build-essential, which depends on compilation tools, while the latter will install development libraries needed to compile VLC.
3. Make a symbolic link in /usr/lib
Make a symbolic link in /usr/lib/ which will point to the libGL library. This may depend on which driver you have installed. You may not need to do this step. For example, I used here:
ln -s /usr/lib/libGL.so.173.14.09 /usr/lib/libGL.so
2. Download the source code
Download the VLC source tarball from the official website (direct link here) and uncompress it:
tar -xjf vlc-1.0.1.tar.bz2
4. Compile and install
Now make sure the current working directory is vlc-1.0.1 and issue the following commands:
./configure --disable-nls --disable-mozilla --disable-live555
make
make install
The last command as root. Without the switches --disable-nls and --disable-mozilla I got the error configure: error: Buggy GNU/libc (version 2.5 - 2.7) present. VLC would crash; there is no viable work-around for this. so I had to disable them.
Finally, run ldconfig as root:
ldconfig
This should be all. Run VLC by typing vlc in a terminal or hitting Alt+F2 and typing vlc in the run box that appears.
You can also install as normal user by changing the installation prefix, e.g.:
./configure --prefix=/home/USER/usr --disable-nls --disable-mozilla --disable-live555
make
make install
Just make sure to replace USER with your username and include /home/USER/usr/bin in your $PATH variable.
1. Install the development packages
As root, type the following two commands:
apt-get install build-essential
apt-get install libassa3.5-5-dev libv4l-ruby1.8 debhelper dh-buildinfo gettext quilt nasm yasm libxul-dev liba52-0.7.4-dev libaa1-dev libasound2-dev libcaca-dev libcdio-dev libdca-dev libdvbpsi4-dev libaudiofile-dev libavahi-client-dev libavcodec-dev libdvdnav-dev libdvdread-dev libesd0-dev libfaad-dev libflac-dev libfreetype6-dev libfribidi-dev libggi2-dev libgl1-mesa-dev libglib2.0-0 libgnutls-dev libhal-dev libid3tag0-dev libidl0 libimlib2-dev libjack-dev liblircclient-dev liblivemedia-dev liblua5.1-0-dev libmad0-dev libmatroska-dev libmodplug-dev libmpcdec-dev libmpeg2-4-dev libncursesw5-dev libnotify-dev libogg-dev libpng12-dev libpostproc-dev libpulse-dev libqt4-dev libschroedinger-dev libsdl-image1.2-dev libsdl1.2-dev libvcdinfo-dev libvorbis-dev libx11-dev libx264-dev libxext-dev libxml2-dev libxpm-dev libxt-dev libxv-dev pkg-config qt4-dev-tools zlib1g-dev
The first one will install the meta package build-essential, which depends on compilation tools, while the latter will install development libraries needed to compile VLC.
3. Make a symbolic link in /usr/lib
Make a symbolic link in /usr/lib/ which will point to the libGL library. This may depend on which driver you have installed. You may not need to do this step. For example, I used here:
ln -s /usr/lib/libGL.so.173.14.09 /usr/lib/libGL.so
2. Download the source code
Download the VLC source tarball from the official website (direct link here) and uncompress it:
tar -xjf vlc-1.0.1.tar.bz2
4. Compile and install
Now make sure the current working directory is vlc-1.0.1 and issue the following commands:
./configure --disable-nls --disable-mozilla --disable-live555
make
make install
The last command as root. Without the switches --disable-nls and --disable-mozilla I got the error configure: error: Buggy GNU/libc (version 2.5 - 2.7) present. VLC would crash; there is no viable work-around for this. so I had to disable them.
Finally, run ldconfig as root:
ldconfig
This should be all. Run VLC by typing vlc in a terminal or hitting Alt+F2 and typing vlc in the run box that appears.
You can also install as normal user by changing the installation prefix, e.g.:
./configure --prefix=/home/USER/usr --disable-nls --disable-mozilla --disable-live555
make
make install
Just make sure to replace USER with your username and include /home/USER/usr/bin in your $PATH variable.
Tuesday, 11 August 2009
How-To: Don't Start Unneeded Services on Start-Up in Debian
By default, Debian uses run level 2, which means that in normal, multi-user mode Debian will automatically run scripts located in the /etc/init.d/ directory. But how does it do it? First, it will look in the corresponding directory of the run level, /etc/rcN.d/ (which, in the case of run level 2 will be /etc/rc2.d/) and run all the scripts which are pointed to by the symbolic links starting with letter S in this directory.
So all the symbolic links in /etc/rc2.d/ actually point out to executable scripts in /etc/init.d/.
If you perform an ls -l /etc/rc2.d you will see an output which can look something like this:
 As you can see, all of them are symlinks to scripts in /etc/init.d/. The links which start with a K will determine the respective script not to start, while the ones starting with S will run it with the start argument. All the scripts in /etc/init.d can be run as:
/etc/init.d/script_name start|stop|restart
Now, in order to prevent a daemon from running at system start-up, for example S20ircd-ircu (the ircu IRC server), all you have to do is rename it to a name which starts with K, then a two-digit number made up from the difference between 100 and the number which follows S, and then its name. For our example, that would be (as root):
mv S20ircd-ircu K80ircd-ircu
The next time you reboot your Debian box, the IRC daemon will not be started automatically, but you'll be able to rename it back to S20ircd-ircu or start it manually, as root, like this:
/etc/init.d/ircd-ircu start
A simple and clear explanation on how things work can be found in the files /etc/rc2.d/README and /etc/init.d/README.
One of the popular uses of this is to prevent display managers from starting up, for example gdm or kdm:
mv S99kdm K01kdm
This will prevent kdm (KDE display manager) from starting up, leaving you at a shell login prompt. Useful when you only need a server, or want to live in command-line only for a while. To start it up, just use, as root:
/etc/init.d/kdm start
So all the symbolic links in /etc/rc2.d/ actually point out to executable scripts in /etc/init.d/.
If you perform an ls -l /etc/rc2.d you will see an output which can look something like this:
 As you can see, all of them are symlinks to scripts in /etc/init.d/. The links which start with a K will determine the respective script not to start, while the ones starting with S will run it with the start argument. All the scripts in /etc/init.d can be run as:
/etc/init.d/script_name start|stop|restart
Now, in order to prevent a daemon from running at system start-up, for example S20ircd-ircu (the ircu IRC server), all you have to do is rename it to a name which starts with K, then a two-digit number made up from the difference between 100 and the number which follows S, and then its name. For our example, that would be (as root):
mv S20ircd-ircu K80ircd-ircu
The next time you reboot your Debian box, the IRC daemon will not be started automatically, but you'll be able to rename it back to S20ircd-ircu or start it manually, as root, like this:
/etc/init.d/ircd-ircu start
A simple and clear explanation on how things work can be found in the files /etc/rc2.d/README and /etc/init.d/README.
One of the popular uses of this is to prevent display managers from starting up, for example gdm or kdm:
mv S99kdm K01kdm
This will prevent kdm (KDE display manager) from starting up, leaving you at a shell login prompt. Useful when you only need a server, or want to live in command-line only for a while. To start it up, just use, as root:
/etc/init.d/kdm start
Monday, 10 August 2009
How-To: Set Up and Install Shutter 0.80.1 in Debian 5.0 Lenny
Shutter is powerful screenshot taking application written in Perl and using the GTK toolkit. Currently at version 0.80.1, Shutter offers a PPA for Ubuntu 9.04 Jaunty but it is not included in Debian Lenny repositories.
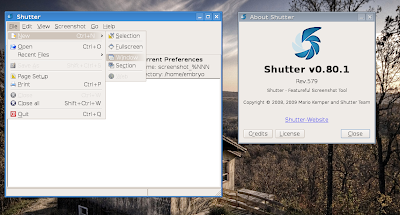
Setting it up in Debian Lenny is easy, just follow these steps:
Install the needed dependencies to run Shutter
Open up Konsole or GNOME Terminal and type as root:
su
apt-get install perl libgnome2-gconf-perl libgnome2-wnck-perl libgtk2-imageview-perl
These are Perl modules needed by Shutter. After the installation is over, go to their official website and download the latest tarball available (at the time of writing this is http://shutter-project.org/wp-content/uploads/releases/tars/shutter-0.80.1.tar.gz). Alternately you can fetch it from command-line:
wget http://shutter-project.org/wp-content/uploads/releases/tars/shutter-0.80.1.tar.gz
The file shutter-0.80.1.tar.gz will get saved in the current working directory. Now uncompress it:
tar -xzf shutter-0.80.1.tar.gz
Next, copy the directory shutter-0.80.1 in a location of your choice, and to fire it up run the script named shutter located in the shutter-0.80.1/bin directory:
./shutter-0.80.1/bin/shutter
You can also make a desktop shortcut or a menu entry for it. This should be all.
Shutter 0.80.1 running in Debian Lenny

Setting it up in Debian Lenny is easy, just follow these steps:
Install the needed dependencies to run Shutter
Open up Konsole or GNOME Terminal and type as root:
su
apt-get install perl libgnome2-gconf-perl libgnome2-wnck-perl libgtk2-imageview-perl
These are Perl modules needed by Shutter. After the installation is over, go to their official website and download the latest tarball available (at the time of writing this is http://shutter-project.org/wp-content/uploads/releases/tars/shutter-0.80.1.tar.gz). Alternately you can fetch it from command-line:
wget http://shutter-project.org/wp-content/uploads/releases/tars/shutter-0.80.1.tar.gz
The file shutter-0.80.1.tar.gz will get saved in the current working directory. Now uncompress it:
tar -xzf shutter-0.80.1.tar.gz
Next, copy the directory shutter-0.80.1 in a location of your choice, and to fire it up run the script named shutter located in the shutter-0.80.1/bin directory:
./shutter-0.80.1/bin/shutter
You can also make a desktop shortcut or a menu entry for it. This should be all.
How-To: Install APT Support for Iceweasel in Debian
aptlinex is a package included in Debian Lenny repositories which will allow browsers like Konqueror or Firefox (Iceweasel in Debian) to install DEB packages only by clicking them in the web browser. With aptlinex, all the links starting with apt:// will automatically download that respective package and perform the installation on your Debian system.
To set this up, first install the aptlinex package as root:
su
apt-get install aptlinex
Next, open Iceweasel and type about:config in the location bar. Click the I'll be careful, I promise! button and create the following four entries by right-clicking anywhere in the window:
These two should be created as New -> String values:
network.protocol-handler.app.apt and enter the value /usr/bin/gambas-apt.gambas
network.protocol-handler.app.apt+http and enter the value /usr/bin/gambas-apt.gambas

The following two should be boolean values (can take either values of either true or false):
network.protocol-handler.warn-external.apt and enter the value true
network.protocol-handler.warn-external.apt+http and enter the value true

Next, you will need to click on a link which starts with apt:// and select the default application to open these links.


This is it.
To set this up, first install the aptlinex package as root:
su
apt-get install aptlinex
Next, open Iceweasel and type about:config in the location bar. Click the I'll be careful, I promise! button and create the following four entries by right-clicking anywhere in the window:
These two should be created as New -> String values:
network.protocol-handler.app.apt and enter the value /usr/bin/gambas-apt.gambas
network.protocol-handler.app.apt+http and enter the value /usr/bin/gambas-apt.gambas
Here is how the entries above should look like:

The following two should be boolean values (can take either values of either true or false):
network.protocol-handler.warn-external.apt and enter the value true
network.protocol-handler.warn-external.apt+http and enter the value true
Here is how the two entries above should look like:

Next, you will need to click on a link which starts with apt:// and select the default application to open these links.
The first time you click on an apt:// link, you will be prompt with this window:

Choose the /usr/bin/gambas-apt.gambas application to open these links

Finally, provide the root password in order to start installing the DEB package

This is it.
Thursday, 9 July 2009
5 Simple APT Tips for Debian and Ubuntu, Part II
Several months ago I created an article with 5 APT (Advanced Packaging Tool) tips for both Debian and Ubuntu available here. APT is the package manager in Debian and Debian-based distributions, like Ubuntu. Here's part two of that article, with 5 more tips and tricks for APT.
Notice: I specified which commands need root privileges. In Debian, type su, followed by your root password, while in Ubuntu just precede each command which needs root privileges with sudo. Notice that by default there is no feedback when entering the password, so you won't be able to see it, but it goes in. Just press Enter when you're done.
Add repositories from a CD or DVD
If you need an offline repository for packages, you can download all the ISO images for your distribution, eventually burn them on CDs/DVDs and add them manually to the /etc/apt/sources.list file using apt-cdrom (as root):
apt-cdrom add
Enter the CD/DVD in the drive and let APT scan for packages.
Another great solution is to not even burn the ISO images to CD, just mount them and add them to your sources.list this way. Here's what you have to do:
First, type:
apt-cdrom -d=/cdrom add
Or replace /cdrom with some empty directory of your choice, that's where the ISO images will be mounted. I use here /mnt/iso0, /mnt/iso1 etc. Just make sure the directory is empty. The output of the above command looks something like this:
# apt-cdrom -d=/cdrom add
Using CD-ROM mount point /cdrom/
Unmounting CD-ROM
Waiting for disc...
Please insert a Disc in the drive and press enter
Now don't press Enter, instead open another terminal session and mount the image in that directory (as root):
mount -o loop /path/to/iso/file.iso /cdrom
Then return to the shell where you started apt-cdrom and press Enter. It should scan the directory where the ISO image was mounted. I'm not very sure this is the only method, but this worked very well for me. If you mount the ISO the first time and then execute apt-cdrom, it first umounts it and then it fails with the message E: Failed to mount the cdrom.
Use dpkg -S to search for a specific file
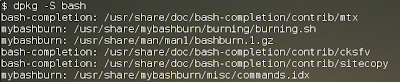
dpkg -S filename will search for filename in all the packages available and return all the packages which have a file (or the path to that file) with the same name. Notice that the name can also be included in the found files. For example, typing dpkg -S bash will return all the packages which contain the name 'bash' in their files, including mybashburn, bash and several other packages. On the other hand, searching for dpkg -S /bin/bash will only return package bash, since dpkg will match the whole path to the bash binary. See the screenshots below for examples:

Use apt-file to search for files in packages
This is a tool which creates a cache with info about all the packages available in the repositories, and it allows to search for specific files in a package and show what files a package will install (including packages which are not already installed). To get it, type as root:
sudo apt-get install apt-file
Next, update its cache:
sudo apt-file update
Use it like this:
apt-file search filename
Or:
apt-file search file_path
This will also return paths which include the name file_path. To show what files a package will install, use:
apt-file show package_name
Here's a more comprehensive tutorial I wrote a while ago about apt-file.
Remove unnecessary packages
This was a feature which existed for while in aptitude, but not in apt. Once you remove an application, it may be possible that some libraries on which that application depended to remain installed in the system. In order to get rid of those too, use:
apt-get autoremove --purge
Notice that this command will only remove packages which are not needed any more by some other application or that are not marked as 'installed manually'. This means packages which you did not specifically installed yourself.
List files in a package
Just use dpkg -L package_name for this one. Example:
dpkg -L amarok
dpkg -L bash
...
This will list all the packages installed by the respective package. Notice that it won't list anything if the specified package is not installed.
Hope this will be useful. Have some more, or maybe something wrong in the article? Please share other APT-related tips and tricks in the comments below.
Notice: I specified which commands need root privileges. In Debian, type su, followed by your root password, while in Ubuntu just precede each command which needs root privileges with sudo. Notice that by default there is no feedback when entering the password, so you won't be able to see it, but it goes in. Just press Enter when you're done.
Add repositories from a CD or DVD
If you need an offline repository for packages, you can download all the ISO images for your distribution, eventually burn them on CDs/DVDs and add them manually to the /etc/apt/sources.list file using apt-cdrom (as root):
apt-cdrom add
Enter the CD/DVD in the drive and let APT scan for packages.
Another great solution is to not even burn the ISO images to CD, just mount them and add them to your sources.list this way. Here's what you have to do:
First, type:
apt-cdrom -d=/cdrom add
Or replace /cdrom with some empty directory of your choice, that's where the ISO images will be mounted. I use here /mnt/iso0, /mnt/iso1 etc. Just make sure the directory is empty. The output of the above command looks something like this:
# apt-cdrom -d=/cdrom add
Using CD-ROM mount point /cdrom/
Unmounting CD-ROM
Waiting for disc...
Please insert a Disc in the drive and press enter
Now don't press Enter, instead open another terminal session and mount the image in that directory (as root):
mount -o loop /path/to/iso/file.iso /cdrom
Then return to the shell where you started apt-cdrom and press Enter. It should scan the directory where the ISO image was mounted. I'm not very sure this is the only method, but this worked very well for me. If you mount the ISO the first time and then execute apt-cdrom, it first umounts it and then it fails with the message E: Failed to mount the cdrom.
Use dpkg -S to search for a specific file
dpkg -S filename will search for filename in all the packages available and return all the packages which have a file (or the path to that file) with the same name. Notice that the name can also be included in the found files. For example, typing dpkg -S bash will return all the packages which contain the name 'bash' in their files, including mybashburn, bash and several other packages. On the other hand, searching for dpkg -S /bin/bash will only return package bash, since dpkg will match the whole path to the bash binary. See the screenshots below for examples:


Use apt-file to search for files in packages
This is a tool which creates a cache with info about all the packages available in the repositories, and it allows to search for specific files in a package and show what files a package will install (including packages which are not already installed). To get it, type as root:
sudo apt-get install apt-file
Next, update its cache:
sudo apt-file update
Use it like this:
apt-file search filename
Or:
apt-file search file_path
This will also return paths which include the name file_path. To show what files a package will install, use:
apt-file show package_name
Here's a more comprehensive tutorial I wrote a while ago about apt-file.
Remove unnecessary packages
This was a feature which existed for while in aptitude, but not in apt. Once you remove an application, it may be possible that some libraries on which that application depended to remain installed in the system. In order to get rid of those too, use:
apt-get autoremove --purge
Notice that this command will only remove packages which are not needed any more by some other application or that are not marked as 'installed manually'. This means packages which you did not specifically installed yourself.
List files in a package
Just use dpkg -L package_name for this one. Example:
dpkg -L amarok
dpkg -L bash
...
This will list all the packages installed by the respective package. Notice that it won't list anything if the specified package is not installed.
Hope this will be useful. Have some more, or maybe something wrong in the article? Please share other APT-related tips and tricks in the comments below.
Wednesday, 8 July 2009
How-To: Download Debian CDs/DVDs Using jigdo
This guide will show how to download ISO images (CDs, DVDs or Blu-Ray) using jigdo, a specific protocol intended to be the main way to download Debian disc images.
jigdo (or Jigsaw Download) downloads individually all the files located on a specific CD/DVD, and then it assembles them into an ISO image. jigdo is known to be a faster alternative to download large image files.
To use jigdo, you need to follow several steps explained below:
Install the jigdo-file package
This package contains a command-line tool for downloading jigdo files, called jigdo-lite. To install jigdo-file, type as root:
apt-get install jigdo-file
Get the jigdo files
You have two ways of doing this. You can go here, choose your architecture and distribution, and either save the jigdo files you want to the local hard drive, or just right-click on each file inside your browser and select Copy Link Location (in Iceweasel, other browsers should have a similar option when right-clicking links). For example, the full address for Debian Lenny 5.0.2 'Stable' CD1 jigdo file is http://cdimage.debian.org/debian-cd/5.0.2/i386/jigdo-cd/debian-502-i386-CD-1.jigdo so that's what I'm going to use when opening it with jigdo-lite.
Run jigdo-lite and start downloading
Open a terminal (like Konsole or GNOME Terminal) and start jigdo-lite. Something which looks like the screenshot below should appear:

Next, paste the address you copied at the second step (either right-click then Paste or Shift+Insert) and press Enter. The following steps should be left default, so just press Enter until it starts downloading the files. It should look like the screenshot below:

The downloaded image and files will be located in the current working directory, so if you were in ~ (home directory) when starting jigdo-lite, that's where your ISO image will be. After downloading is finished, jigdo should return a message like the one below:

After downloading, there will be 3 different files available, only one of them being the ISO image, which you can burn to a CD/DVD (depending on which type is).
Further reading
Downloading Debian CD images with jigdo - official documenation
jigdo official website
jigdo (or Jigsaw Download) downloads individually all the files located on a specific CD/DVD, and then it assembles them into an ISO image. jigdo is known to be a faster alternative to download large image files.
To use jigdo, you need to follow several steps explained below:
Install the jigdo-file package
This package contains a command-line tool for downloading jigdo files, called jigdo-lite. To install jigdo-file, type as root:
apt-get install jigdo-file
Get the jigdo files
You have two ways of doing this. You can go here, choose your architecture and distribution, and either save the jigdo files you want to the local hard drive, or just right-click on each file inside your browser and select Copy Link Location (in Iceweasel, other browsers should have a similar option when right-clicking links). For example, the full address for Debian Lenny 5.0.2 'Stable' CD1 jigdo file is http://cdimage.debian.org/debian-cd/5.0.2/i386/jigdo-cd/debian-502-i386-CD-1.jigdo so that's what I'm going to use when opening it with jigdo-lite.
Run jigdo-lite and start downloading
Open a terminal (like Konsole or GNOME Terminal) and start jigdo-lite. Something which looks like the screenshot below should appear:

Next, paste the address you copied at the second step (either right-click then Paste or Shift+Insert) and press Enter. The following steps should be left default, so just press Enter until it starts downloading the files. It should look like the screenshot below:

The downloaded image and files will be located in the current working directory, so if you were in ~ (home directory) when starting jigdo-lite, that's where your ISO image will be. After downloading is finished, jigdo should return a message like the one below:

After downloading, there will be 3 different files available, only one of them being the ISO image, which you can burn to a CD/DVD (depending on which type is).
Further reading
Downloading Debian CD images with jigdo - official documenation
jigdo official website
Thursday, 2 July 2009
How-To: Install FrostWire 4.18.0 in Debian Lenny
FrostWire is an open-source, free Java-based peer-to-peer client with support for the BitTorrent protocol, skins and iTunes. The latest release, 4.18.0, contains many improvements, bug fixes and several changes. See the official announcement here.

Debian Lenny doesn't come with FrostWire included in its repositories, but installing it is very easy if you follow the steps below.
1. Download the DEB package
First, grab the DEB package from the official website and save it to a location on your hard disk. It is the same package for both Debian and Ubuntu.
2. Enable non-free repositories
If those are not enabled yet, use your favourite text editor to edit the /etc/apt/sources.list file as root:
su
nano /etc/apt/sources.list
Then make sure you have a line which says:
deb ftp://ftp.ro.debian.org/debian/ lenny main contrib non-free
Or add it if it's not already there. Make sure to save the sources.list file (Ctrl+O followed by Ctrl+X to exit Nano).
3. Install the Java Runtime Environment
As root, install the sun-java6-jre package:
su
apt-get install sun-java6-jre
4. Install the FrostWire DEB package
Make sure the current working directory is the one where you saved the frostwire-4.18.0.i586.deb package and type as root:
dpkg -i frostwire-4.18.0.i586.deb
FrostWire should be now installed, and there is only one more step left.
5. Select the Java binary
This step is about making the /etc/alternatives/java symbolic link to point to the actual Java binary (/usr/lib/jvm/java-6-sun/jre/bin/java) instead of the default OpenJDK, so run as root the following:
update-alternatives --config java
Something like the following should appear:
This should be all. To run FrostWire, either type frostwire in a terminal window or type Alt+F2 and write frostwire in the run box that appears.
Updated: July 17, 2009
FrostWire 4.18.0 running in Debian Lenny

Debian Lenny doesn't come with FrostWire included in its repositories, but installing it is very easy if you follow the steps below.
1. Download the DEB package
First, grab the DEB package from the official website and save it to a location on your hard disk. It is the same package for both Debian and Ubuntu.
2. Enable non-free repositories
If those are not enabled yet, use your favourite text editor to edit the /etc/apt/sources.list file as root:
su
nano /etc/apt/sources.list
Then make sure you have a line which says:
deb ftp://ftp.ro.debian.org/debian/ lenny main contrib non-free
Or add it if it's not already there. Make sure to save the sources.list file (Ctrl+O followed by Ctrl+X to exit Nano).
3. Install the Java Runtime Environment
As root, install the sun-java6-jre package:
su
apt-get install sun-java6-jre
4. Install the FrostWire DEB package
Make sure the current working directory is the one where you saved the frostwire-4.18.0.i586.deb package and type as root:
dpkg -i frostwire-4.18.0.i586.deb
FrostWire should be now installed, and there is only one more step left.
5. Select the Java binary
This step is about making the /etc/alternatives/java symbolic link to point to the actual Java binary (/usr/lib/jvm/java-6-sun/jre/bin/java) instead of the default OpenJDK, so run as root the following:
update-alternatives --config java
Something like the following should appear:
# update-alternatives --config javaWhat you need to do is make sure to select the third option, /usr/lib/jvm/java-6-sun/jre/bin/java, and then press Enter.
There are 3 alternatives which provide `java'.
Selection Alternative
-----------------------------------------------
1 /usr/bin/gij-4.3
*+ 2 /usr/lib/jvm/java-gcj/jre/bin/java
3 /usr/lib/jvm/java-6-sun/jre/bin/java
Press enter to keep the default[*], or type selection number: 3
Using '/usr/lib/jvm/java-6-sun/jre/bin/java' to provide 'java'.
This should be all. To run FrostWire, either type frostwire in a terminal window or type Alt+F2 and write frostwire in the run box that appears.
Updated: July 17, 2009
Monday, 29 June 2009
How-To: Compile and Install SMPlayer from Source in Debian Lenny
SMPlayer uses the mplayer engine for displaying videos and it's one of the most powerful and popular video players out there. Built using the Qt 4 toolkit, SMPlayer offers great features and it's highly customisable.
The latest version is 0.6.7, which brings experimental support for DVD menus and several other improvements and bug fixes over the previous release, 0.6.6. Here are several steps to follow in order to build SMPlayer from source in Debian Lenny:
1. Enable the sources repositories
Edit the /etc/apt/sources.list file as root with your favourite text editor (e.g. nano /etc/apt/sources.list or kdesu /etc/apt/sources.list) and make sure you have a line which starts with deb-src, as in the example below:
deb-src ftp://ftp.ro.debian.org/debian/ lenny main contrib non-free
You can replace the TLD with the one of your country (e.g. instead of ro use fi for Finland, de for Germany etc.) Next, update the packages list as root:
apt-get update
2. Install the needed dependencies
As root, type:
apt-get build-dep smplayer
apt-get install devscripts
This will install the tools needed to build SMPlayer and also the development libraries on which it depends.
3. Download the source tarball and uncompress it
Get the latest source for SMPlayer (which is 0.6.7 at the time of writing) from the official website (the file is called smplayer-0.6.7.tar.bz2). To uncompress it, make sure the current working directory is the one where you saved the source and type:
tar -xjf smplayer-0.6.7.tar.bz2
4. Compile and install SMPlayer
Change the working directory to smplayer-0.6.7 and issue the commands:
make QMAKE=/usr/share/qt4/bin/qmake
And to install it type as root:
make install
This should be all. SMPlayer should be inside /usr/local/bin/smplayer.
The latest version is 0.6.7, which brings experimental support for DVD menus and several other improvements and bug fixes over the previous release, 0.6.6. Here are several steps to follow in order to build SMPlayer from source in Debian Lenny:
1. Enable the sources repositories
Edit the /etc/apt/sources.list file as root with your favourite text editor (e.g. nano /etc/apt/sources.list or kdesu /etc/apt/sources.list) and make sure you have a line which starts with deb-src, as in the example below:
deb-src ftp://ftp.ro.debian.org/debian/ lenny main contrib non-free
You can replace the TLD with the one of your country (e.g. instead of ro use fi for Finland, de for Germany etc.) Next, update the packages list as root:
apt-get update
2. Install the needed dependencies
As root, type:
apt-get build-dep smplayer
apt-get install devscripts
This will install the tools needed to build SMPlayer and also the development libraries on which it depends.
3. Download the source tarball and uncompress it
Get the latest source for SMPlayer (which is 0.6.7 at the time of writing) from the official website (the file is called smplayer-0.6.7.tar.bz2). To uncompress it, make sure the current working directory is the one where you saved the source and type:
tar -xjf smplayer-0.6.7.tar.bz2
4. Compile and install SMPlayer
Change the working directory to smplayer-0.6.7 and issue the commands:
make QMAKE=/usr/share/qt4/bin/qmake
And to install it type as root:
make install
This should be all. SMPlayer should be inside /usr/local/bin/smplayer.
Wednesday, 24 June 2009
How-To: Compile and Install Kaffeine 0.8.8 in Debian Lenny
Kaffeine is a powerful video player for KDE, using the Xine engine. The latest KDE3 release is 0.8.8, which fixes some bugs and introduces S2 support.
These are a few steps to follow in order to compile Kaffeine on Debian Lenny (which ships by default with 0.8.7):
1. Make sure the sources repositories are enabled
Edit your /etc/apt/sources.list file as root (e.g. su; nano /etc/apt/sources.list) and make sure a line which starts with deb-src and looks like the one below is available:
deb-src ftp://ftp.ro.debian.org/debian/ lenny main contrib non-free
Next, update the sources lists:
su
apt-get update
2. Download the source code
Get the source from the official homepage, here, then uncompress it:
tar -xjf kaffeine-0.8.8.tar.bz2
3. Install the needed dependencies
As root, type:
apt-get build-dep kaffeine
apt-get install libcdio-paranoia-dev
The library libcdio-paranoia-dev is needed in order to get rid of the error ERROR: Could not find cdparanoia headers.
This will install build-essential and the development libraries needed to compile Kaffeine.
4. Compile and install Kaffeine
Just follow the usual steps:
./configure
make
make install
The last one as root. If you want to install Kaffeine as local user, use:
./configure --prefix=/home/USER/usr
make
make install
No root required for the last command. This should do it.
These are a few steps to follow in order to compile Kaffeine on Debian Lenny (which ships by default with 0.8.7):
1. Make sure the sources repositories are enabled
Edit your /etc/apt/sources.list file as root (e.g. su; nano /etc/apt/sources.list) and make sure a line which starts with deb-src and looks like the one below is available:
deb-src ftp://ftp.ro.debian.org/debian/ lenny main contrib non-free
Next, update the sources lists:
su
apt-get update
2. Download the source code
Get the source from the official homepage, here, then uncompress it:
tar -xjf kaffeine-0.8.8.tar.bz2
3. Install the needed dependencies
As root, type:
apt-get build-dep kaffeine
apt-get install libcdio-paranoia-dev
The library libcdio-paranoia-dev is needed in order to get rid of the error ERROR: Could not find cdparanoia headers.
This will install build-essential and the development libraries needed to compile Kaffeine.
4. Compile and install Kaffeine
Just follow the usual steps:
./configure
make
make install
The last one as root. If you want to install Kaffeine as local user, use:
./configure --prefix=/home/USER/usr
make
make install
No root required for the last command. This should do it.
Saturday, 2 May 2009
How-To: Compile and Install digiKam 0.10 in Debian Sid
digiKam is a popular photo management application for both KDE3 and KDE4. Starting with version 0.10, digiKam offers a KDE4 port too. Here are instructions on how to compile from source and install the latest release in Debian Sid.
1. Install the needed dependencies
First of all, install the tools needed for the compilation. Type as root:
apt-get install build-essential cmake
Get the KDE4 development libraries too:
apt-get install kdelibs5-dev
Now, install the development libraries needed to compile digiKam (that's only one line):
apt-get install libgphoto2-2-dev libkipi6-dev libexiv2-dev libkdcraw7-dev liblcms1-dev libtiff4-dev libpng12-dev libjpeg62-dev libjasper-dev
These should do it.
2. Download the source code
Next, download the tarball from the official website and uncompress it:
tar -xjf digikam-0.10.0.tar.bz2
3. Compile and install digiKam
Change the current working directory to digikam-0.10.0, then compile and install it using these commands:
cmake .
make
make install
The last one as root. This worked for me (I hope I didn't miss any dependencies, if so, please let me know.) DigiKam 0.10 should be now installed.
1. Install the needed dependencies
First of all, install the tools needed for the compilation. Type as root:
apt-get install build-essential cmake
Get the KDE4 development libraries too:
apt-get install kdelibs5-dev
Now, install the development libraries needed to compile digiKam (that's only one line):
apt-get install libgphoto2-2-dev libkipi6-dev libexiv2-dev libkdcraw7-dev liblcms1-dev libtiff4-dev libpng12-dev libjpeg62-dev libjasper-dev
These should do it.
2. Download the source code
Next, download the tarball from the official website and uncompress it:
tar -xjf digikam-0.10.0.tar.bz2
3. Compile and install digiKam
Change the current working directory to digikam-0.10.0, then compile and install it using these commands:
cmake .
make
make install
The last one as root. This worked for me (I hope I didn't miss any dependencies, if so, please let me know.) DigiKam 0.10 should be now installed.
Tuesday, 31 March 2009
How-To: Debian Lenny Minimal Installation
Debian Lenny comes with KDE 3.5.10 and GNOME 2.22, and will install by default the entire GNOME desktop environment and the X Window System. This means many applications which you may never use will also be installed, so here is a solution in order to get only a basic system and then install only the packages you need.
This tutorial will briefly show what you have to do in order to have a basic and minimum Debian installation on your PC.
First, when the installer reaches the window where it asks what software you want to install (like Desktop Environment, Web Server, Basic System etc.), just de-select the Desktop Environment option using the SPACE key, and also make sure the Basic System option remains selected.
After the installation is over, Debian will ask to reboot the computer, then it will boot to a shell login. Login as root, then type the following commands in order to only get the core packages for the X Window System and your desktop environment of choice:
If you want GNOME, type:
apt-get update
apt-get install xserver-xorg-core gdm gnome-core
If you want KDE, type:
apt-get update
apt-get install xserver-xorg-core kdm kde-core
Either of those commands will only install a minimum needed for running Debian graphically, so you will be able after that to install only the applications which you actually need.
gdm and kdm stand for GNOME Display Manager and, respectively, K Display Manager and they are, as the name suggests, the login applications for GNOME and KDE. gnome-core and kde-core will only fetch and install the basic libraries and applications needed to run GNOME and, respectively, KDE. This means that in KDE, for example, only applications like KControl, Kate or Konqueror (but not applications like noatun or kdegames) will be installed. You then get to choose which image viewer, music and video players will install.
Next, to start the X Server, use one of the commands as root:
If you installed GNOME and GDM:
/etc/init.d/gdm start
If you installed KDE and KDM:
/etc/init.d/kdm start
If the X server fails to start, try, as root:
dpkg-reconfigure xserver-xorg
And specify the driver vesa in section Device inside the /etc/X11/xorg.conf file. You may need to install the specific video driver for your video card.
Notice that you can also install any other (read: lighter) desktop environments, like Xfce or even Enlightenment for example.
Notice: This is a later, revised version of the tutorial I initially posted here.
This tutorial will briefly show what you have to do in order to have a basic and minimum Debian installation on your PC.
First, when the installer reaches the window where it asks what software you want to install (like Desktop Environment, Web Server, Basic System etc.), just de-select the Desktop Environment option using the SPACE key, and also make sure the Basic System option remains selected.
After the installation is over, Debian will ask to reboot the computer, then it will boot to a shell login. Login as root, then type the following commands in order to only get the core packages for the X Window System and your desktop environment of choice:
If you want GNOME, type:
apt-get update
apt-get install xserver-xorg-core gdm gnome-core
If you want KDE, type:
apt-get update
apt-get install xserver-xorg-core kdm kde-core
Either of those commands will only install a minimum needed for running Debian graphically, so you will be able after that to install only the applications which you actually need.
gdm and kdm stand for GNOME Display Manager and, respectively, K Display Manager and they are, as the name suggests, the login applications for GNOME and KDE. gnome-core and kde-core will only fetch and install the basic libraries and applications needed to run GNOME and, respectively, KDE. This means that in KDE, for example, only applications like KControl, Kate or Konqueror (but not applications like noatun or kdegames) will be installed. You then get to choose which image viewer, music and video players will install.
Next, to start the X Server, use one of the commands as root:
If you installed GNOME and GDM:
/etc/init.d/gdm start
If you installed KDE and KDM:
/etc/init.d/kdm start
If the X server fails to start, try, as root:
dpkg-reconfigure xserver-xorg
And specify the driver vesa in section Device inside the /etc/X11/xorg.conf file. You may need to install the specific video driver for your video card.
Notice that you can also install any other (read: lighter) desktop environments, like Xfce or even Enlightenment for example.
Notice: This is a later, revised version of the tutorial I initially posted here.
Tuesday, 24 March 2009
How-To: Compile and Install Banshee 1.4.3 in Debian Lenny
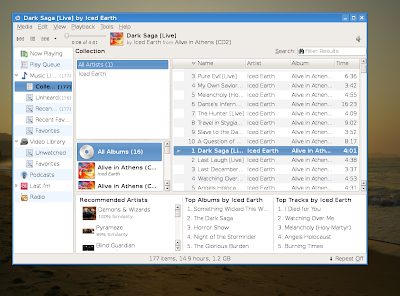
Banshee is a popular audio player written using the GTK toolkit. Currently at version 1.4.3, Banshee is a good alternative to players like Rhythmbox or Exaile for GNOME or Amarok for KDE.
This release comes with improved MTP (media transfer protocol) support and several bug fixes.
Here are several easy to follow steps for compiling Banshee on Debian Lenny (since Debian comes with Banshee 1.0):
Notice that iPod support will not be available!
1. Install the tools needed for compilation
Type in a terminal as root:
apt-get install build-essential
2. Install the dependencies
Make sure the sources repositories are enabled in the /etc/apt/sources.list file (you should have a line which starts with deb-src, like deb-src ftp://ftp.ro.debian.org/debian/ lenny main contrib non-free) and then issue the following commands as root:
apt-get update
apt-get build-dep banshee
3. Download the source tarball
Download the tarball from the official website, here (direct link), then uncompress it:
tar -xjf banshee-1-1.4.3.tar.bz2
4. Compile and install Banshee
Issue the following commands inside the banshee-1-1.4.3 directory:
./configure --disable-ipod
make
make install
The last one as root.
Although I tried to install Banshee as normal user too (using ./configure --prefix), I've got an error when it was still trying to write to /usr so I'm not sure whether it can be installed as normal user this way.
You can run Banshee by pressing ALT+F2 and typing banshee-1 in the Run dialogue that appears.
To uninstall it, just issue the command make uninstall as root from inside the banshee-1-1.4.3 directory.
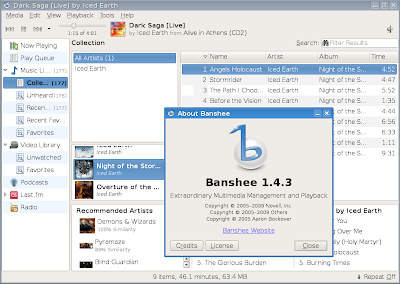
This release comes with improved MTP (media transfer protocol) support and several bug fixes.
Here are several easy to follow steps for compiling Banshee on Debian Lenny (since Debian comes with Banshee 1.0):
Notice that iPod support will not be available!

1. Install the tools needed for compilation
Type in a terminal as root:
apt-get install build-essential
2. Install the dependencies
Make sure the sources repositories are enabled in the /etc/apt/sources.list file (you should have a line which starts with deb-src, like deb-src ftp://ftp.ro.debian.org/debian/ lenny main contrib non-free) and then issue the following commands as root:
apt-get update
apt-get build-dep banshee
3. Download the source tarball
Download the tarball from the official website, here (direct link), then uncompress it:
tar -xjf banshee-1-1.4.3.tar.bz2
4. Compile and install Banshee
Issue the following commands inside the banshee-1-1.4.3 directory:
./configure --disable-ipod
make
make install
The last one as root.
Although I tried to install Banshee as normal user too (using ./configure --prefix), I've got an error when it was still trying to write to /usr so I'm not sure whether it can be installed as normal user this way.
You can run Banshee by pressing ALT+F2 and typing banshee-1 in the Run dialogue that appears.
To uninstall it, just issue the command make uninstall as root from inside the banshee-1-1.4.3 directory.

Monday, 12 January 2009
How-To: Compile and Install Code::Blocks from Source in Debian Lenny
Code::Blocks is a complete, cross-platform integrated development environment for C and C++, built using the wxWidgets toolkit. Code::Blocks is available on Linux, Windows and OS X, so you may find it useful on Linux if you switched and are already used to it or an IDE like Dev-C++, for example.

The last stable version is 8.02, and was released almost an year ago. Since Code::Blocks is not included in the Debian repositories, I will show in this tutorial how to compile and install it from source in Lenny, the upcoming stable Debian release. Just follow the steps below:
1. Download the source and uncompress it
Download the source code from the official website, here, then make sure to switch the current directory to the one where you saved the source and uncompress it using the following command:
tar -xjf codeblocks-8.02-src.tar.bz2
2. Install the needed dependencies
This should be easy since only a few dependencies are needed. First, make sure you have the build-essential meta-package installed, which contains tools like make or g++, needed for compilation:
su
apt-get install build-essential
Next, install the development packages needed by Code::Blocks:
su
apt-get install wx-common libwxgtk2.8-dev libgtk2.0-dev
You will also need package zip to build it:
apt-get install zip
3. Update wx-config to point to wxWidgets 2.8
Issue the following command as root:
update-alternatives --config wx-config
What appears should look something like this:
# update-alternatives --config wx-config
There are 4 alternatives which provide `wx-config'.
Selection Alternative -----------------------------------------------
1 /usr/lib/wx/config/base-unicode-release-2.6 +
2 /usr/lib/wx/config/gtk2-unicode-release-2.6
3 /usr/lib/wx/config/base-unicode-release-2.8
* 4 /usr/lib/wx/config/gtk2-unicode-release-2.8
Press enter to keep the default[*], or type selection number:
4 Using '/usr/lib/wx/config/gtk2-unicode-release-2.8' to provide 'wx-config'.
Select option 4 from the list, that is /usr/lib/wx/config/gtk2-unicode-release-2.8
4. Compile from source and install
Make sure the working directory is the uncompressed source of Code::Blocks (codeblocks-8.02) and issue the usual commands:
./configure
make
make install
The last one as root.
5. Run ldconfig as root
Finally, run the ldconfig utility as root to update the links to shared libraries:
su
ldconfig
Code::Blocks should be now properly installed in /usr/local/bin/ and you can run it using codeblocks from a terminal or from a run dialogue (ALT+F2 and type codeblocks in KDE and GNOME).


Related articles
Compiling C/C++ Code in Ubuntu and Available IDEs
Running Google Chrome Under Wine 1.1.6 in Debian
Create a Launcher in KDE3

The last stable version is 8.02, and was released almost an year ago. Since Code::Blocks is not included in the Debian repositories, I will show in this tutorial how to compile and install it from source in Lenny, the upcoming stable Debian release. Just follow the steps below:
1. Download the source and uncompress it
Download the source code from the official website, here, then make sure to switch the current directory to the one where you saved the source and uncompress it using the following command:
tar -xjf codeblocks-8.02-src.tar.bz2
2. Install the needed dependencies
This should be easy since only a few dependencies are needed. First, make sure you have the build-essential meta-package installed, which contains tools like make or g++, needed for compilation:
su
apt-get install build-essential
Next, install the development packages needed by Code::Blocks:
su
apt-get install wx-common libwxgtk2.8-dev libgtk2.0-dev
You will also need package zip to build it:
apt-get install zip
3. Update wx-config to point to wxWidgets 2.8
Issue the following command as root:
update-alternatives --config wx-config
What appears should look something like this:
# update-alternatives --config wx-config
There are 4 alternatives which provide `wx-config'.
Selection Alternative -----------------------------------------------
1 /usr/lib/wx/config/base-unicode-release-2.6 +
2 /usr/lib/wx/config/gtk2-unicode-release-2.6
3 /usr/lib/wx/config/base-unicode-release-2.8
* 4 /usr/lib/wx/config/gtk2-unicode-release-2.8
Press enter to keep the default[*], or type selection number:
4 Using '/usr/lib/wx/config/gtk2-unicode-release-2.8' to provide 'wx-config'.
Select option 4 from the list, that is /usr/lib/wx/config/gtk2-unicode-release-2.8
4. Compile from source and install
Make sure the working directory is the uncompressed source of Code::Blocks (codeblocks-8.02) and issue the usual commands:
./configure
make
make install
The last one as root.
5. Run ldconfig as root
Finally, run the ldconfig utility as root to update the links to shared libraries:
su
ldconfig
Code::Blocks should be now properly installed in /usr/local/bin/ and you can run it using codeblocks from a terminal or from a run dialogue (ALT+F2 and type codeblocks in KDE and GNOME).


Related articles
Compiling C/C++ Code in Ubuntu and Available IDEs
Running Google Chrome Under Wine 1.1.6 in Debian
Create a Launcher in KDE3
Subscribe to:
Posts (Atom)