Clementine 0.5 in Kubuntu 10.10 Maverick Beta
Sunday, 26 September 2010
Clementine 0.5: New and Improved KDE4 Port of Amarok 1.4
Clementine is a port to KDE4 of one of the most beloved music players on Linux, Amarok 1.4. The latest release brings several new features, including iPod, MTP and USB mass storage disks support, queue manager, support for Wii Remote to control it, and numerous bug fixes to already existing features.
Labels:
amarok,
audio,
clementine,
kde,
review
Shotwell - The New Photo Manager in Ubuntu 10.10
As many of you already know, Shotwell will replace F-Spot in the next Ubuntu release, Maverick Meerkat, which is scheduled for October 10. Shotwell is a GTK photo management application which organizes your photos in a collection, allows them to be tagged and rated, and more.
Shotwell 0.7.2 in Ubuntu 10.10 Maverick Meerkat Beta
Very Nice Music Player for GNOME: Decibel Audio Player
Decibel is a music player built in GTK which takes a different approach when it comes to the way features are implemented, and that is, Decibel uses only plug-ins which can be enabled or disabled on demand. This makes it either a pretty featured player, or a very simple and basic one, depending on which plug-ins you need enabled.
Decibel integrates well in GNOME and follows its HIG
Krita - The KDE Answer to GIMP
I was recently browsing through various Linux news sites and bumped into this article, a taste of a comic done in Krita, the KDE painting and image editor application, which is part of the KOffice suite. Now I rarely use image editors, and I'm totally untalented at it, but when I do, I use GIMP for basic cropping, coloring or other simple stuff. Anyway, I remembered I only tried Krita once, in KDE 3, and I was a little dissatisfied with it (can't remember exactly why), so at the time I decided to stay with GIMP. This is why this article brought Krita again in my attention, so I decided to give it a spin and see how it looks like.
Monday, 20 September 2010
Collection of 18 Popular APT & DPKG Tips for Debian and Ubuntu
This is a guide containing the most popular and useful ways of using the APT and DPKG commands, and it applies to both Ubuntu and Debian (and their derivatives). I mentioned where super user privileges are required, the ones without a mention can be executed as normal user. If you're using Ubuntu, precede a command with sudo in order to gain root privileges (and enter your user password); on Debian, type su, enter the root password, and then type in the commands as shown below.
dpkg -L package_name
This command will show what files package_name installed on your computer. Notice that this works only for already installed packages. Example:
embryo@debian:~$ dpkg -L vorbis-tools
/.
/usr
/usr/bin
/usr/bin/ogg123
apt-get build-dep package_name
(needs root privileges)
This is a very useful command, which will install all the development libraries needed by an application. So if you need to compile a newer version of a program than the one included in the repositories, use this command to fetch the dependencies. Notice that the libraries installed will be for the current version coming with the repositories, so you may need to install additional libraries if needed. However, this usually works for most of the applications. Example:
apt-get build-dep wesnoth
This will fetch all the development packages needed for Wesnoth. Keep in mind that your sources repositories must be enabled (they are enabled by default in Ubuntu).
apt-get clean (and apt-get autoclean)
(needs root privileges)
This command will remove the archives installed on your system. Whenever you install a package, it is downloaded and the DEB package is kept inside the /var/cache/apt/archives/ directory. This command removes those packages, freeing up space.
apt-get clean
apt-get autoclean
Regarding apt-get autoclean: this command will remove only the archives which are no longer available in the repositories, and will keep the ones which are currently available. Helpful if you want to get rid of old archives which have been updated, but still want to keep the upgraded ones just in case. To see how much space the archive occupy, use du -h (the -h argument stands for human readable, so it will show sizes in human readable format):
du -h /var/cache/apt/archives/
apt-cache show package_name
Will show information about any package in the repository. You only have to type in the name of it, not the entire name and version. Example:
embryo@debian:~$ apt-cache show vorbis-tools
Package: vorbis-tools
Priority: optional
Section: sound
Installed-Size: 580
...
apt-cache search pattern
Will search and list all the packages which contain pattern in their name or in their description. You can pipe this with grep for more relevant results:
embryo@debian:~$ apt-cache search gnome terminal|grep terminal
gmfsk - MFSK, RTTY and other digital mode terminal for HF/amateur radio
gnome-terminal-data - Data files for the GNOME terminal emulator
gnome-terminal - The GNOME 2 terminal emulator application
apt-get update && apt-get upgrade
(needs root privileges)
This is a one-liner to update your packages list and upgrade your system. Since it requires root privileges, if your distribution is Ubuntu use sudo apt-get update && sudo apt-get upgrade. Notice that the second command (after the double ampersand) is executed only if the first one was successful, so if fetching any of the lists fails, the second command will not be executed. If you're running a testing or beta release, use instead the following:
sudo apt-get update && sudo apt-get dist-upgrade
This will fetch updates even if they depend on newer packages.
dpkg --get-selections
This command will list all the packages installed on a system using the package manager. Example:
embryo@debian:~$ dpkg --get-selections
acpi-support-base install
acpid install
adduser install
akregator install
...
dpkg -S filename
Will list the packages which install filename. Example:
embryo@debian:~$ dpkg -S oggenc
vorbis-tools: /usr/share/man/man1/oggenc.1.gz
vorbis-tools: /usr/bin/oggenc
embryo@debian:~$
apt-get autoremove
(needs root privileges)
This command will remove unnecessary packages (e.g. orphaned packages), which are no longer needed by any of the packages installed in the system. This happens often after you uninstall a certain application, and its dependencies still remain installed on the system. Use this command to get rid of them.
apt-cache dump
This command will list every package in the cache.
apt-cache depends package_name
A very useful command which lists every dependency a package has, including recommended packages.
embryo@debian:~$ apt-cache depends vorbis-tools
vorbis-tools
Depends: libao2
Depends: libc6
Depends: libcurl3-gnutls
...
apt-cache rdepends package_name
Will show dependencies in reversed order, that is, it will list all the packages which depend on the specified package.
apt-cache rdepends mplayer
apt-cache policy package_name
This will list the repository in which a package is located. In Ubuntu, there are four such repositories: main, restricted, universe and multiverse. Debian has main, contrib and non-free. There is a certain policy for each package, and depending on that, the package is included in one of the specified repositories.
apt-cache policy amarok
apt-cache policy sun-java6-jre
apt-cache showsrc package_name
Will show information about a package source.
apt-get -f install
(needs root privileges)
Will try to fix broken dependencies. This usually comes in handy if you try to manually install a DEB package without installing first its dependencies. Run apt-get -f install to fix the missing dependencies and try to install the package again.
apt-cdrom add
(needs root privileges)
Will add a CD ROM to your sources, so you can install packages from it. This command is mostly useful if you have some ISO images, which you don't want to burn to a CD. In order to scan the ISO images, use:
apt-cdrom -d=/cdrom add
This will mount the ISO image inside the /cdrom directory, and then add its contents to the sources.list. Notice that the /cdrom directory has to be empty. You can use any empty directory for this:
apt-cdrom -d=/home/USER/mydir
dpkg -c local_file.deb
The -c argument tells dpkg to list the contents of a DEB package. Example:
embryo@debian:~$ dpkg -c google-chrome-stable_current_i386.deb
...
drwxr-xr-x root/root 0 2010-07-30 23:54 ./usr/share/man/man1/
-rwxr-xr-x root/root 3098 2010-07-30 23:54 ./usr/share/man/man1/google-chrome.1
lrwxrwxrwx root/root 0 2010-07-30 23:54 ./usr/bin/google-chrome -> /opt/google/chrome/google-chrome
dpkg -f local_file.deb
This shows the control file for a binary package. A control file is a file which provides information to the package manager about dependencies, maintainer, homepage, description, and more.
embryo@debian:~$ dpkg -f google-chrome-stable_current_i386.deb
Package: google-chrome-stable
Version: 5.0.375.126-r53802
...
These are the most popular uses of APT and DPKG. Have some more? Please, share them!
Yet Another Music Player for Linux: Foobnix
When it comes to music players, Linux evolved heavily during the last three or four years, and new players are announced on a regular basis. I remember that in 2006, when I was starting up with Linux, there were only a few applications to choose from, like Amarok, Rhythmbox, Listen or XMMS, and a few more less popular and not so full-featured. But times have changed and now the Linux platform benefits from players of all kinds: there are replacements for XMMS for both GNOME and KDE (Audacious and Qmmp), collection-oriented players like Amarok, Banshee, Exaile or Rhythmbox. There are less-known players like Quod Libet, Guayadeque or Jajuk, or the client-server oriented ones like MPD. And the ones I just listed are only the ones which came to my mind at the moment. Some would say having so many players for a single task is a bad thing, but I say it's not. Having enough options to choose from is a great advantage. If you don't like one style, try the next player, if you don't like its approach either, try the next one, and so on.
Considering that over time I reviewed probably over 80% of the players available out there, it's time to get in touch with a new one, namely, Foobnix.
Foobnix is a pretty basic player written in GTK which takes a somewhat different approach organizing the music collection. That is, it organizes the music found in the selected directories in a tree structure. Take a look at the screenshot below:
The screenshot shows the usual Foobnix interface, having the playlist on the right side and the music organized in a tree-like structure to the left. Another thing to notice is the simple and clean organization of the widgets, especially how the menu bar and the control buttons are organized on a single level, at the top of the player window.
Here are some of the features which come with Foobnix:
- tree-like music list
- online music search panel
- lyrics fetching
- album cover fetching
- info panel
- Last.fm song submission
- tray integration, clicking the tray icon shows the user control buttons, including previous and next track
- global hotkeys support
- online radios support
Foobnix looks pretty good. I think the widget spacing needs a little more attention though, because having the lyrics or info panel enabled will put the top of them over the title of the currently playing song, but other than that, it's a very clean and pretty intuitive interface. Also, the option to change the disc cover size in the Preferences window doesn't seem to work.
Regarding features, it currently can't compare with players which offer all the bells and whistles, but it looks promising if development continues.
The only big problem I encountered with Foobnix was regarding several application freezes when performing certain actions, like using the online music search function. Right-clicking the tray icon will show the control buttons, but to make it go away you have to press the OK button, which is not quite a feature. Let's hope these coding problems will be soon solved.
All in all, it's not necessarily a 'must-try' application, and it has a fair share of bugs, but it can fit enough users who will like how the music is organized, or the clean, plain interface.
Considering that over time I reviewed probably over 80% of the players available out there, it's time to get in touch with a new one, namely, Foobnix.
Foobnix is a pretty basic player written in GTK which takes a somewhat different approach organizing the music collection. That is, it organizes the music found in the selected directories in a tree structure. Take a look at the screenshot below:
The screenshot shows the usual Foobnix interface, having the playlist on the right side and the music organized in a tree-like structure to the left. Another thing to notice is the simple and clean organization of the widgets, especially how the menu bar and the control buttons are organized on a single level, at the top of the player window.
Here are some of the features which come with Foobnix:
- tree-like music list
- online music search panel
- lyrics fetching
- album cover fetching
- info panel
- Last.fm song submission
- tray integration, clicking the tray icon shows the user control buttons, including previous and next track
- global hotkeys support
- online radios support
Lyrics and info panels
Foobnix looks pretty good. I think the widget spacing needs a little more attention though, because having the lyrics or info panel enabled will put the top of them over the title of the currently playing song, but other than that, it's a very clean and pretty intuitive interface. Also, the option to change the disc cover size in the Preferences window doesn't seem to work.
Regarding features, it currently can't compare with players which offer all the bells and whistles, but it looks promising if development continues.
The only big problem I encountered with Foobnix was regarding several application freezes when performing certain actions, like using the online music search function. Right-clicking the tray icon will show the control buttons, but to make it go away you have to press the OK button, which is not quite a feature. Let's hope these coding problems will be soon solved.
All in all, it's not necessarily a 'must-try' application, and it has a fair share of bugs, but it can fit enough users who will like how the music is organized, or the clean, plain interface.
Sunday, 19 September 2010
What Makes Debian One of the Most Popular Distros Out There: 5 Good Reasons
Debian is one of the oldest and most popular distributions among the Linux users. There are probably hundreds of distributions which are based on Debian, or others which are based on distributions which in turn are based on Debian. Although I'm not a Debian developer, I use it for over two years or so, and slowly got to love this OS.
This is not a 'Debian is better than X' article, it's just about Debian alone. So, let's proceed and see what makes Debian so popular and loved among the Linux users.
Stability. I know as a Debian or Ubuntu (or why not, some other distribution) user you probably heard this a million times. But yes, stability. Debian is renowned for the fact that its 'stable' version is always released only if all known critical bugs have been fixed and it's been stripped from most of the ones with a lower priority. When you install Debian stable you have the certitude that it will not give you a headache, that it is secure and that all the tools and daemons will work the right way. There is a reason for which Debian is used by so many web hosting companies as their preferred Linux distribution for their servers.
Huge community. From a user's point of view, especially a tech-oriented one, having enough persons from which at least one will know the answer is a blessing. There are the Debian mailing lists, the IRC channels (both the official OFTC one and the Freenode one), the forums. And why not say it, UbuntuForums.org does a great job too in helping Debian. How's that?, you may ask. Well, Ubuntu is so popular and used by so many people that on the online forums you can get a straight, good answer to a question in minutes. And since Ubuntu is based on Debian, over 90% of the questions which apply for Ubuntu will apply for Debian too.
Good documentation. I'm talking here books and books of official online documentation. We have the Debian Wiki, we have powerful manuals written by professionals, and to list some, here are the New Maintainers' Guide, the Debian Policy Manual or the Debian Packing Manual.To say nothing about all the third-party help sites, news sites, blogs and articles referring to Debian. This makes Debian a very rich-documented distribution, and knowing help is out there if you do a little reading is a key aspect for any user.
Debian Free Software Guidelines. The social contract is a major aspect which affected how Debian developed and continues to be developed. Debian is one of the distributions which follow a very specific code from which there is no straying. Debian will always be 100% free, it will be open, it will fulfill the community needs and it will respect the free software standards.
Debian fits perfectly both as desktop or as web server. With high security and stability standards, Debian makes the perfect fit for a web server. But Debian comes with over 17,000 from which a huge amount is made by GUI applications, desktop environments and many other user-friendly tools.
And the list goes on. The true power of Debian lies not only in the few points I listed here, but in its users and mentality. Software done this way will always be there, because it relies on an entire community to survive, and as long as the community is there, then so is Debian. A proof to this is that Debian has been around almost since the beginning of Linux, in 1993, when Ian Murdock, founder of Debian, announced the availability of Debian on August 16, and together with Slackware or Red Hat, it is at the top of the pyramid regarding tradition in the Linux world.
How-To: Install Dillo Web Browser in Ubuntu Maverick Beta
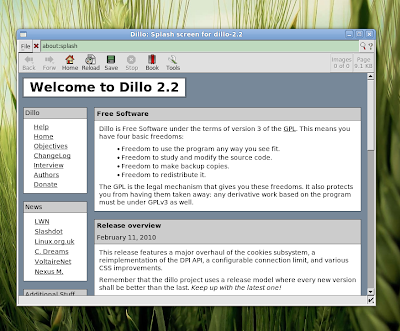
Dillo is a simplistic, minimal web browser built using the FLTK2 (Fast Light Toolkit) library, designed especially for a minimal load on resources. It is used successfully by various distributions out there that aim to stay small and fast (the last time I checked it was included in Damn Small Linux for example).
I decided to make a review of Dillo (in the past I reviewed version 2.0 here) but realized that currently Dillo is not included in the Ubuntu Maverick repositories. So this is why I set out to make first a short how-to on how to install it in Maverick. Considering you will also need to compile and install FLTK2 in order to compile Dillo (because the repositories include FLTK 1.1, but not FLTK 2.0), we will use a DEB package to install it. Just follow the steps below.
Download the DEB package from the Dillo PPA archive (direct link) and save it somewhere on your hard disk. Now open a terminal, make sure the currently working directory is the one where you saved it (use the pwd command to print the working directory) and type:
sudo dpkg -i dillo_2.2-0+dillo1~karmic1_i386.deb
That's it! To start Dillo, press Alt+F2 and type dillo in the run box that appears.
Note: This tutorial probably applies for older Ubuntu releases too.
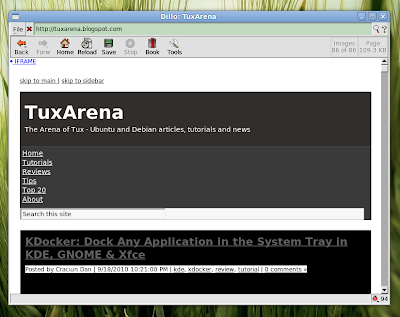
Dillo 2.2 - the minimalist and fast web browser for Linux
I decided to make a review of Dillo (in the past I reviewed version 2.0 here) but realized that currently Dillo is not included in the Ubuntu Maverick repositories. So this is why I set out to make first a short how-to on how to install it in Maverick. Considering you will also need to compile and install FLTK2 in order to compile Dillo (because the repositories include FLTK 1.1, but not FLTK 2.0), we will use a DEB package to install it. Just follow the steps below.
Download the DEB package from the Dillo PPA archive (direct link) and save it somewhere on your hard disk. Now open a terminal, make sure the currently working directory is the one where you saved it (use the pwd command to print the working directory) and type:
sudo dpkg -i dillo_2.2-0+dillo1~karmic1_i386.deb
That's it! To start Dillo, press Alt+F2 and type dillo in the run box that appears.
Note: This tutorial probably applies for older Ubuntu releases too.
Saturday, 18 September 2010
KDocker: Dock Any Application in the System Tray in KDE, GNOME & Xfce
I bet at one point or another you felt you missed the system tray integration feature in some application, be it xterm, an audio player, a file manager or any other program. Well, KDocker is just the thing which comes to help: a simple, yet practical docking application built for KDE4 (older KDE3 version can be found here), but not only. Let me tell you how to use this program in a productive and useful manner.
KDocker is a docking application for KDE4 which allows you to dock any application in the system tray. The great thing about KDocker is that it works not only in KDE, but also in GNOME, Xfce and other window managers which are compliant with the NET WM standard.
The project is hosted on Launchpad, being actively developed, with the latest version (4.4) released earlier this year, on July 17. To install it in Ubuntu, type in a terminal sudo apt-get install kdocker, then launch it by pressing Alt+F2 and typing kdocker in the run dialogue window that appears.
Here's how to use: first, start it, then select the window which you want to dock. Below is a screenshot of xterm docked in the system tray using KDocker:
Here are several options KDocker provides besides only docking applications:
- it allows to skip the taskbar or the pager (so the application is not shown on the taskbar/pager)
- make the window sticky
- iconify when minimized/obscured or focus is lost or on close
- show a balloon when the window title changes
Now, one of the real uses KDocker provides is the ability to run it as a command, e.g. kdocker application_name and eventually create a desktop shortcut to this command, or make it start at the login. For example, creating a desktop shortcut in KDE to automatically start Konsole and put it in the system tray can be done like this:
First, create a file on the desktop (well, on the Desktop Folder widget actually) called anything.desktop (or whatever name you like, but with the .desktop extension). Put the following content in it:
[Desktop Entry]
Exec=kdocker konsole
Icon=konsole
Name=Konsole (Docked)
Type=Application
Comment=Console
And save the file. Now, you can click that desktop shortcut to launch Konsole in the system tray.
Let's say you want to launch a terminal-based application inside Konsole, which should be docked in the system tray. The example that follows is for Midnight Commander, the powerful file manager with a text user interface:
[Desktop Entry]
Exec=kdocker konsole -e mc
Icon=konsole
Name=Konsole (Docked)
Type=Application
Comment=Console
The -e argument tells Konsole to execute the command mc after starting.
Have some more uses for KDocker? Please share in the comments below.
KDocker 4.3 docking an xterm instance
KDocker is a docking application for KDE4 which allows you to dock any application in the system tray. The great thing about KDocker is that it works not only in KDE, but also in GNOME, Xfce and other window managers which are compliant with the NET WM standard.
The project is hosted on Launchpad, being actively developed, with the latest version (4.4) released earlier this year, on July 17. To install it in Ubuntu, type in a terminal sudo apt-get install kdocker, then launch it by pressing Alt+F2 and typing kdocker in the run dialogue window that appears.
Here's how to use: first, start it, then select the window which you want to dock. Below is a screenshot of xterm docked in the system tray using KDocker:
Here are several options KDocker provides besides only docking applications:
- it allows to skip the taskbar or the pager (so the application is not shown on the taskbar/pager)
- make the window sticky
- iconify when minimized/obscured or focus is lost or on close
- show a balloon when the window title changes
KDocker options
Now, one of the real uses KDocker provides is the ability to run it as a command, e.g. kdocker application_name and eventually create a desktop shortcut to this command, or make it start at the login. For example, creating a desktop shortcut in KDE to automatically start Konsole and put it in the system tray can be done like this:
First, create a file on the desktop (well, on the Desktop Folder widget actually) called anything.desktop (or whatever name you like, but with the .desktop extension). Put the following content in it:
[Desktop Entry]
Exec=kdocker konsole
Icon=konsole
Name=Konsole (Docked)
Type=Application
Comment=Console
Create a .desktop launcher to anything you want to dock
And save the file. Now, you can click that desktop shortcut to launch Konsole in the system tray.
Let's say you want to launch a terminal-based application inside Konsole, which should be docked in the system tray. The example that follows is for Midnight Commander, the powerful file manager with a text user interface:
[Desktop Entry]
Exec=kdocker konsole -e mc
Icon=konsole
Name=Konsole (Docked)
Type=Application
Comment=Console
The -e argument tells Konsole to execute the command mc after starting.
Launching Midnight Commander in Konsole and docking it in the system tray
Have some more uses for KDocker? Please share in the comments below.
Banshee 1.7.5 Review in Ubuntu Maverick Beta
Being actively developed, feature-rich, providing access to several useful Internet services and with a pretty decent media library, Banshee has a pretty fair share of users, and it is definitely a powerful music player not to be ignored.
Although Banshee includes support for both audio and video files, and comes with a video library too, its well-known and popular for its music playing capabilities rather than video playback.
The version I'm going to talk about is 1.7.5 (for some reason I couldn't get 1.7.6 to compile in Ubuntu 10.10 Beta - if you can help, I'd be grateful), released on September 1, 2010, which ships in Ubuntu 10.10 Maverick Beta.
Banshee improved a lot since the last time I reviewed it, which was over an year ago, back when the version was 1.6 beta. For those who never tried it, here are the main features:
- music library
- support for podcasts
- Internet radio support
- smart playlists
- integrated access to Amazon MP3 store
- Last.fm song submission and Last.fm radio (since the Last.fm radio service became paid a while ago, you will need to have a subscriber account for the radio to work)
- fast access to Miro guide, a website which allows to search and download videos
- cover fetching from the Internet
- system tray support, with a nice mouse-over info report and the ability to control Banshee by right-clicking the tray icon (this includes rating the currently playing song, play next or previous, pause, repeat or shuffle)
- built using GTK2, so it blends well into the GNOME browser
Just a mention about the Amazon MP3 store: it looks like by default either the geo IP detection is not working properly or Germany is selected. To change this, go to Edit->Preferences, click the Source Specific tab in the window that appears, select the Amazon MP3 Store entry in the Source list box, and then select the desired country:
Banshee allows the user to configure several aspects, like gapless playback (to get rid of the short gap on track change), collection organization, services, and enable/disable various extensions. Which are actually quite impressing: Banshee includes Wikipedia extension, Audio CD extension, Internet radio, Podcasts, iPod support, Last.fm, Mini Mode and Notification, these to only list a few. The Mini Mode is quite a delight actually, for those who need just a small window, so it doesn't take up to the whole desktop space:
Smart playlists, the 5-star rating system and the tag editor are another pluses for this great player.
Again, it seems to me that fetching local covers doesn't work properly (or maybe it is not a feature at all?) I tried to open a video file, play it, pause it after a while and then hit the play button ago. At this point instead of continuing the video Banshee started to play the song that was playing before opening the video. In my sole opinion (and this is not only Banshee-specific), having a single button for play/pause is not the best idea. I also bumped into a balloon message reading "Please move your music to /home/embryo/Music" and changing the music directory in the preferences didn't make it go away. I think this is a little inappropriate, since I like my music where it is (and that is not /home/embryo/Music). This has also been reported as a bug on for Maverick here.
Other than that: I found Banshee's usability far greater than some other audio players. Believe me or not, over 50% of the music players for Linux that I tested didn't have a keyboard shortcut to focus the track search field. Banshee uses Alt+S for this.
To conclude, Banshee's state is currently as it has always been in the past two years or so: a very good player, pretty stable now, with a lot of features, which can be a the perfect replacement for other GNOME collection-oriented players, like Rhythmbox.
Although Banshee includes support for both audio and video files, and comes with a video library too, its well-known and popular for its music playing capabilities rather than video playback.
Banshee 1.7.5 in Ubuntu 10.10 Maverick Beta
The version I'm going to talk about is 1.7.5 (for some reason I couldn't get 1.7.6 to compile in Ubuntu 10.10 Beta - if you can help, I'd be grateful), released on September 1, 2010, which ships in Ubuntu 10.10 Maverick Beta.
Banshee improved a lot since the last time I reviewed it, which was over an year ago, back when the version was 1.6 beta. For those who never tried it, here are the main features:
- music library
- support for podcasts
- Internet radio support
- smart playlists
- integrated access to Amazon MP3 store
- Last.fm song submission and Last.fm radio (since the Last.fm radio service became paid a while ago, you will need to have a subscriber account for the radio to work)
- fast access to Miro guide, a website which allows to search and download videos
- cover fetching from the Internet
- system tray support, with a nice mouse-over info report and the ability to control Banshee by right-clicking the tray icon (this includes rating the currently playing song, play next or previous, pause, repeat or shuffle)
- built using GTK2, so it blends well into the GNOME browser
Just a mention about the Amazon MP3 store: it looks like by default either the geo IP detection is not working properly or Germany is selected. To change this, go to Edit->Preferences, click the Source Specific tab in the window that appears, select the Amazon MP3 Store entry in the Source list box, and then select the desired country:
Banshee allows the user to configure several aspects, like gapless playback (to get rid of the short gap on track change), collection organization, services, and enable/disable various extensions. Which are actually quite impressing: Banshee includes Wikipedia extension, Audio CD extension, Internet radio, Podcasts, iPod support, Last.fm, Mini Mode and Notification, these to only list a few. The Mini Mode is quite a delight actually, for those who need just a small window, so it doesn't take up to the whole desktop space:
Banshee in Mini Mode
Smart playlists, the 5-star rating system and the tag editor are another pluses for this great player.
Again, it seems to me that fetching local covers doesn't work properly (or maybe it is not a feature at all?) I tried to open a video file, play it, pause it after a while and then hit the play button ago. At this point instead of continuing the video Banshee started to play the song that was playing before opening the video. In my sole opinion (and this is not only Banshee-specific), having a single button for play/pause is not the best idea. I also bumped into a balloon message reading "Please move your music to /home/embryo/Music" and changing the music directory in the preferences didn't make it go away. I think this is a little inappropriate, since I like my music where it is (and that is not /home/embryo/Music). This has also been reported as a bug on for Maverick here.
Other than that: I found Banshee's usability far greater than some other audio players. Believe me or not, over 50% of the music players for Linux that I tested didn't have a keyboard shortcut to focus the track search field. Banshee uses Alt+S for this.
Playing a video
To conclude, Banshee's state is currently as it has always been in the past two years or so: a very good player, pretty stable now, with a lot of features, which can be a the perfect replacement for other GNOME collection-oriented players, like Rhythmbox.
Guide to Using Finch - Terminal-Based Chat Client
Finch is a TUI (text user interface) IM client for Linux which uses libpurple, the same library on which the GNOME IM client Pidgin is based on. Usually, if you have Pidgin installed, you should have Finch too, unless Pidgin was compiled with the text interface option disabled. In addition to this, Finch supports every protocol that Pidgin supports, and even though it is a terminal-based application, it offers enough configuration options, and more can be done using the .gntrc configuration file, which is discussed later in this guide. If not, installing the latest Finch release, even from source, should be easy.
To install it in Ubuntu, open a terminal and type sudo apt-get install finch or use the Ubuntu Software Centre to search for it and install it. On Debian, you can install the older version from the repositories, or use this guide to compile and install the latest version. Yahoo! for example changed its protocol, so the version which comes included in Debian Lenny is not able to connect to it.
A little about installing as a normal user, using a different prefix. I have Pidgin (and Finch for that matter) 2.7.3 installed in Debian Lenny under the /home/embryo/usr prefix, so my binaries are located in /home/embryo/usr/bin/ and the manual pages in /home/embryo/usr/share/man/man1/finch.1/ and /home/embryo/usr/share/man/pidgin.1/ respectively. So in order to launch them I need to include the first path into my $PATH variable. To do so, edit your ~/.bashrc file using a text editor, and add this line at the end:
export PATH=$PATH:/home/USER/usr/bin
Replace USER with your username (and the full path if your prefix was different). Now, I don't know if there is another workaround for this, but i noticed that man finch or man pidgin do not work after installing in a different path than the standard ones. The manual pages for them actually exist, but in the directory /home/embryo/usr/share/man/man1/. So, to access them, use these commands:
man -l /home/USER/usr/share/man/man1/finch.1
man -l /home/USER/usr/share/man/man1pidgin.1
The -l argument tells man to open a manual page (and format it) for a custom file provided by the user.
Now that Finch is properly installed, let's get to work. First, type finch in a console to fire it up:
Navigation
Finch is built using the ncurses toolkit, which is a library designed especially to built text user interfaces. To navigate in a Finch window, use Tab to focus the next widget (option, tickbox, button), Shift+Tab to focus the previous one, Space in order to tick/untick an option, and Enter to 'click' a button. You will also need to press Esc to exit from menus such as the Actions menu.
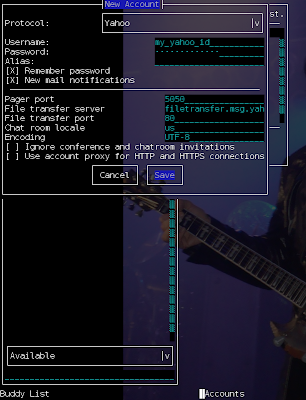
The first time it starts, Finch automatically opens the accounts window, so you can now select the Add button and press Enter. In the window that appears - New Account - use the arrows to select the desired protocol, and then use Tab to navigate to the next field, fill it in with your data, and so on:
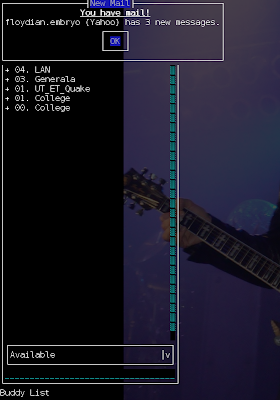
Next, save your newly created account. Now, to close the Accounts window, press Alt+C. You should be now able to see your contact lists since Finch will try to automatically connect to the protocol you specified.
Now, before moving on to configure Finch, first let me list the most important keyboard shortcuts which are useful to navigate, customize and use this application.
Moving around
Alt+Q - just so you know this quits Finch, getting back to console
Alt+A - opens the Actions menu, which contains everything you need to configure Finch: accounts, buddy lists, file transfers, plugins, sounds, preferences and statuses; use the Esc key to close this menu when you're done
Alt+C - closes the currently opened window
Alt+N - switch to the next window; you will need this to switch between chats, and other openend windows
Alt+P - switch to the previous window
Moving and resizing windows
There are two important shortcuts here, which will help you to:
1. Move windows in Finch
For this, use the Alt+M keyboard shortcut. This will highlight the currently selected window so you will be able to use the arrow keys in order to move it anywhere inside the terminal; use Esc to deselect it when you're done.
2. Resize windows in Finch
Press Alt+R in order to highlight the currently selected window, then use the arrow keys to resize it; press Esc to deselect it when you're done.
Configuring Finch
To configure Finch, press Alt+A, which will open the Actions menu. Here you can edit accounts, enable/disable plugins or configure general Finch preferences. For now we will focus on the the Preferences entry:
As you can see, you can configure the:
- Buddy List - to turn on/off showing idle times or offline buddies
- Conversations - to show timestamps or notify buddies when you are typing them a new message
- Logging - the log format, which can be plain text or HTML (formatted), also which types of events to log
- Idle - which will report idle time based only on the last time you typed something in Finch (anywhere in Finch) or since the last message you send; also the number of minutes before becoming idle
Configure this to your liking. A little more about configuration options: they are kept in the same directory for both Finch and Pidgin, and changes done to one of them affect the other. The configuration files and the logs can be found inside the ~/.purple/ directory, where ~ is your home directory. Notice that .purple is a hidden directory, so make sure that your file manager will list those (or use ls -a in console to view them).
Plugins
Finch comes bundled with several useful plugins, like Buddy Notes, TinyURL or the Log Reader:
To open the above window, press Alt+A and go to the the Plugins entry. Configure those as you wish.
The ~/.gntrc file
This file allows you to configure Finch in more detail, including colors for its interface, re-binding keys, change keys for various Finch actions, and even enable mouse support.
Here's how to enable mouse support. Open up a text editor and edit (or create if it doesn't already exist - and it probably won't) the ~/.gntrc file:
nano ~/.gntrc # or gedit ~/.gntrc
Next, add the following lines in this file, then save it:
[general]
mouse = 1
This is all. Notice that if the file is already created, you should find the section [general] and set the mouse option to 1 (true). Although the manual page says the mouse support is still experimental, I found no issues with it. However, manipulating Finch actually seems harder with a mouse after using it exclusively from the keyboard.
Why use Finch at all?
Well, don't if you want avatars and all the beauty a graphical client offers! Use Pidgin, Empathy, Kopete or something else! But if you need for some reason (speed, lack of memory etc) a terminal-based application for instant messaging, then give Finch a try.
This should be all for today. I hope you'll enjoy Finch as much as I do!
Further reading
Don't forget man finch - it has all the info you need (and more about all the ~/.gntrc file, which couldn't be covered in this guide). The official homepage and guide:
Using Finch
Finch homepage
To install it in Ubuntu, open a terminal and type sudo apt-get install finch or use the Ubuntu Software Centre to search for it and install it. On Debian, you can install the older version from the repositories, or use this guide to compile and install the latest version. Yahoo! for example changed its protocol, so the version which comes included in Debian Lenny is not able to connect to it.
A little about installing as a normal user, using a different prefix. I have Pidgin (and Finch for that matter) 2.7.3 installed in Debian Lenny under the /home/embryo/usr prefix, so my binaries are located in /home/embryo/usr/bin/ and the manual pages in /home/embryo/usr/share/man/man1/finch.1/ and /home/embryo/usr/share/man/pidgin.1/ respectively. So in order to launch them I need to include the first path into my $PATH variable. To do so, edit your ~/.bashrc file using a text editor, and add this line at the end:
export PATH=$PATH:/home/USER/usr/bin
Replace USER with your username (and the full path if your prefix was different). Now, I don't know if there is another workaround for this, but i noticed that man finch or man pidgin do not work after installing in a different path than the standard ones. The manual pages for them actually exist, but in the directory /home/embryo/usr/share/man/man1/. So, to access them, use these commands:
man -l /home/USER/usr/share/man/man1/finch.1
man -l /home/USER/usr/share/man/man1pidgin.1
The -l argument tells man to open a manual page (and format it) for a custom file provided by the user.
Now that Finch is properly installed, let's get to work. First, type finch in a console to fire it up:
Navigation
Finch is built using the ncurses toolkit, which is a library designed especially to built text user interfaces. To navigate in a Finch window, use Tab to focus the next widget (option, tickbox, button), Shift+Tab to focus the previous one, Space in order to tick/untick an option, and Enter to 'click' a button. You will also need to press Esc to exit from menus such as the Actions menu.
The first time it starts, Finch automatically opens the accounts window, so you can now select the Add button and press Enter. In the window that appears - New Account - use the arrows to select the desired protocol, and then use Tab to navigate to the next field, fill it in with your data, and so on:
Creating a new Yahoo! account
Next, save your newly created account. Now, to close the Accounts window, press Alt+C. You should be now able to see your contact lists since Finch will try to automatically connect to the protocol you specified.
New mail notification
Now, before moving on to configure Finch, first let me list the most important keyboard shortcuts which are useful to navigate, customize and use this application.
Moving around
Alt+Q - just so you know this quits Finch, getting back to console
Alt+A - opens the Actions menu, which contains everything you need to configure Finch: accounts, buddy lists, file transfers, plugins, sounds, preferences and statuses; use the Esc key to close this menu when you're done
Alt+C - closes the currently opened window
Alt+N - switch to the next window; you will need this to switch between chats, and other openend windows
Alt+P - switch to the previous window
Moving and resizing windows
There are two important shortcuts here, which will help you to:
1. Move windows in Finch
For this, use the Alt+M keyboard shortcut. This will highlight the currently selected window so you will be able to use the arrow keys in order to move it anywhere inside the terminal; use Esc to deselect it when you're done.
2. Resize windows in Finch
Press Alt+R in order to highlight the currently selected window, then use the arrow keys to resize it; press Esc to deselect it when you're done.
Configuring Finch
To configure Finch, press Alt+A, which will open the Actions menu. Here you can edit accounts, enable/disable plugins or configure general Finch preferences. For now we will focus on the the Preferences entry:
As you can see, you can configure the:
- Buddy List - to turn on/off showing idle times or offline buddies
- Conversations - to show timestamps or notify buddies when you are typing them a new message
- Logging - the log format, which can be plain text or HTML (formatted), also which types of events to log
- Idle - which will report idle time based only on the last time you typed something in Finch (anywhere in Finch) or since the last message you send; also the number of minutes before becoming idle
Configure this to your liking. A little more about configuration options: they are kept in the same directory for both Finch and Pidgin, and changes done to one of them affect the other. The configuration files and the logs can be found inside the ~/.purple/ directory, where ~ is your home directory. Notice that .purple is a hidden directory, so make sure that your file manager will list those (or use ls -a in console to view them).
Plugins
Finch comes bundled with several useful plugins, like Buddy Notes, TinyURL or the Log Reader:
To open the above window, press Alt+A and go to the the Plugins entry. Configure those as you wish.
The ~/.gntrc file
This file allows you to configure Finch in more detail, including colors for its interface, re-binding keys, change keys for various Finch actions, and even enable mouse support.
Here's how to enable mouse support. Open up a text editor and edit (or create if it doesn't already exist - and it probably won't) the ~/.gntrc file:
nano ~/.gntrc # or gedit ~/.gntrc
Next, add the following lines in this file, then save it:
[general]
mouse = 1
This is all. Notice that if the file is already created, you should find the section [general] and set the mouse option to 1 (true). Although the manual page says the mouse support is still experimental, I found no issues with it. However, manipulating Finch actually seems harder with a mouse after using it exclusively from the keyboard.
Why use Finch at all?
Well, don't if you want avatars and all the beauty a graphical client offers! Use Pidgin, Empathy, Kopete or something else! But if you need for some reason (speed, lack of memory etc) a terminal-based application for instant messaging, then give Finch a try.
This should be all for today. I hope you'll enjoy Finch as much as I do!
Further reading
Don't forget man finch - it has all the info you need (and more about all the ~/.gntrc file, which couldn't be covered in this guide). The official homepage and guide:
Using Finch
Finch homepage
Two Free Linux Civilization-Like Games: Freeciv and FreeCol
While most of the proprietary games get all the attention on Windows, on Linux it's the other way around. Of course, this is because we're stuck with only few choices for mainly any type of game, from arcade to shooters or strategies. But there are good, if not great, alternatives in Linux.
Today I will overview two Linux games which are a very good alternative to the famous Civilization series from Windows, Freeciv and FreeCol. They are both open-source, free, and usually come included with every distribution.
Freeciv
Freeciv is based on the client/server model, so the server is started automatically when you start a new game. It provides two different client interfaces: GTK2 and SDL (see below on how to install and launch).
To install in Ubuntu, type in a terminal either one of the following commands:
sudo apt-get install freeciv-client-gtk2 # (for the GTK client) sudo apt-get install freeciv-client-sdl # (for the SDL client)
To launch the game, press Alt+F2 and type freeciv in the run dialogue that appears or go to Applications->Games->Freeciv. If you installed both packages (even though there is no need to do it), to launch it either type freeciv-gtk2 or freeciv-sdl.
The SDL client allows you to run the game in window mode and fullscreen and to change the resolution.
Freeciv Homepage
Freeciv FAQ
Freeciv Forum
FreeCol
FreeCol is written in Java, so it has a slower interface, but other than that, it looks and behaves great. Freecol resembles the Colonization game, under the slogan 'the Colonization of America' but having better graphics and being actively developed. FreeCol runs in fullscreen but it doesn't steal control from the window manager, so it allows you to use Alt+Tab in order to access your other opened applications.
Installation in Ubuntu. Just type sudo apt-get install freecol in a terminal. The version included in the Maverick Beta repositories is 0.9.2.
FreeCol homepage
FreeCol forum
Today I will overview two Linux games which are a very good alternative to the famous Civilization series from Windows, Freeciv and FreeCol. They are both open-source, free, and usually come included with every distribution.
Freeciv
Freeciv is based on the client/server model, so the server is started automatically when you start a new game. It provides two different client interfaces: GTK2 and SDL (see below on how to install and launch).
Freeciv 2.2.1
To install in Ubuntu, type in a terminal either one of the following commands:
sudo apt-get install freeciv-client-gtk2 # (for the GTK client) sudo apt-get install freeciv-client-sdl # (for the SDL client)
To launch the game, press Alt+F2 and type freeciv in the run dialogue that appears or go to Applications->Games->Freeciv. If you installed both packages (even though there is no need to do it), to launch it either type freeciv-gtk2 or freeciv-sdl.
Starting a new game
The SDL client allows you to run the game in window mode and fullscreen and to change the resolution.
SDL client
GTK2 client - in-game screenshot
Freeciv Homepage
Freeciv FAQ
Freeciv Forum
FreeCol
FreeCol is written in Java, so it has a slower interface, but other than that, it looks and behaves great. Freecol resembles the Colonization game, under the slogan 'the Colonization of America' but having better graphics and being actively developed. FreeCol runs in fullscreen but it doesn't steal control from the window manager, so it allows you to use Alt+Tab in order to access your other opened applications.
Installation in Ubuntu. Just type sudo apt-get install freecol in a terminal. The version included in the Maverick Beta repositories is 0.9.2.
FreeCol homepage
FreeCol forum
A Different Way to Manage Your Linux Desktop: GNOME Shell Looks Promising
GNOME Shell is a window manager designed specifically for the upcoming GNOME 3 desktop, with the intention of offering a rather different way of interacting with the desktop, providing a workspace which hardly resembles the classic desktops.
Currently under heavy development, GNOME Shell is included in Ubuntu 10.10 Beta and it currently looks like this:
The main feature that jumps into attention is the way of organizing and listing opened windows, just like the fast web access from Opera, for example. GNOME Shell also offers virtual desktops.
As you can see, GNOME Shell offers the user easy access to applications, places and devices, a way of searching applications or documents and recently accessed items.
You can switch between the Activities mode (where you can visualize all your opened applications and access more) and the normal way of working by clicking on the top-left Activities button, or just pointing your mouse cursor in the top-left corner.
If you want to quit GNOME Shell and return back to your usual GNOME desktop, open a terminal and type the following two commands:
compiz --replace &
gnome-panel restart &
If you don't have desktop effects enabled, use metacity --replace& instead of compiz --replace&.
To install GNOME Shell in Ubuntu 10.10 Maverick Beta, type in a terminal sudo apt-get install gnome-shell, and then to start it type gnome-shell --replace in order to replace your current window manager.
GNOME Shell definitely looks good and from a usability point of view, it really has a lot of potential, especially if we keep in mind that it's not finished yet, so more features will come.
Currently under heavy development, GNOME Shell is included in Ubuntu 10.10 Beta and it currently looks like this:
GNOME Shell in Ubuntu 10.10 Maverick Beta
The main feature that jumps into attention is the way of organizing and listing opened windows, just like the fast web access from Opera, for example. GNOME Shell also offers virtual desktops.
As you can see, GNOME Shell offers the user easy access to applications, places and devices, a way of searching applications or documents and recently accessed items.
You can switch between the Activities mode (where you can visualize all your opened applications and access more) and the normal way of working by clicking on the top-left Activities button, or just pointing your mouse cursor in the top-left corner.
Accessing your applications
If you want to quit GNOME Shell and return back to your usual GNOME desktop, open a terminal and type the following two commands:
compiz --replace &
gnome-panel restart &
If you don't have desktop effects enabled, use metacity --replace& instead of compiz --replace&.
To install GNOME Shell in Ubuntu 10.10 Maverick Beta, type in a terminal sudo apt-get install gnome-shell, and then to start it type gnome-shell --replace in order to replace your current window manager.
GNOME Shell definitely looks good and from a usability point of view, it really has a lot of potential, especially if we keep in mind that it's not finished yet, so more features will come.
Thursday, 16 September 2010
Miro Review - Great Internet HD Video Player
Miro is a free, open-source video player with ports for Linux, Windows and Mac OS X, designed especially for watching HD videos. Miro bundles over 6000 Internet TV shows and video podcasts, and allows you to download each of them to your computer, so you can watch them without the need of an Internet connection.
In this review I will talk about the latest version of Miro available to date, 3.0.3, as it comes with the Ubuntu 10.10 Beta repositories.
Among the video formats supported by Miro are AVI, WMV, MOV, Ogg Theora, MKV or MPEG. Miro also includes support for subtitles. But Miro was not created to be the usual movie player, it was created having HD Internet TV in mind.
The first time you fire up Miro, a wizard will appear asking you if you want to enable opening Miro at start-up and if you want to let him scan local folders for video content. Here's how the main window of Miro looks like:
As you can see, it includes a mini web browser which points at https://www.miroguide.com/, a place from which you can start searching for videos on the web, view lists of HD video shows or watch the most popular ones.
Miro also includes integrated video search, and allows you to download and view the selected videos:
Another feature of Miro is the media library, where you can organize video and audio files and manage your downloads. In addition to these, Miro offers a BitTorrent client with search capabilities and several audio and video feeds, like the default Global Pulse or Wildlife Highlights, which contains awesome wildlife videos in HD format. You can also create playlists of your content in Miro.
Regarding preferences, Miro allows you to configure thing such:
- system tray integration
- control how feeds are handled
- configure the BitTorrent client
- watch certain directories for changes and show them in the media library
As a final conclusion, Miro is just great firstly because of the awesome HD movie feeds it provides. However, as a movie player it does not offer the more advanced options dedicated movie players provide, like video and audio effects, support for DVDs, etc. But this is not the case, since Miro's goal is not to do these things, but to offer a great way of watching online videos.
In this review I will talk about the latest version of Miro available to date, 3.0.3, as it comes with the Ubuntu 10.10 Beta repositories.
Among the video formats supported by Miro are AVI, WMV, MOV, Ogg Theora, MKV or MPEG. Miro also includes support for subtitles. But Miro was not created to be the usual movie player, it was created having HD Internet TV in mind.
The first time you fire up Miro, a wizard will appear asking you if you want to enable opening Miro at start-up and if you want to let him scan local folders for video content. Here's how the main window of Miro looks like:
As you can see, it includes a mini web browser which points at https://www.miroguide.com/, a place from which you can start searching for videos on the web, view lists of HD video shows or watch the most popular ones.
Miro also includes integrated video search, and allows you to download and view the selected videos:
Another feature of Miro is the media library, where you can organize video and audio files and manage your downloads. In addition to these, Miro offers a BitTorrent client with search capabilities and several audio and video feeds, like the default Global Pulse or Wildlife Highlights, which contains awesome wildlife videos in HD format. You can also create playlists of your content in Miro.
Wildlife Highlights
Regarding preferences, Miro allows you to configure thing such:
- system tray integration
- control how feeds are handled
- configure the BitTorrent client
- watch certain directories for changes and show them in the media library
As a final conclusion, Miro is just great firstly because of the awesome HD movie feeds it provides. However, as a movie player it does not offer the more advanced options dedicated movie players provide, like video and audio effects, support for DVDs, etc. But this is not the case, since Miro's goal is not to do these things, but to offer a great way of watching online videos.
Tutorial: Install Clementine Music Player in Kubuntu 10.10 Maverick Beta
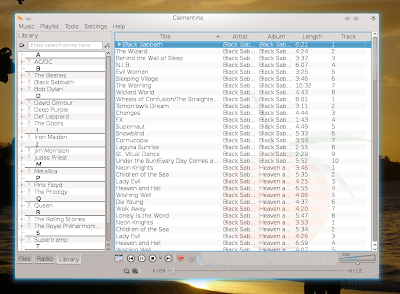
Clementine is a KDE4 port of the beloved music player Amarok 1.4. Although Clementine still needs work done in order to reach Amarok's functionality - like support for scripts, or for example I couldn't get it to add a whole music directory to the playlist - is there a way to do it? - it comes with pretty decent features up to now:
- equalizer
- Last.fm song submission, love/ban buttons
- music library
- file browser
- radio support
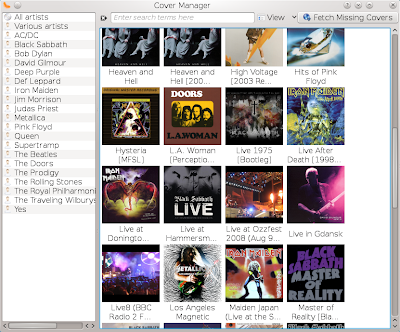
- cover manager
Installing Clementine in Kubuntu 10.10 Maverick Meerkat Beta
We will use the packages in the Clementine PPA in order to install it on Maverick. Fire up a terminal and type:
sudo add-apt-repository ppa:riccetn/clementine
This command will add the Clementine PPA repository inside your /etc/apt/sources.list.d/ directory.
Notice that the current version in the PPA is 0.3. If you already have an older version of Clementine installed on your system, it is best to remove it first:
sudo apt-get remove --purge clementine
Now update the packages list:
sudo apt-get update
And finally, install Clementine by typing:
sudo apt-get install clementine
And you're done! To start it up, press Alt+F2 and type clementine followed by Enter.
Clementine Homepage
Clementine at Google Code
Clementine PPA at Launchpad.net
- equalizer
- Last.fm song submission, love/ban buttons
- music library
- file browser
- radio support
- cover manager
Installing Clementine in Kubuntu 10.10 Maverick Meerkat Beta
We will use the packages in the Clementine PPA in order to install it on Maverick. Fire up a terminal and type:
sudo add-apt-repository ppa:riccetn/clementine
This command will add the Clementine PPA repository inside your /etc/apt/sources.list.d/ directory.
Notice that the current version in the PPA is 0.3. If you already have an older version of Clementine installed on your system, it is best to remove it first:
sudo apt-get remove --purge clementine
Now update the packages list:
sudo apt-get update
And finally, install Clementine by typing:
sudo apt-get install clementine
And you're done! To start it up, press Alt+F2 and type clementine followed by Enter.
Cover manager
Clementine Homepage
Clementine at Google Code
Clementine PPA at Launchpad.net
Labels:
audio,
clementine,
maverick,
tutorial,
ubuntu
Subscribe to:
Posts (Atom)