Thursday 30 April 2009

3 Tweaks to Speed Up Firefox 3 and Free Memory

Sometimes Firefox can become a real memory hog, especially if you keep it running for hours and have many tabs opened. In order to make Firefox a little more responsive and save some RAM memory, here are three tweaks I bumped into over time. Notice that most of these tips only free up some memory at the expense of (usually) loading speed for web pages. You won't make Firefox 10 times faster, but you will surely make it use less RAM.

Tweak the browser.sessionhistory.max_total_viewers variable
In Firefox, open a new tab (Ctrl+T) and type about:config in the address bar. Click on the I'll be careful, I promise! button and start typing the variable name browser.sessionhistory.max_total_viewers in the Filter text box.
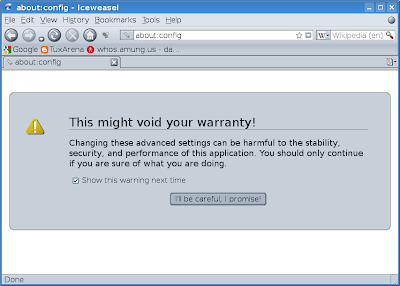

This variable specifies Firefox how many pages it should keep in the memory, so when you hit Back and Forward buttons it loads pages faster. The default value is -1, which means that it sets a certain number of pages depending on the total RAM memory the system has. You can change this value to 0 (just double-click the variable), which means it won't hold into memory any pages.

Variable: browser.sessionhistory.max_total_viewers
Value: 0

Use the Flashblock extension to load Flash only on demand
Flash support on Linux seems pretty poor, at least to me, even with the latest Flash plugin available - 10.0.22.87. I noticed Firefox scrolls very slow on Flash-rich pages and after several hours Flash videos stop working or producing any sound. Anyway, Flashblock is a very useful extension which will allow you to only show Flash videos on demand, replacing them with a button on which you can click in order to start the video. Get the latest Flashblock release from the Mozilla add-ons page and install it. Notice that JavaScript must be enabled in order to use it (Edit -> Preferences -> Content and tick the Enable JavaScript option).

Tweak the browser.cache.memory.capacity variable
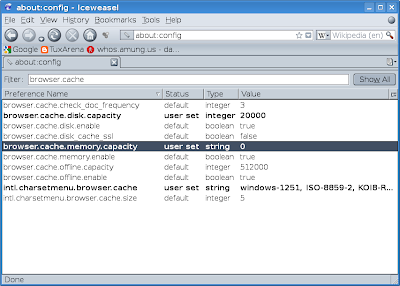
Create the variable browser.cache.memory.capacity in the about:config dialogue and set it to 0. To create a new variable, right click anywhere, go to New -> Integer, insert the variable name where it says to enter the preference name, then set the integer value to 0. This will disable memory cache completely and free up some RAM. The default value is -1, which will set the values automatically. Alternately, you can set here a custom memory size, like 16 (which is default if you have 256 MB RAM and the variable is set to -1) or 32 (default for a system with 512 MB RAM). The same thing can be accomplished by setting the variable browser.cache.memory.enable to false.

Variable: browser.cache.memory.capacity
Value: 0

This how-to is part of a series of Firefox-related articles I'm putting up. If you want to read them, here they are:

5 Essential Add-ons for Firefox 3
5 Useful Tips to Customise Firefox 3

Updated: May 3, 2009

Round-Up: Most Popular Posts in April

Kubuntu 9.04 Jaunty Jackalope Overview and Screenshots
Here's an overview of the new Kubuntu 9.04 release including screenshots.


14 Most Popular Text Editors for Linux
A review of 14 (16 with the latest additions) text editors available on Linux.

5 Essential Add-ons for Firefox 3
Overview of Video DownloadHelper, AdBlock, Speed Dial, PDF Download and Google Preview.


10 File Managers for Linux
A review of no fewer than 12 (with two other additions) file managers for Linux. Dolphin, Nautilus, Thunar, Krusader, Midnight Commander and many more, they are all here.

4 IM Clients for Ubuntu Jaunty Jackalope
Overview of 4 chat applications included in the Ubuntu 9.04 repositories.


12 Popular Audio Players for Linux
This article reviews 12 graphical audio players for Linux. For console, see this article.

Overview: 5 BitTorrent Clients for Linux
As the title suggests, this article overviews 5 of the most popular BitTorrent clients for Linux, like Deluge or KTorrent.

Wednesday 29 April 2009

Easily Configure QEMU to Run Bootable ISO Images

QEMU is a powerful, open-source machine emulator which allows you to run virtually any operating system inside your currently running distribution. In this brief tutorial I'll show how to run distributions for which the ISO is available, directly from within Debian or Ubuntu.

Ubuntu Jaunty Jackalope running in QEMU

First, install the package qemu:

apt-get install qemu

Next, we will need to create a QEMU image, so use the following command (and adjust parameters if needed to):

qemu-img create -f qcow qemu_disk.img 3G

The qcow (QEMU Copy-on-Write) specifies the disk image type, while the 3G parameter specifies the amount of memory that can be used (3 GB in this case).

Given that we have an ISO distro image, in order to start it in QEMU use, for example:

qemu -cdrom distribution_image.iso -hda qemu_disk.img -m 256 -boot d

-cdrom distribution_image.iso chooses the ISO image which should be loaded
-m 256 switch sets the virtual RAM size to 256 MB, default being 128
-boot d specifies to boot on CD-ROM, default being c, hard-disk

Below is a screenshot showing Ubuntu 9.04 Jaunty Jackalope running in QEMU on Debian Lenny, after giving the command (one line):

qemu -cdrom ubuntu-9.04-desktop-i386.iso -hda qemu_disk.img -m 256 -boot d

Booting up Ubuntu 9.04 Jaunty Jackalope from the Desktop CD

Connect Remotely to Your Linux Machine Graphically

Free NX is a client/server application which allows you to login remotely from another PC into your Linux system. The client is available for both Linux and Windows, so you will be able to login from a Windows machine too.

NX client connected to a Debian KDE3 session, 1024x768

In order to set up Free NX, you only need to install three DEB packages, start a SSH server and you're ready to go. In Debian Lenny and Ubuntu, just follow the steps below:

First of all, install the SSH (secure shell) server:

apt-get install openssh-server

SSH listens by default on port 22. You can test your SSH server by trying to login to localhost:

ssh your_username@localhost

And use your user's password. If the login is successful, you can proceed to the next step. In order to logout, just type Ctrl+D.

Next, download the Free NX DEB packages from the NoMachine website, here. The files which you need to download are called:

nxclient_3.3.0-6_i386.deb
nxnode_3.3.0-17_i386.deb
nxserver_3.3.0-22_i386.deb

Next, you will need to install all three of them, so type as root:

dpkg -i nxclient_3.3.0-6_i386.deb
dpkg -i nxnode_3.3.0-17_i386.deb
dpkg -i nxserver_3.3.0-22_i386.deb

What you need to do next is to start the NX server (if it isn't already started). To do that, type as root:

/etc/init.d/nxserver start

The output should be something like this:

# /etc/init.d/nxserver start
NX> 122 Service started.
NX> 999 Bye.
NX> 723 Cannot start NX statistics:
NX> 709 NX statistics are disabled for this server.
NX> 999 Bye.

Now, in order to test if what we've done is working, try to connect using the NX client to your own machine, so run as normal user:

/usr/NX/bin/nxclient

Notice that the path to nxclient is non-standard, so nxclient will not be included in your path; you have to use the full path to it. See the screenshots below of NX client in action:

Enter your username and password from your Linux machine

Configure NX client - I used localhost host here, but from another machine you'll have to enter the IP of the remote machine

An alternative NX client is qtnx (apt-get install qtnx) but I had some stability issues with it when trying to connect to a machine which doesn't has NX server configured.

QtNX, another NX client

The good thing about Free NX is that clients are provided for both Linux and Windows, so you will be able to login into your Linux machine from Windows without any problems.

Tuesday 28 April 2009

5 Popular Tricks to Customise Nano Editor


Nano is a popular and user-friendly text editor for console which is mostly used for editing quickly configuration files, sources or various other text files. It does not compete with advanced development environments like Vim or Emacs, but it's fast and easy on resources.

Here are five (popular, I hope) tips for customising Nano and changing its default behaviour.

1. Enable auto-indentation
When Nano starts, it reads a system wide configuration file which is usually located inside /etc/nanorc and executes the commands located inside it, then it searches for the user configuration file, located in ~/.nanorc, where ~ is the user's home directory. To configure Nano for your user, you only need to edit the ~/.nanorc file. Notice that since this is a hidden file, you may have to turn on hidden file view in your file manager, or use ls -a in a terminal.

Edit the ~/.nanorc configuration file (create it if it doesn't exist; ~ is your home directory) and add the following line:

set autoindent

This will turn on auto-indentation for a new line to the same level of the previous line. Alternately, you can run Nano with the -i switch:

nano -i

Or just type Alt+I inside Nano when it's running.

2. Enable syntax highlighting
Edit the ~/.nanorc configuration file and add lines which go like this:

include "/usr/share/nano/c.nanorc"
include "/usr/share/nano/perl.nanorc"

Default Perl syntax highlighting in Nano

Several other default highlighting rules are found inside the /usr/share/nano/ directory. I wrote a full tutorial about enabling syntax highlighting in Nano here.

3. Turn off the creation of backup files
By default, Nano creates backup files with names like filename~ after editing a file. To turn this behaviour off, edit the ~/.nanorc file and add the line:

unset backup

To turn backup files on again, use set backup in the configuration file.

4. Don't add newlines at end of files
By default, Nano will add a newline character at the end of a saved text file. If you want this disabled, add the following option inside ~/.nanorc:

set nonewlines

5. Change tab size
Nano uses by default 8 columns for the tab size. In order to change it to another value, say 4, use:

set tabsize 4

Or some other value depending on your needs.

These are several settings I think are among the most popular. For a complete manual, use man nano, man nanorc and the official online manual.

How-To: Convert APE to Ogg Vorbis or MP3 in Debian and Ubuntu

APE is an open-source, free lossless audio format, just like FLAC or WAV. APE is also known as Monkey's Audio. To convert it to either Ogg Vorbis or MP3, you will first need to install several packages:

apt-get install monkeys-audio vorbis-tools

The first package includes the mac tool, which is a command-line frontend to the APE decoder. vorbis-tools is the package required to encode to the free Ogg Vorbis audio format. I recommend this one over MP3, since it's completely free and usually all the players on Linux support it by default.

Next, we will use the mac tool to convert the APE file(s) to WAV. For a single file, use the following command:

mac audio_file.ape audio_file.wav -d

For several files, use:

for i in *.ape; do mac "$i" "$i.wav" -d; done

Now all the APE files will be converted into WAV, which can be easily converted to Ogg Vorbis or MP3 using the commands below.

Ogg Vorbis
Convert WAV to Vorbis using the following command:

oggenc -b 256 audio_file.wav

Which will convert audio_file.wav to Ogg Vorbis at a nominal bitrate of 256 kbps. To convert more than one file at a time, use wildcards, e.g.:

oggenc -b 256 *.wav

MP3
Still, for MP3 the lame utility is required, which is included in the debian-multimedia.org repositories for Debian and Medibuntu for Ubuntu. After adding those repositories to your /etc/apt/sources.list file and updated the package lists (apt-get update), install the lame package:

apt-get install lame

Now, to convert WAV to MP3, use:

lame -b 256 audio_file.wav

If you want to convert several WAV files at a time, use:

for i in *.wav; do lame -b 192 "$i"; done

Which will convert all the files with the .wav extension using a nominal bitrate of 192 kbps.

If you're having trouble splitting a larger APE file with a CUE file, read this tutorial I wrote in the past.

Monday 27 April 2009

Kaffeine 1.0 Pre-Release Preview - First KDE4 Port


The first pre-release of Kaffeine 1.0 was released yesterday so I decided to give it a spin and see how it behaves. Since this is a pre-release, it is not intended for general use and currently lacks many features and functionality from Kaffeine 0.8.7. This is first KDE4 port of Kaffeine for KDE3, which was one of the most powerful players for KDE, including support for DVD menus, subtitles, video effects, and supporting a huge number of video and audio formats via the Xine engine.

According to the official announcement, the next release will be more suitable for general use, and this one is intended for testing purposes only, it's just a preview.

Kaffeine 1.0 pre-release

For this preview I installed Kaffeine from source on a Debian Sid system.

The interface at first sight made me a good impression. It's characteristic to Kaffeine, clean and simple, with 4 tabs to the left for fast access to functions like playback, the playlist or television. As usual, Kaffeine will show several buttons for the main actions in its start-up window, and those include Play File, Play Audio CD, Play Video CD, Play DVD and Digital TV.

Start tab


The Settings menu currently includes only the option to configure shortcuts, but this is a preview release, so configuration options will get there soon.

The first thing which jumps into attention is the Television module, which looks extremely promising, but currently has no functionality (or at least, it didn't look to me to have any). However, I was enchanted to see it in concept: it looks great.

Television- no functionality yet

A good change which seems very useful is that the Playlist tab includes a playlist, a movie preview and also a file manager. See the screenshot below:

Playlist, file manager and movie preview

I was able to play Ogg Theora, but no other formats (including the free Matroska or DVDs).

About

Conclusion
Although this is a pre-alpha release, it looks just awesome, and if all the features (or at least almost all) will be implemented by the time 1.0 gets out as a stable release, Kaffeine will definitely keep being one of the most powerful video players for KDE. I'm very curious on how the TV functionality will turn out, and I'm also pleased to see the same clean and intuitive interface, which doesn't stay in the way of the user. I'm looking forward to a full-featured release which certainly won't disappoint the fans of Kaffeine.

Updated: April 28, 2009

Pros and Cons for Using CLI

In this article I will debate on several major advantages and disadvantages for using the command-line in Linux. When I think it's 'better' to use CLI, when not, and how can this can impact the work speed.

The pros

It's faster: It's well-known that in most cases the use of command-line is faster and makes easier working with large numbers of files
Easily automate tasks through scripts: Scripts and functions can prove very handy for certain tasks which need to be performed on a regular basis
Aliases: A strong point of the shell is the ability to create aliases, which usually replace a longer command (or small group of commands) with an easy to type one
More powerful: In most cases CLI is more powerful. Just an example, when it comes to manipulating a big number of files CLI is the way to go, since it can perform custom operations using several commands which usually fit on a single line very fast
Faster for getting help: It's faster to get help by copying and pasting a command (given that you know what it does) than through screenshots; bandwidth is one factor, another one is different desktop environments (e.g. use Synaptic/KPackage, go there, under that button, press that etc, instead of just apt-get install something)
Less memory: Using CLI won't load additional GUI libraries (given they aren't already loaded)
Less bandwidth: Although today bandwidth is not a major factor any more, using CLI for navigating on the Internet saves bandwidth and is faster
Basic CLI knowledge can make wonders: CLI can be successfully used on a very old computer, and you can browse the web, listen to music, use IRC and IM, read mail etc without any problems. A minimum CLI knowledge will also help troubleshooting a computer for which X won't start etc
GUI frontends can be incomplete: With CLI, you have complete power over the parameters to pass to a command-line tool. Sometimes GUI frontends lack those

The cons

Making mistakes: Running commands and scripts in a wrong manner (especially if one doesn't know what the specific command does) can lead to unwanted removal of files, a broken system and so on
Lack of GUI: Although you can browse the web, see images and even videos (using ASCII), it's obviously using CLI for that isn't the optimum way. Of course, this also depends on one's needs, but browsing the web for example with a text-based browser is usually slower and lacks images, videos etc.
GUI is definitely more intuitive: And also, more easy to remember things. Since the brain memorizes images too, GUI will be easier to use for the average user
GUI looks good: I guess it's always nicer to look at KDE4 effects or Compiz than at a screen full of text

Now I won't be hypocritical: I think over 95% of the Linux users have a GUI, and although one can use a computer only with CLI, it makes no sense to use only CLI if you also need to do tasks which require a GUI.

Sunday 26 April 2009

How-To: Compile and Install K3b 1.65.0 Alpha from Source in Ubuntu Jaunty Jackalope

Over time K3b got its reputation as one of the most powerful burning applications not only for KDE, but for Linux in general. Development at the KDE4 release evolved rapidly in the last couple of months and the first usable alpha of the KDE4 port was put up for testing a few days ago, on April 22. Earlier today I made a brief review of this release, which you can read here (nothing is new, K3b 1.65.0 comes with the same features of 1.0.5, the only major difference is that it was ported to use the KDE4 libraries).

This short guide will list several easy steps you need to follow in order to compile and install K3b from source in Ubuntu/Kubuntu 9.04 Jaunty.

Notice that since this is an alpha release, it is not recommended for production work.

Here are the mandatory (and several optional) dependencies which you need to install before building K3b:

sudo apt-get install build-essential
sudo apt-get install cmake

The following is just one line of code:

sudo apt-get install kdelibs5-dev libsamplerate0-dev libkcddb-dev libcdparanoia-dev genisoimage wodim dvd+rw-tools cdrdao libflac++-dev libdvdread-dev libtag1-dev libmusicbrainz4-dev ffmpeg libsndfile1-dev libvorbis-dev

These should be (almost all). Anyway, they should be enough to compile K3b.

The next step is to go on the official website and download the source (direct link). Then, make sure the current working directory is the one where you saved it and uncompress it:

tar -xjf k3b-1.65.0alpha1.tar.bz2

Change the working directory to k3b-1.65.0, then compile and install it:

cmake -DK3B_BUILD_K3BSETUP=OFF
make
sudo make install

The -DK3B_BUILD_K3BSETUP=OFF switch will get rid of the Polkit-Qt error (great thanks for a comment in this thread on the Fedora Community forums).

That's it! K3b should be now properly installed. Here's a screenshot:

K3b 2.0 Alpha Preview - First Release of the KDE4 Port Is Out


I was pleased to hear a while ago that K3b got two new developers assigned by the Mandriva project and that work at the KDE4 port is going well now. Although K3b was inactive for a pretty long time (the last stable release was 1.0.5 for KDE3 on May 27, 2008), it looks like development goes at a fast pace and the first alpha of the KDE4 port was put up a little earlier this month.

It's a well-known fact that K3b is one of the most popular CD/DVD burning applications for Linux (if not the most popular) and sometimes the burner of choice for GNOME users too, not only KDE ones. So I decided to compile and install this alpha preview on a Debian Sid system with KDE4 and see how it looks by now.

Currently K3b 1.65.0 alpha1 does not include any new features over its KDE3 version, but it has been ported to KDE4, which is just great news.

Here are several screenshots of the new alpha:

The interface hasn't changed much, and the menu structure is the same.

Usual instance of K3b 1.65.0 alpha1

K3b settings

About

K3b comes with the features which it already had in KDE3, and they were plenty: on-screen display, support for themes, the ability to burn CDs/DVDs and ISO images, Konqueror integration (by the way, I think Dolphin integration is required too), notifications, CDDB support and more.

Overall, I was extremely enchanted to see this port of K3b and I'm sure it won't be long and the official 2.0 release will be out. Although there isn't much to say at this point because currently it does not seem to include new features (K3b was kind of full-featured already in the KDE3 version), they will surely come.

Official website

Saturday 25 April 2009

Several powerful console music players for Linux

These players are among the top audio players for console available on Linux. You can run them in a shell instance without the need of an X Server, and although several use only a command-line interface (like ogg123 of mpg123), several come with a nice, ncurses-based interface which makes music management easier and pleasant.

CMus (full review here)
Also named C* music player, CMus is a powerful player featuring an ncurses interface, with support for audio formats like Ogg Vorbis, FLAC, WAV or MP3. It comes with 7 different view modes (the default one is called the library view mode and includes two panels, one as a file browser and the other one as a playlist), support for themes, configurable shorcuts, Vi-style commands. I found CMus to be extremely fast, highly configurable and flexible. Definitely worth a try for those who are looking for a terminal-based audio player.
Homepage

CMus

MOC (full review here)
Yet another powerful and popular audio player for the terminal, MOC (music on console) has an ncurses interface, it supports various formats (the ffmpeg-moc plugin extends those to bassically everything ffmpeg supports), it is easy to use. It comes with a twin panel interface and allows themes too. MOC is very popular and provides a good alternative to players like CMus or mp3blaster.
Homepage

MOC

mp3blaster
It's unlikely that any audiophile who prefers to play his music in console mode didn't hear about mp3blaster. Just as the name suggests, mp3blaster is a MP3, WAV and Ogg Vorbis player, with an ncurses interface. The last release is 3.2.5, and although it was rarely updated over the couple of years (except for minor changes), it's full-featured and a good alternative to the players mentioned above.
Homepage

mp3blaster

mplayer
Well-known for its video capabilities, mplayer can also play lots of audio formats in command-line mode. Some of the audio formats mplayer reads are Ogg Vorbis, MP3, WAV, AAC, FLAC or WMA. I can recommend mplayer for those who want to be able to play virtually any audio file out there, and not stay only with MP3 or Vorbis.
Homepage

mplayer

In addition to those 4 players mentioned above, I can recommend two simpler players for command-line:

ogg123, which is the official player for FLAC and Ogg Vorbis from Xiph.org
mpg123, a player for MP3 files, also featuring a command-line interface

Also, following a server-client model, there are two other powerful ways of playing music, mpd + ncmpc (music player daemon) and xmms2 + xmms2-client-cli.

Friday 24 April 2009

Kubuntu 9.04 Jaunty Jackalope Overview & Screenshots

Ubuntu 9.04, codenamed Jaunty Jackalope, was released on April 23rd, also celebrating the 10th Ubuntu release. Since its first version back in October 2004, Ubuntu went through many improvements and quickly became one of the most popular distributions out there, with a huge and continuously thriving community and a fast development method. Free CDs through the ShipIt service can be also ordered, which is another way from which users can benefit of Ubuntu and spread it.

Ubuntu is based on Debian, one of the oldest distributions out there, well-known for its highly stable releases, but it delivers the latest versions of applications with each release and offers a more polished desktop. Many other projects were born based on Ubuntu, including Kubuntu (which is practically Ubuntu using KDE instead of GNOME), Edubuntu (for educational purposes), or Xubuntu (using the Xfce desktop environment).

In this article I'll overview Kubuntu 9.04, which comes with KDE 4.2.2, bleeding-edge software like OpenOffice.org 3.0.1 and Amarok 2.0.2.

Typical Kubuntu 9.04 desktop with default wallpaper

First of all, Kubuntu was always known as Ubuntu's little brother, since it was based on KDE and opinions were always different regarding its stability. Some say Kubuntu was always a buggy distribution, and probably the worst KDE-based distribution out there, while for others it works very well. Since Kubuntu shares the same repositories with Ubuntu and the KDE packages come from Debian Sid (the unstable Debian repositories), this can be understandable, especially that usually the Ubuntu community focuses on GNOME.

Although I already had Kubuntu 9.04 Beta installed on a separate partition, I decided to download the final release and install it on a clean partition instead of apt-get dist-upgrading. Anyway, here's what the brand, new and shiny Kubuntu 9.04 Jaunty has to offer...

I took the following screenshots at 1280x1024, with the nVIDIA 180.29 driver on a GeForce FX 7600GS graphics card.

As usual, I noticed incompatibilities between KDE's desktop settings and nVIDIA driver, but they seem to go away after using nvidia-settings utility to set resolution and save settings to the /etc/X11/xorg.conf.

I made a full review of Amarok 2.0.2 on Kubuntu here, and although I found it buggy and lacking features, 2.1 promises great improvements.

Amarok 2.0.2 - currently pretty buggy

There was a problem after ticking the 'Ctrl+Alt+Backspace restarts the xserver' check box in System Settings' Display tab (it didn't restart the X Server), but it went away after setting the resolution through the nvidia-settings tool.

System Settings

Kontact, Kopete and KTorrent

Konqueror

KMenu

Dragon Player

I could notice Dolphin will eat 100% CPU and practically freezes the system when moving the mouse over a Quick Time .MOV file (I guess that's because codecs are not installed, but nevertheless, this should be fixed).

Dolphin

I liked to see KDE 4.2 is much faster than how it was in Kubuntu 8.10. Great transparency effects, wobbly windows, animated minimise/maximise of windows are just a few of the wonderful desktop effects KDE has to offer.

Overall, Kubuntu 9.04 seemed, at least to me, buggy as usual. The pppoeconf utility does not seem to work, despite the fact that the Internet connection works flawless in Debian; (update: this proved to be actually a problem with the ISP),there are still some problems with fonts when changing resolution (this is probably a KDE issue, since it's been there for years, KDE3 too). But still, with a little tweaking, Jaunty can offer a good KDE 4.2 experience and bleeding-edge applications.

Review: MOC, text-based audio player

Last week I put up a short guide and review of CMus, a powerful audio player using the ncurses interface. Today I'll continue with an overview with screenshots of MOC, and hopefully in a few days I'll also review mp3blaster.

MOC 2.5.0-alpha3

Based on ncurses, MOC (music on console) is a popular, text-based audio player which can play various audio formats, including Ogg Vorbis, FLAC, MP3, MP4, WMA and WAV. The release I'm going to talk about in this article is 2.5.0-alpha3, as it comes with Debian Lenny.

Default interface

By default, the interface consists of two panels, with a file browser to the left and the playlist to the right. You can start adding tracks to the playlist by navigating to a music directory and using the a key. To clear the playlist, use C (that's uppercase). Here are several useful keyboard shortcuts for using MOC (notice that uppercase and lowercase matters):

a add music files to the playlist
C clear the playlist
Right Arrow seek forward
Left Arrow seek backward
Space play/pause currently selected song
s stop playing
S shuffle playlist
R repeat playlist
Tab switch between panels
, increase volume by 5%
. decrease volume by 5%
Q quit mocp
? get help

MOC does not seem to include Last.fm song submission by default, but there is a script on the official website called lastfm-mocp, here (direct download link), which uses the Last.fm submission daemon (package lastfmsubmitd in Debian).

The configuration file for MOC is ~/.moc/config, but it is not needed by default. It also supports configurable keybindings.

MOC also supports various themes, which you can select by using T. To add more themes if the default ones are not enough, copy them inside the ~/.moc/themes/ directory. See several screenshots below:

Transparent theme

Green theme

I liked that MOC can also run as a 'server' by detaching the player using q. Overall, it is a pretty nice audio player for the shell, it's lightweight and provides a very good and easy to use alternative to other players like CMus or mp3blaster.

Saturday 18 April 2009

Several Nice Linux Easter Eggs

Although some of this stuff is old, here are some funny Easter eggs I bumped into over time.

In APT
Fire up a terminal and type the following, one command at a time:

aptitude moo
aptitude -v moo
aptitude -v -v moo
aptitude -v -v -v moo
aptitude -v -v -v -v moo
aptitude -v -v -v -v -v moo
aptitude -v -v -v -v -v -v moo

Here's a screenshot:


Here's another one. Open a terminal and type apt-get moo:


Easter egg in Firefox 3
Open up Firefox 3 and type into the location bar: about:robots


Another one: In OpenOffice.org Calc, typing =STARCALCTEAM() in any cell will bring up a picture of the Star Calc team:

Thursday 16 April 2009

CMus Review - A Great ncurses Music Player

CMus (also called C* Music Player) is an ncurses-based audio player which can be run in a shell, with no need for an X server.

CMus is very powerful and highly configurable, and it features Vi-like commands and keyboard shortcuts which can be bound to other keys if needed. It supports various audio formats, including Ogg Vorbis, FLAC, MP3 (with libmad), WAV, AAC or WMA. CMus is lightweight and I must say that it was a delight testing it, and although by default it lacks support for one of the features I consider a must-have, the Last.fm song submission, this can be accomplished by applying a patch and recompiling it.

Usual look of CMus, using the default view mode

The first thing you will want to do when starting CMus is to add some music folders. You can do this by typing :add /path/to/music/folder/, then navigating through the playlist by using the J and K keys or using the Up/Down arrow keys. To start playing press Enter and to stop CMus use V.

CMus takes commands using a Vi-style, which means that you will have to type : then your command, for example:

:add /path/to/music/ will add audio files found in /path/to/music/
:clear will clear the playlist
:save ~/playlist_name.pls will save the current playlist into playlist_name.pls inside your home directory
:load playlist_name.pls will load playlist_name.pls
:set softvol=true will enable software volume control

I found CMus to be extremely fast and flexible. Although adding over 5000 songs can take a while, loading a playlist this large takes less than a few seconds on a medium-performance computer.

CMus offers no fewer than 7 view modes, and you can switch to any of those simply by using the 1-7 keys:
Library view (key 1), which is also the default view mode, includes an artist/album tree, with albums sorted by year
Sorted library view (key 2), which provides a simple, common playlist view with custom sorting
Playlist view (key 3), editable playlist
Play queue view (key 4), displays a queue of tracks
File Browser (key 5), a directory browser
Filters view (key 6), a list of user-defined filters
Settings view (key 7), displays keybinds and options

File browser mode

Sorted library view mode

In order to search for a song, you can use the / (slash) character, followed by the desired song name (you can enter words in any order). Press Enter when you're done, then Enter again to play the song. Press N in order to search for the next occurrence in the library.

Regarding the Last.fm song submission issue: it does not seem implemented by default, at least not in the version included in Debian Lenny, but there is an available patch for it here. You can fetch the source, apply the patch, then recompile CMus in order to have Last.fm support. Here I wrote an article on how to enable Last.fm support in Debian and Ubuntu.

CMus also supports configurable colour schemes, which you can customise by using the :colorscheme command. Notice that the commands can be auto-completed using TAB, and you can also use Emacs-like shortcuts (for example Ctrl+U to delete all the characters to the left of the cursor etc.)

Using the green-mono-88 colour scheme

You can put commands and configuration options inside the ~/.cmus/rc file, where ~ is your home directory (create the file if it doesn't already exist).

Since it's not a graphical application, I can't talk about cover art, and it also seem to lack lyrics fetching support, but who knows, maybe it will get it in a future release.

Overall, except for the lack of Last.fm support, CMus is one hell of an audio player for using in a terminal or in an environment without X. It is lightweight, powerful, fast, highly configurable and it seems, at least to me, intuitive and easy to use once you grasp the commands and keyboard shortcuts. A great piece of software, and I really hope for a future release to include by default Last.fm integration.
Homepage
CMus on Freshmeat

Updated: April 26, 2009