Exaile 3.0.1 was released on 6 September and it is a bugfix for the stable 3.0 series. To get it in Ubuntu Jaunty, follow the steps below:
Edit /etc/apt/sources.list and add the following two lines (the second one is needed only if you want the sources too):
deb http://ppa.launchpad.net/exaile-devel/ppa/ubuntu jaunty main
deb-src http://ppa.launchpad.net/exaile-devel/ppa/ubuntu jaunty main
Make sure to save the file and add the trusted key:
sudo apt-key adv --keyserver keyserver.ubuntu.com --recv-keys 43CBFCC0
Next, update the source packages:
sudo apt-get update
To install Exaile 3.0.1, issue the following command in a terminal application:
sudo apt-get install exaile
This should be all. Run Exaile by typing Alt+F2 and entering exaile in the run box that appears.
Friday, 11 September 2009
Flagfox: Firefox Add-on to Show the Country of the Current Server
Flagfox is a small Firefox add-on which will display a flag of the country where the server of the current website is located. Flagfox will show the current server IP, the hostname, country, city, local time, postal code and even latitude and longitude of the location.
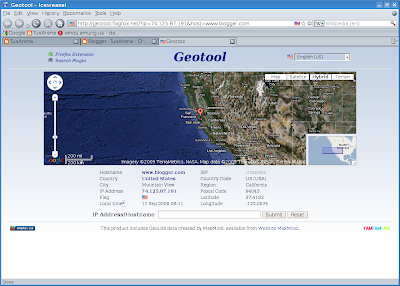
Flagfox can be configured to show the flag and additional information in the address bar or the status bar (left or right), open information in a new tab or window, and define a custom action for middle-clicking on the country flag icon.
Middle-clicking on the flag icon will perform a whois, copy the IP address or open an additional tab with Wikipedia information about the selected country, depending on how you set this action in the Flagfox preferences window.
Custom actions are also supported, the default action (if enabled) will look for pages indexed by Google of the current website. For example, using the default action for this address will return these search results.
Install Flagfox from the Firefox add-ons page
Flagfox homepage
Flagfox 3.3.15

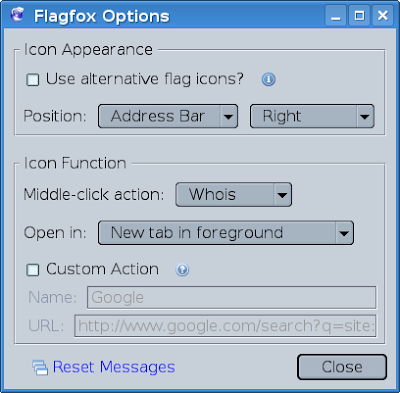
Flagfox can be configured to show the flag and additional information in the address bar or the status bar (left or right), open information in a new tab or window, and define a custom action for middle-clicking on the country flag icon.
Preferences

Middle-clicking on the flag icon will perform a whois, copy the IP address or open an additional tab with Wikipedia information about the selected country, depending on how you set this action in the Flagfox preferences window.
Custom actions are also supported, the default action (if enabled) will look for pages indexed by Google of the current website. For example, using the default action for this address will return these search results.
Install Flagfox from the Firefox add-ons page
Flagfox homepage
Sunday, 6 September 2009
How-To: Install Amarok 2.2 Beta 1 from the Kubuntu Beta Backports

The first beta of Amarok 2.2, codenamed 'Crystal Clear', was released on September 4 and packages are available for Kubuntu 9.04 Jaunty from the Kubuntu Beta Backports.
Amarok 2.2 Beta 1 comes with a huge number of bug fixes and many improvements and new features. To list some of them:
- new videoclip applet
- new photo applet
- improved browser layout to the left
- widgets can now be arranged differently from default
- ratings
- support for audio CDs
- the playlist offers multi-level sorting now
Those are only the highlights though, to see the full announcement and changelog read this.
To install Amarok 2.2 Beta 1 in Kubuntu/Ubuntu 9.04 Jaunty Jackalope just follow the instructions below:
First, edit the /etc/apt/sources.list file with your favourite text editor, e.g.:
sudo nano /etc/apt/sources.list
Or:
kdesudo kate /etc/apt/sources.list
Next, add the following two lines:
deb http://ppa.launchpad.net/kubuntu-ppa/beta/ubuntu karmic main
deb-src http://ppa.launchpad.net/kubuntu-ppa/beta/ubuntu karmic main
Make sure to save the file and then add the trusted key for this repository:
sudo apt-key adv --keyserver keyserver.ubuntu.com --recv-keys 8AC93F7A
Now update your package lists:
sudo apt-get update
Eventually, remove your existing Amarok installation:
sudo apt-get remove --purge amarok
sudo apt-get autoremove --purge
And now install the latest Amarok:
sudo apt-get install amarok
This should be all. Run Amarok 2.2 Beta 1 by pressing Alt+F2 and typing amarok in KRunner.
Saturday, 5 September 2009
How-To: Install OpenOffice.org 3.1.1 in Ubuntu 9.04 Jaunty Jackalope
OpenOffice.org 3.1.1 was released a few days ago, bringing many bug fixes to the stable 3.1 series. One of the ways to get it on Jaunty is to use the Launchpad.net PPA for OpenOffice.org Scribblers which recently packaged it for Ubuntu Jaunty and included it in their repositories.
To install the latest release using command-line, just use the instructions below:
First, edit the /etc/apt/sources.list file and enter your user password:
sudo nano /etc/apt/sources.list
Add the following two lines (the second one is not necessary, unless you want the sources to be available too):
deb http://ppa.launchpad.net/openoffice-pkgs/ppa/ubuntu jaunty main
deb-src http://ppa.launchpad.net/openoffice-pkgs/ppa/ubuntu jaunty main
Add the trusted key for these repositories:
sudo apt-key adv --keyserver keyserver.ubuntu.com --recv-keys 247D1CFF
Update the packages lists:
sudo apt-get update
You can eventually remove your existing OpenOffice installation by using the following two commands:
sudo apt-get remove --purge openoffice.org
sudo apt-get autoremove --purge
This will also remove system-wide configuration files.
Now, install OpenOffice.org 3.1.1:
sudo apt-get install openoffice.org
This should be all. You can run it by pressing Alt+F2 and typing openoffice in the run box.
Subscribe to:
Posts (Atom)