If you don't like the PC speaker (also known as system beep), you can easily disable it:
sudo modprobe -r pcspkr
Next, edit the /etc/modprobe.d/blacklist file (if it does not exist, create it):
sudo nano /etc/modprobe.d/blacklist
(Or you can issue gksudo gedit /etc/modprobe.d/blacklist or kdesu kate /etc/modprobe.d/blacklist for a graphical text editor - the first one for GNOME, which is the default desktop environment in Ubuntu, and the second for KDE, which is the default in Kubuntu.)
And add the following line:
blacklist pcspkr
The first command, sudo modprobe -r pcspkr will remove the pcspkr module from the kernel, so the beeps will stop immediately after issuing this command. The line blacklist pcspkr will prevent the kernel from loading this particular module when the computer boots up.
Now, the PC speaker functionality is disabled not only in the desktop environment, but also when in command-line.
Tuesday, 31 March 2009
How-To: Debian Lenny Minimal Installation
Debian Lenny comes with KDE 3.5.10 and GNOME 2.22, and will install by default the entire GNOME desktop environment and the X Window System. This means many applications which you may never use will also be installed, so here is a solution in order to get only a basic system and then install only the packages you need.
This tutorial will briefly show what you have to do in order to have a basic and minimum Debian installation on your PC.
First, when the installer reaches the window where it asks what software you want to install (like Desktop Environment, Web Server, Basic System etc.), just de-select the Desktop Environment option using the SPACE key, and also make sure the Basic System option remains selected.
After the installation is over, Debian will ask to reboot the computer, then it will boot to a shell login. Login as root, then type the following commands in order to only get the core packages for the X Window System and your desktop environment of choice:
If you want GNOME, type:
apt-get update
apt-get install xserver-xorg-core gdm gnome-core
If you want KDE, type:
apt-get update
apt-get install xserver-xorg-core kdm kde-core
Either of those commands will only install a minimum needed for running Debian graphically, so you will be able after that to install only the applications which you actually need.
gdm and kdm stand for GNOME Display Manager and, respectively, K Display Manager and they are, as the name suggests, the login applications for GNOME and KDE. gnome-core and kde-core will only fetch and install the basic libraries and applications needed to run GNOME and, respectively, KDE. This means that in KDE, for example, only applications like KControl, Kate or Konqueror (but not applications like noatun or kdegames) will be installed. You then get to choose which image viewer, music and video players will install.
Next, to start the X Server, use one of the commands as root:
If you installed GNOME and GDM:
/etc/init.d/gdm start
If you installed KDE and KDM:
/etc/init.d/kdm start
If the X server fails to start, try, as root:
dpkg-reconfigure xserver-xorg
And specify the driver vesa in section Device inside the /etc/X11/xorg.conf file. You may need to install the specific video driver for your video card.
Notice that you can also install any other (read: lighter) desktop environments, like Xfce or even Enlightenment for example.
Notice: This is a later, revised version of the tutorial I initially posted here.
How-To: Create an Open as Root Service Menu in Dolphin and Konqueror (KDE4)
Not so long ago I put up a tutorial which included three useful tips for Konqueror 3.5.9 (KDE3), and one of them was how to create an Open as Root service menu for directories. In this how-to I will show how to accomplish the same thing in KDE4 this time, for both Dolphin and Konqueror.
One of the things which changed is the location where the .desktop file will be located, in the case of KDE4 this should be placed in the ~/.kde/share/kde4/services/ServiceMenus directory. In order to find out what are the directories where the service menus can be put you can run this command:
kde4-config --path services
Which, on my Kubuntu 9.04 system outputs:
embryo@kubu:~$ kde4-config --path services
/home/embryo/.kde/share/kde4/services/:/usr/share/kde4/services/
Also, the syntax of the desktop file changed a little. Here is a basic example of the .desktop file:
[Desktop Entry]
Type=Service
Icon=dolphin
Actions=OpenAsRoot
ServiceTypes=KonqPopupMenu/Plugin,inode/directory,inode/directory-locked
[Desktop Action OpenAsRoot]
Exec=kdesu dolphin %U
Icon=dolphin
Name=Open as Root
Save the file under a name like action_root.desktop inside ~/.kde/share/kde4/services/ServiceMenus and then right-click any directory inside Dolphin or Konqueror, go to Actions -> Open as Root and enter your user password (in Ubuntu) or root password in order to open that directory as root. I had to reload the tabs in Dolphin for the service menu to appear.
Here's how it looks like:


Additional resources
You may find these two tutorials very useful if you plan to create various service menus in KDE4: this tutorial from KDE TechBase and this forum discussion from KubuntuForums.net.
You can also download and explore a complete script hosted on www.kde-apps.org, called Root Actions Servicemenu.
Related articles
3 Popular Tips for Konqueror 3.5.9
Review: Dolphin 1.2.1 File Manager
One of the things which changed is the location where the .desktop file will be located, in the case of KDE4 this should be placed in the ~/.kde/share/kde4/services/ServiceMenus directory. In order to find out what are the directories where the service menus can be put you can run this command:
kde4-config --path services
Which, on my Kubuntu 9.04 system outputs:
embryo@kubu:~$ kde4-config --path services
/home/embryo/.kde/share/kde4/services/:/usr/share/kde4/services/
Also, the syntax of the desktop file changed a little. Here is a basic example of the .desktop file:
[Desktop Entry]
Type=Service
Icon=dolphin
Actions=OpenAsRoot
ServiceTypes=KonqPopupMenu/Plugin,inode/directory,inode/directory-locked
[Desktop Action OpenAsRoot]
Exec=kdesu dolphin %U
Icon=dolphin
Name=Open as Root
Save the file under a name like action_root.desktop inside ~/.kde/share/kde4/services/ServiceMenus and then right-click any directory inside Dolphin or Konqueror, go to Actions -> Open as Root and enter your user password (in Ubuntu) or root password in order to open that directory as root. I had to reload the tabs in Dolphin for the service menu to appear.
Here's how it looks like:
In Dolphin and KDE 4.2.1

In Konqueror and KDE 4.2.1

Additional resources
You may find these two tutorials very useful if you plan to create various service menus in KDE4: this tutorial from KDE TechBase and this forum discussion from KubuntuForums.net.
You can also download and explore a complete script hosted on www.kde-apps.org, called Root Actions Servicemenu.
Related articles
3 Popular Tips for Konqueror 3.5.9
Review: Dolphin 1.2.1 File Manager
4 Ways to Create CD/DVD ISO Images in Ubuntu
In this guide I will show how to create CD/DVD ISO images in Ubuntu using four easy methods.
1. Create ISO Images With K3b
K3b is the KDE default CD/DVD burner and also one of the most popular (if not the most popular) burning application for Linux. The current version comes installed by default in Kubuntu 8.10 and 9.04, but if you are using Ubuntu and want to get install it issue the following command:
sudo apt-get install k3b
A port for KDE4 is in the works too, but until now there is no stable release. (Update: This applies for K3b 2.0+ too)
To create an ISO image just fire up K3b and follow the steps below:
Go to File -> New Project -> New Data CD Project (or New Data DVD Project, depending on what size the image you want to create will have):

Next, drag and drop the files and folders from the file browser to the bottom area:

Now, click the Burn button and, in the window that appears, tick the Only create image option under the Settings widget. The image will be created by default as the /tmp/kde-YOUR_USERNAME/image_name.iso, but you can change this location in the Image tab.


Next, click on Start and wait for the image to be created. This should be all.

Here's what the file /var/kde-embryo/my_iso_image.iso shows:
embryo@kubu:~$ file /tmp/kde-embryo/my_iso_image.iso
/tmp/kde-embryo/my_iso_image.iso: ISO 9660 CD-ROM filesystem data 'my_iso_image '
2. Create ISO images with Brasero
Brasero is the default CD/DVD burning application in Ubuntu. The way Brasero creates images is similar with K3b's. If you don't have Brasero installed for some reason, type:
sudo apt-get install brasero
Start Brasero (or fire it up, as you wish to call it) and click on the Data project button (or go to Project -> New Project -> New Data Project).

Change the name of the disc at the bottom to whatever you like and then click on the green plus sign in the upper left corner in the toolbar to start adding files and directories to your image:


After you finished adding files click on Burn and make sure no empty CD/DVD is in your optical drives:

This should be all. The image will be located in the home directory.
3. Create ISO images using AcetoneISO
AcetoneISO is a GUI (graphical user interface) application built in Qt4 for mounting and unmounting CD/DVD ISO (NRG, MDF and BIN too) images, but it can also be used to create ISO images.
To install AcetoneISO in Ubuntu you can follow the guide I put up a while ago, here. I will use version 2.0.2 for this example. In newer Ubuntu versions, just type in a terminal:
sudo apt-get install acetoneiso
First, put all the files and folders you want included in the image into a new, empty directory. Next, in the menu go to Conversion -> Generate ISO from folder, select the desired folder and enter the name of the image:


That's it.
4. Create ISO images using command-line
What, you thought I was going to leave CLI behind? Here's (probably) the easiest way to create ISO images using command-line interface.
First, install the tool called genisoimage (if you already have Brasero or K3b installed, this package is probably already installed):
sudo apt-get install genisoimage
Use it like this:
genisoimage -o my_image.iso my_directory
Or:
genisoimage -o my_image.iso file01 file02 file03
The first command will create an ISO image from the contents of folder my_directory (and it will include it as the root directory), while the second one will create an image containing file01, file02, file03 (and no root directory).
For Rock Ridge extensions (which provide permissions and ownership support), use:
genisoimage -o my_image.iso -R my_directory
So, these are the four methods I find most accessible for creating CD/DVD images in Ubuntu. Please share other ways of accomplishing this in the comments below.
Updated: September 19, 2010
Tip of the Day: Easily Start a Dedicated Urban Terror Server
Here is an example for starting a dedicated Urban Terror server:

/usr/local/games/ioquake3/ioq3ded.i386 +set fs_game q3ut4 +set dedicated 2 +set net_IP <IP> +set net_port 27960 +set com_hunkmegs 256 +set sv_maxclients 12 +exec server.cfg
Don't forget to replace <IP> with the machine's IP. You will also have to configure your server.cfg file (more details in the official documentation, here). Once everything is in place the server should be listed in the in-game Internet server browser.
Monday, 30 March 2009
Review: Dolphin 1.2.1 File Manager
Introduction
Dolphin was intended to replace Konqueror as the default file manager in KDE 4. The scope of Dolphin was to only provide a compact and easy-to-use file manager, without all the features and uses Konqueror has. And (I think) it succeeded. In the beginning most of the users were reticent regarding this idea, since Konqueror provided anything one could possibly ask from a file manager. Besides, most KDE fans thought Dolphin looks too much like with Nautilus and may be limited regarding usability and configuration. However, I see in Dolphin an appropriate manager for day-to-day use.

Interface
Dolphin is split in three main components (except for the menubar and toolbar). The first one would be the Places widget, located by default to the left, and containing shortcuts to the most important places like home directory, root, trash, and mounted devices. The center is occupied with the file browser, while to the right there is the file information widget. The good thing is that the Places and Information widgets can be moved and grouped wherever one likes. Another plus is the way the icons in the Places tab resize depending on the tab's width.
Features
Dolphin comes with tab support (the usual CTRL+T and CTRL+N shortcuts by default, also the KDE-specific CTRL+, and CTRL+. for switching to the previous and, respectively, next tab). Although not visible by default, the location bar can be shown using the standard CTRL+L shortcut.

Regarding configuration, Dolphin offers all the necessary and specific options for a regular file manager: from sorting files by name, size, date, type etc to file previews, a huge number of zoom levels for icons (with a zoom slider which can be shown or hidden via Settings -> Configure Dolphin -> General tab), the ability to browse through archives (by embedding Ark) and several more. It allows three view modes for files: icons, details and columns, and it also includes the option to split tabs vertically (left/right). Basically, all the important features in Konqueror's file manager can be found in Dolphin too.

As in every standard KDE application, you can configure the shortcuts in the Settings -> Configure shortcuts menu option.
If you miss buttons like Up (Alt+Up) or Zoom In/Out from the toolbar, you can add these by right-clicking on the toolbar and going to the Configure Toolbars... option.
Conclusion
Since my main system is Debian Lenny (KDE3) I must say I did not have much time to test KDE4 (although lately I spent some time with Kubuntu Jaunty Beta), but I was impressed in a pleasant way by Dolphin. What I've read before was mostly how crappy of a file manager it is, how limited it is and so on. Although I prefer Konqueror, I must say this isn't true: Dolphin is actually pretty feature-complete and easy to use.

It's true that once you get used in Konqueror, for example, to open pictures, text files etc. in a new tab, it will be hard to get unused to this when in Dolphin. But Dolphin's purpose is not to be Konqueror and that's it. And it is not so 'basic' and tiny as some make it look. In time, it will probably become the file manager of choice for the majority of KDE4 users (if not already).

Do you use Dolphin on a daily basis? Do you prefer it over Konqueror or use another file manager in KDE4? Please share it in the comments below.
Homepage
Dolphin was intended to replace Konqueror as the default file manager in KDE 4. The scope of Dolphin was to only provide a compact and easy-to-use file manager, without all the features and uses Konqueror has. And (I think) it succeeded. In the beginning most of the users were reticent regarding this idea, since Konqueror provided anything one could possibly ask from a file manager. Besides, most KDE fans thought Dolphin looks too much like with Nautilus and may be limited regarding usability and configuration. However, I see in Dolphin an appropriate manager for day-to-day use.

Interface
Dolphin is split in three main components (except for the menubar and toolbar). The first one would be the Places widget, located by default to the left, and containing shortcuts to the most important places like home directory, root, trash, and mounted devices. The center is occupied with the file browser, while to the right there is the file information widget. The good thing is that the Places and Information widgets can be moved and grouped wherever one likes. Another plus is the way the icons in the Places tab resize depending on the tab's width.
Features
Dolphin comes with tab support (the usual CTRL+T and CTRL+N shortcuts by default, also the KDE-specific CTRL+, and CTRL+. for switching to the previous and, respectively, next tab). Although not visible by default, the location bar can be shown using the standard CTRL+L shortcut.

Regarding configuration, Dolphin offers all the necessary and specific options for a regular file manager: from sorting files by name, size, date, type etc to file previews, a huge number of zoom levels for icons (with a zoom slider which can be shown or hidden via Settings -> Configure Dolphin -> General tab), the ability to browse through archives (by embedding Ark) and several more. It allows three view modes for files: icons, details and columns, and it also includes the option to split tabs vertically (left/right). Basically, all the important features in Konqueror's file manager can be found in Dolphin too.
Split left/right

As in every standard KDE application, you can configure the shortcuts in the Settings -> Configure shortcuts menu option.
If you miss buttons like Up (Alt+Up) or Zoom In/Out from the toolbar, you can add these by right-clicking on the toolbar and going to the Configure Toolbars... option.
Conclusion
Since my main system is Debian Lenny (KDE3) I must say I did not have much time to test KDE4 (although lately I spent some time with Kubuntu Jaunty Beta), but I was impressed in a pleasant way by Dolphin. What I've read before was mostly how crappy of a file manager it is, how limited it is and so on. Although I prefer Konqueror, I must say this isn't true: Dolphin is actually pretty feature-complete and easy to use.

It's true that once you get used in Konqueror, for example, to open pictures, text files etc. in a new tab, it will be hard to get unused to this when in Dolphin. But Dolphin's purpose is not to be Konqueror and that's it. And it is not so 'basic' and tiny as some make it look. In time, it will probably become the file manager of choice for the majority of KDE4 users (if not already).
About

Do you use Dolphin on a daily basis? Do you prefer it over Konqueror or use another file manager in KDE4? Please share it in the comments below.
Homepage
Sunday, 29 March 2009
10 Essential Applications Included in Kubuntu 9.04 Jaunty Jackalope
While I agree that there are applications for KDE 4.2 which still lack several important features (like for example the equalizer and ability to go to the previous/next song using the tag editor in Amarok), I must say that it also improved very much since the last time I had a look at it. It is definitely faster, the desktop looks nicer, it does not seem a beta environment any more. Overall, the improvements in KDE 4 are really visible and I'm glad for that from a user's point of view. The only drawback is that (at least on my system - an Intel Core 2 Duo 1.8 GHz, 1 GB DDRAM2 and GeForce FX 7600GS) I had to disable desktop effects (OpenGL support) when playing Unreal Tournament 2004. The nVIDIA driver I used was the last one from the official website (180.29). I also tried the ones included in the repositories (all 4 versions of the packaged nvidia-glx) but this one seemed to work best for me. I'll give it another go when Jaunty will be stable and eventually make a full review.
Back to the main topic of this article. I will briefly review no less than ten applications which are included by default on the Kubuntu 9.04 CD. The Kubuntu team released the first Jaunty Jackalope beta on March 26, so after installing it on a separate 10 GB partition (my other system is Debian Lenny) I performed a sudo apt-get update && sudo apt-get dist-upgrade to make sure the last updates were included. Kubuntu 9.04 comes with KDE 4.2.1, Amarok 2.0.2 and OpenOffice 3.0.1 as an office suite (still no inclusion of KOffice).
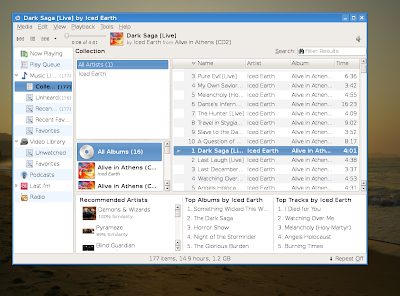
Music player: Amarok 2.0.2
This is the KDE 4 port of the famous Amarok audio player. It has some issues with scanning the music collection, but it's usable overall. It comes with a lot of features, including a powerful collection manager, cover manager, support for services like Last.fm and Jamendo. One of the great features introduced in Amarok 2.x was the widget support, which allows you to embed lyrics, song info and many more in the central area of the player.
Official website

Movie player: Dragon Player 2.0
Although not as powerful as players like SMPlayer or Kaffeine, Dragon Player (formerly known as Codeine) will play all the popular video formats (including Matroska MKV) and DVDs. It is a small, basic player with support for subtitles but not any other options.
Official website

Web browser: Konqueror 4.2.1
This is the port of the famous and default file manager, viewer and web browser in KDE3. Currently it still has some issues, especially crashes when pressing some web buttons or filling in forms. For example, I couldn't write a Blogspot post using Konqueror. Still, it is the default web browser which ships with KDE 4 and implicitly Kubuntu Jaunty and I hope it will be fixed in the versions to come.
Official website

File manager: Dolphin 1.2.1
Praised by some and highly criticised by others, Dolphin is now the default file manager in KDE 4. Although there are many (including me) which prefer to use Konqueror as the file manager, Dolphin has a nice clean interface and it's pretty simple and intuitive to use.
Official website


CD/DVD burner: K3b 1.0.5
Probably the most loved and the most complete burning application available for Linux, K3b still is at version 1.0.5 for KDE3, which will make it look a little ugly compared to the way KDE 4 applications look now. Although Kubuntu 9.04 will come with this K3b version, the official maintainer of this wonderful application started working at a KDE 4 port for it.
Official website

BitTorrent client: KTorrent 3.2.0
Together with clients like Azureus or Deluge, KTorrent was always one of the top BitTorrent clients available for Linux, and definitely the number one choice for KDE users. It's just feature-complete, it has support for plugins and the default ones are more than enough, you can download many torrents at one time without any problems, it can download only specific files from inside a torrent, you can search for torrents directly from within KTorrent and many, many more.
Official website

IM client: Kopete 0.70.0
Kopete hasn't changed much compared to its KDE 3 counterpart. It currently has no more features, it's just the same old client ported to KDE 4 with a changed interface here and there. It supports many networks like Yahoo, AIM, ICQ, Jabber and WLM.
Official website

Image viewer: Gwenview 2.2.0
Gwenview was always my default image viewer of choice. It is powerful enough, well-designed, with a clean interface and all the options one needs from an image viewing application. It also comes with a bunch of plugins which will turn out quite useful for basic image manipulation.
Official website


IRC client: Quassel 0.4.1
Quassel is an IRC client which is new to me, and I've never used it before. Since the Konversation port to KDE 4 is yet to be complete as far as I know, Kubuntu includes this one. It's a basic client with no scripting support, but it includes enough configuration options to make it useful for getting on IRC. Those who never bothered making various plugins or customising their IRC client using event-based scripting will be fine with Quassel. There are, however, some problems with Quassel. I couldn't change the chat window font and it doesn't seem to remember the size of the nicklist.
Official website

Terminal application: Konsole 2.2.1
I couldn't exclude a terminal application from an 'essential applications' list in Linux. Konsole is the default shell in KDE and it supports configurable profiles (together with font sizes and colours).
Official website

Together with those there are also included OpenOffice 3.0.1 as the office suite, Okular, which is the universal document viewer in KDE 4, and KOrganizer.
Back to the main topic of this article. I will briefly review no less than ten applications which are included by default on the Kubuntu 9.04 CD. The Kubuntu team released the first Jaunty Jackalope beta on March 26, so after installing it on a separate 10 GB partition (my other system is Debian Lenny) I performed a sudo apt-get update && sudo apt-get dist-upgrade to make sure the last updates were included. Kubuntu 9.04 comes with KDE 4.2.1, Amarok 2.0.2 and OpenOffice 3.0.1 as an office suite (still no inclusion of KOffice).
Music player: Amarok 2.0.2
This is the KDE 4 port of the famous Amarok audio player. It has some issues with scanning the music collection, but it's usable overall. It comes with a lot of features, including a powerful collection manager, cover manager, support for services like Last.fm and Jamendo. One of the great features introduced in Amarok 2.x was the widget support, which allows you to embed lyrics, song info and many more in the central area of the player.
Official website

Movie player: Dragon Player 2.0
Although not as powerful as players like SMPlayer or Kaffeine, Dragon Player (formerly known as Codeine) will play all the popular video formats (including Matroska MKV) and DVDs. It is a small, basic player with support for subtitles but not any other options.
Official website

Web browser: Konqueror 4.2.1
This is the port of the famous and default file manager, viewer and web browser in KDE3. Currently it still has some issues, especially crashes when pressing some web buttons or filling in forms. For example, I couldn't write a Blogspot post using Konqueror. Still, it is the default web browser which ships with KDE 4 and implicitly Kubuntu Jaunty and I hope it will be fixed in the versions to come.
Official website

File manager: Dolphin 1.2.1
Praised by some and highly criticised by others, Dolphin is now the default file manager in KDE 4. Although there are many (including me) which prefer to use Konqueror as the file manager, Dolphin has a nice clean interface and it's pretty simple and intuitive to use.
Official website


CD/DVD burner: K3b 1.0.5
Probably the most loved and the most complete burning application available for Linux, K3b still is at version 1.0.5 for KDE3, which will make it look a little ugly compared to the way KDE 4 applications look now. Although Kubuntu 9.04 will come with this K3b version, the official maintainer of this wonderful application started working at a KDE 4 port for it.
Official website

BitTorrent client: KTorrent 3.2.0
Together with clients like Azureus or Deluge, KTorrent was always one of the top BitTorrent clients available for Linux, and definitely the number one choice for KDE users. It's just feature-complete, it has support for plugins and the default ones are more than enough, you can download many torrents at one time without any problems, it can download only specific files from inside a torrent, you can search for torrents directly from within KTorrent and many, many more.
Official website

IM client: Kopete 0.70.0
Kopete hasn't changed much compared to its KDE 3 counterpart. It currently has no more features, it's just the same old client ported to KDE 4 with a changed interface here and there. It supports many networks like Yahoo, AIM, ICQ, Jabber and WLM.
Official website

Image viewer: Gwenview 2.2.0
Gwenview was always my default image viewer of choice. It is powerful enough, well-designed, with a clean interface and all the options one needs from an image viewing application. It also comes with a bunch of plugins which will turn out quite useful for basic image manipulation.
Official website


IRC client: Quassel 0.4.1
Quassel is an IRC client which is new to me, and I've never used it before. Since the Konversation port to KDE 4 is yet to be complete as far as I know, Kubuntu includes this one. It's a basic client with no scripting support, but it includes enough configuration options to make it useful for getting on IRC. Those who never bothered making various plugins or customising their IRC client using event-based scripting will be fine with Quassel. There are, however, some problems with Quassel. I couldn't change the chat window font and it doesn't seem to remember the size of the nicklist.
Official website

Terminal application: Konsole 2.2.1
I couldn't exclude a terminal application from an 'essential applications' list in Linux. Konsole is the default shell in KDE and it supports configurable profiles (together with font sizes and colours).
Official website

Together with those there are also included OpenOffice 3.0.1 as the office suite, Okular, which is the universal document viewer in KDE 4, and KOrganizer.
Thursday, 26 March 2009
How-To: Change the Wine Theme to Something More Appealing
Notice: I tested this tutorial using Wine 1.1.17, but it should work successfully on previous versions too.
By default, Windows applications which run through Wine don't look very well, since that's the look and feel of Windows 98 at best, to mention nothing about XP:
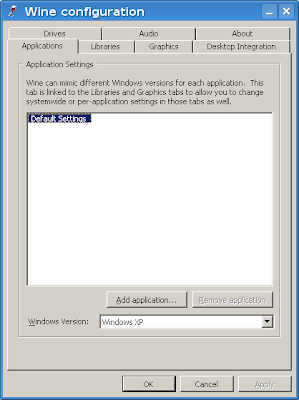
So what follows are a few easy steps which will allow to change the way applications ran through Wine look like. If you need guidance for installing Wine, here are two tutorials I recently wrote, for Ubuntu 8.04 here and here, and for Debian Lenny here. These should also work in Ubuntu 8.10 (and the upcoming 9.04 Jaunty Jackalope) and the latest Wine release.
1. Download some MS styles from deviantART
First, you will need to get some themes from here. For my example I will be using VistaPerfection X4 (direct download link). After saving it, uncompress the ZIP file and copy the .msstyles file (in our example the file is called VistaPerfection.msstyles) in a location of your choice.
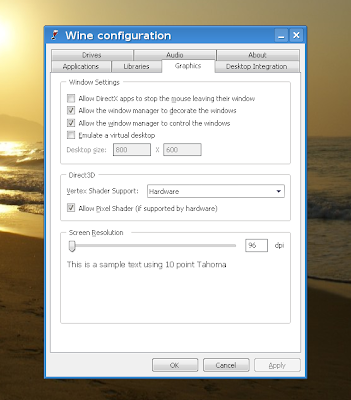
2. Run winecfg and install the theme
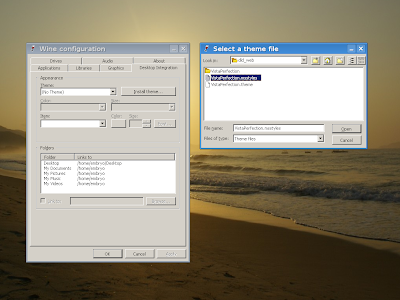
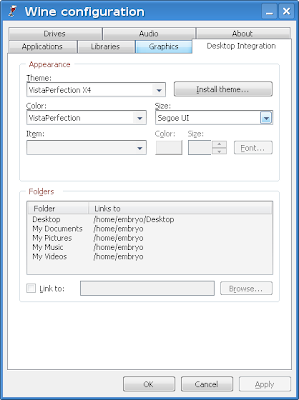
Next, run the Wine configuration utility, winecfg, and under the Desktop Integration tab, click the Install theme... button, then navigate to where your .msstyles file is located and select it.
Now under the Theme drop-down menu, select the VistaPerfection X4 theme and then click OK. This should be all and the new theme should be now installed. Notice that you can still configure the colors if you don't like the default ones.
Notice: I bumped into this short tutorial in a post on UbuntuForums, here.
By default, Windows applications which run through Wine don't look very well, since that's the look and feel of Windows 98 at best, to mention nothing about XP:

So what follows are a few easy steps which will allow to change the way applications ran through Wine look like. If you need guidance for installing Wine, here are two tutorials I recently wrote, for Ubuntu 8.04 here and here, and for Debian Lenny here. These should also work in Ubuntu 8.10 (and the upcoming 9.04 Jaunty Jackalope) and the latest Wine release.
1. Download some MS styles from deviantART
First, you will need to get some themes from here. For my example I will be using VistaPerfection X4 (direct download link). After saving it, uncompress the ZIP file and copy the .msstyles file (in our example the file is called VistaPerfection.msstyles) in a location of your choice.
2. Run winecfg and install the theme
Next, run the Wine configuration utility, winecfg, and under the Desktop Integration tab, click the Install theme... button, then navigate to where your .msstyles file is located and select it.
Select the .msstyles file for installation

Now under the Theme drop-down menu, select the VistaPerfection X4 theme and then click OK. This should be all and the new theme should be now installed. Notice that you can still configure the colors if you don't like the default ones.
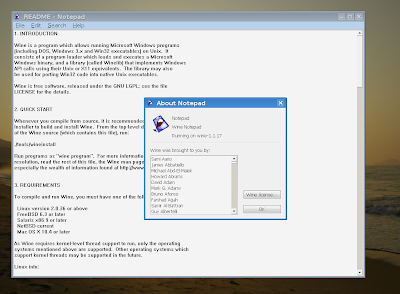
The look of Wine applications with VistaPerfection X4

Running Notepad

The VistaX theme

Notice: I bumped into this short tutorial in a post on UbuntuForums, here.
Tip of the Day: Convert AC3 to WAV Using MPlayer
Say you have an audio AC3 file and you want to convert it to WAV in order to work with it in Audacity or some other audio manipulation application. One of the methods is to use mplayer, included in the Debian Multimedia repositories.
The command to convert the desired file to WAV is:
mplayer -ao pcm:file=output_file.wav input_file.ac3
This command will convert input_file.ac3 to output_file.wav, using the PCM audio output driver.
The command to convert the desired file to WAV is:
mplayer -ao pcm:file=output_file.wav input_file.ac3
This command will convert input_file.ac3 to output_file.wav, using the PCM audio output driver.
Wednesday, 25 March 2009
Tip of the Day: Create an ISO Image from a Directory Using CLI
For this tip we'll be using genisoimage, a command-line tool which allows the creation of ISO9660 filesystems with Rock Ridge attributes (which provide support for file permissions and ownership).
To install it, type in the terminal the following command as root:
apt-get install genisoimage
The simplest way to create an ISO image is like this:
genisoimage -o cd.iso directory_name
This command will create an ISO image with directory_name being the root directory. If you want to include more than one file (or directory) inside the image (without having a single root directory), you can run it like this:
genisoimage -o cd.iso filename_1 filename_2 filename_3
If you need the Rock Ridge extensions, then issue:
genisoimage -o cd.iso -R directory_name
Tuesday, 24 March 2009
Review: Battle for Wesnoth 1.6
After more than a year of constant development, The Battle for Wesnoth 1.6 was put out on March 22. This release comes with new graphics and unit portraits, a new campaign, called 'Legend of Wesmere', the possibility to log into the multiplayer with the forum account, and many, many other improvements.

For those who don't know, Battle for Wesnoth is a wonderful, completely free (licensed under the GPL) turn-based strategy game, with a huge community, developed continuously and at a fast rate.
Before proceeding with the review of 1.6, I'd like to point out that the 1.4.x series (the now old stable release) was also a very good and polished release, so what more can Wesnoth provide with this release?
First of all, one of the features which was always subject of debate on the forums was now implemented: the ability to own a nickname in the multiplayer game. You can now join the multiplayer lobby using your own username and password from the Wesnoth forums, so you won't have problems with someone else 'stealing' your nickname or identifying friends. This feature was awaited for a long time and now it's available.
Regarding the game interface, it didn't change much. The main menu has a background which resembles the one in 1.4, which looks very good anyway.
Major changes were done at the graphics, unit portraits, terrain, and the way in-game messages are displayed. Although there are still default faction units which don't have a portrait, most of them have refined portraits which now look awesome compared to the older ones used in 1.4.x. There are also new graphics for terrain like forest and villages, but all in all the way the terrain looks did not change much.

Most of the maps were re-done, for example the popular Isar's Cross is now larger and Fallenstar Lake (former Meteor Lake in versions pre-1.4) will need a different approach to play it in the middle of the map.


Regarding campaigns, 1.6 includes no less than 14 official ones, and most of them were available before only as add-ons. Also, the new campaign 'Legend of Wesmere' tells the story of Kalenz, an Elvish hero probably best known from the campaign Heir to the Throne. In one scenario, this campaign allows the AI to control one of your allied sides too.

The WML (Wesnoth Markup Language) also received many improvements and the map editor can be started now from within the game's main menu. The background music hasn't changed much but that's OK since 1.4 had pretty appealing music. However, there are five new original background tracks.
Like all the default features are not enough, there are plenty of add-ons available, which definitely turn Wesnoth into an even more appealing TBS game.

All in all, this release is one step ahead for Wesnoth regarding both graphics and gameplay, and although in my opinion the difference from 1.4 to 1.6 does not seem to be as big as the changes from 1.2 to 1.4, it is definitely a good and long-awaited improvement.
Update: Here is a video of Wesnoth 1.6 on the Colosseum map:
Battle for Wesnoth 1.6 - main menu

For those who don't know, Battle for Wesnoth is a wonderful, completely free (licensed under the GPL) turn-based strategy game, with a huge community, developed continuously and at a fast rate.
Before proceeding with the review of 1.6, I'd like to point out that the 1.4.x series (the now old stable release) was also a very good and polished release, so what more can Wesnoth provide with this release?
First of all, one of the features which was always subject of debate on the forums was now implemented: the ability to own a nickname in the multiplayer game. You can now join the multiplayer lobby using your own username and password from the Wesnoth forums, so you won't have problems with someone else 'stealing' your nickname or identifying friends. This feature was awaited for a long time and now it's available.
Regarding the game interface, it didn't change much. The main menu has a background which resembles the one in 1.4, which looks very good anyway.
Major changes were done at the graphics, unit portraits, terrain, and the way in-game messages are displayed. Although there are still default faction units which don't have a portrait, most of them have refined portraits which now look awesome compared to the older ones used in 1.4.x. There are also new graphics for terrain like forest and villages, but all in all the way the terrain looks did not change much.
Playing vs. AI on Isar's Cross - notice the changes in the map

Most of the maps were re-done, for example the popular Isar's Cross is now larger and Fallenstar Lake (former Meteor Lake in versions pre-1.4) will need a different approach to play it in the middle of the map.
Comparing Fallenstar Lake in 1.4 vs 1.6


Regarding campaigns, 1.6 includes no less than 14 official ones, and most of them were available before only as add-ons. Also, the new campaign 'Legend of Wesmere' tells the story of Kalenz, an Elvish hero probably best known from the campaign Heir to the Throne. In one scenario, this campaign allows the AI to control one of your allied sides too.
The new Legend of Wesmere campaign

The WML (Wesnoth Markup Language) also received many improvements and the map editor can be started now from within the game's main menu. The background music hasn't changed much but that's OK since 1.4 had pretty appealing music. However, there are five new original background tracks.
Like all the default features are not enough, there are plenty of add-ons available, which definitely turn Wesnoth into an even more appealing TBS game.
This is how the new in-game dialogues look like now

All in all, this release is one step ahead for Wesnoth regarding both graphics and gameplay, and although in my opinion the difference from 1.4 to 1.6 does not seem to be as big as the changes from 1.2 to 1.4, it is definitely a good and long-awaited improvement.
Update: Here is a video of Wesnoth 1.6 on the Colosseum map:
How-To: Compile and Install GIMP 2.6.6 in Debian Lenny
The latest stable series, 2.6.x, include several UI improvements, new filters, and the introduction of the GEGL (Generic Graphics Library) framework.
Although the version which comes with Debian Lenny (2.4.7) is stable enough and full-featured, if you want the latest release you can easily compile your own version by following the steps below.
1. Install build-essential and the development libraries
apt-get install build-essential
Next, make sure the sources repositories are enabled (there should be a line which starts with deb-src in /etc/apt/sources.list), for example:
deb-src ftp://ftp.ro.debian.org/debian/ lenny main contrib non-free
Update the package lists:
apt-get update
Install the development libraries:
apt-get build-dep gimp
Install additional dependencies:
apt-get install libgegl-0.0-dev
3. Download the source code
Download the GIMP 2.6.6 source tarball from here, then uncompress it:
tar -xjf gimp-2.6.6.tar.bz2
4. Compile and install GIMP 2.6.6
To compile and install GIMP, just issue the usual commands inside the gimp-2.6.6 directory:
./configure
make
make install
The last one as root. You can also install as normal user using the --prefix parameter, e.g.:
./configure --prefix=/home/USER/usr

Tip of the Day: Easily Get Audio from DVD .VOB Files
Notice: This tip should work for both Debian and Ubuntu, except for the way of installing mplayer which differs (in Ubuntu you should use Medibuntu, while in Debian you have the debian-multimedia.org repositories).
This is usually useful when you only need some audio recording from a live performance DVD or some other recording of some kind. If you have a DVD image and you need to mount it, you can do so by typing as root:
mkdir /mnt/iso0
mount -o loop /path/to/dvd/image.iso /mnt/iso0
You can choose any empty directory for mounting the image, in the above example I chose /mnt/iso0. It's also a good idea to eventually concatenate the VOB files you want to extract audio from, e.g.:
cat /mnt/iso0/VIDEO_TS/VTS_01_[1-3].VOB > ~/my_vob.vob
This will concatenate files VTS_01_1.VOB, VTS_01_2.VOB and VTS_01_1.VOB into one single VOB file, my_vob.vob, inside the home directory. The same can be accomplished using, for example:
cd /mnt/iso0/VIDEO_TS/
cat VTS_01_1.VOB VTS_01_2.VOB VTS_01_3.VOB > ~/my_vob.vob
Next, install mplayer (read here for instructions to get it from debian-multimedia.org repositories - after adding it, type as root apt-get install mplayer) and issue the following command inside the directory where the my_vob.vob file is located:
mplayer my_vob.vob -aid ${AID} -dumpaudio -dumpfile my_audio.ac3
Notice that you will have to replace ${AID} with a number corresponding to the audio channel, for VOB + AC3 that number is between 128-159. So our command should look like this:
mplayer my_vob.vob -aid 128 -dumpaudio -dumpfile my_audio.ac3
And there you go, the extracted audio file is my_audio.ac3.
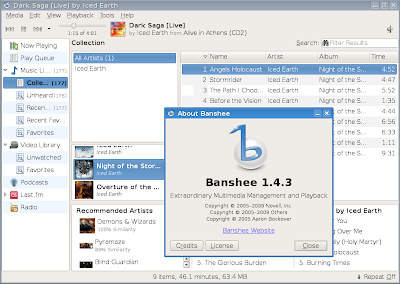
How-To: Compile and Install Banshee 1.4.3 in Debian Lenny
Banshee is a popular audio player written using the GTK toolkit. Currently at version 1.4.3, Banshee is a good alternative to players like Rhythmbox or Exaile for GNOME or Amarok for KDE.
This release comes with improved MTP (media transfer protocol) support and several bug fixes.
Here are several easy to follow steps for compiling Banshee on Debian Lenny (since Debian comes with Banshee 1.0):
Notice that iPod support will not be available!
1. Install the tools needed for compilation
Type in a terminal as root:
apt-get install build-essential
2. Install the dependencies
Make sure the sources repositories are enabled in the /etc/apt/sources.list file (you should have a line which starts with deb-src, like deb-src ftp://ftp.ro.debian.org/debian/ lenny main contrib non-free) and then issue the following commands as root:
apt-get update
apt-get build-dep banshee
3. Download the source tarball
Download the tarball from the official website, here (direct link), then uncompress it:
tar -xjf banshee-1-1.4.3.tar.bz2
4. Compile and install Banshee
Issue the following commands inside the banshee-1-1.4.3 directory:
./configure --disable-ipod
make
make install
The last one as root.
Although I tried to install Banshee as normal user too (using ./configure --prefix), I've got an error when it was still trying to write to /usr so I'm not sure whether it can be installed as normal user this way.
You can run Banshee by pressing ALT+F2 and typing banshee-1 in the Run dialogue that appears.
To uninstall it, just issue the command make uninstall as root from inside the banshee-1-1.4.3 directory.
This release comes with improved MTP (media transfer protocol) support and several bug fixes.
Here are several easy to follow steps for compiling Banshee on Debian Lenny (since Debian comes with Banshee 1.0):
Notice that iPod support will not be available!

1. Install the tools needed for compilation
Type in a terminal as root:
apt-get install build-essential
2. Install the dependencies
Make sure the sources repositories are enabled in the /etc/apt/sources.list file (you should have a line which starts with deb-src, like deb-src ftp://ftp.ro.debian.org/debian/ lenny main contrib non-free) and then issue the following commands as root:
apt-get update
apt-get build-dep banshee
3. Download the source tarball
Download the tarball from the official website, here (direct link), then uncompress it:
tar -xjf banshee-1-1.4.3.tar.bz2
4. Compile and install Banshee
Issue the following commands inside the banshee-1-1.4.3 directory:
./configure --disable-ipod
make
make install
The last one as root.
Although I tried to install Banshee as normal user too (using ./configure --prefix), I've got an error when it was still trying to write to /usr so I'm not sure whether it can be installed as normal user this way.
You can run Banshee by pressing ALT+F2 and typing banshee-1 in the Run dialogue that appears.
To uninstall it, just issue the command make uninstall as root from inside the banshee-1-1.4.3 directory.

How-To: Compile and Install VLC 0.9.8 from Source in Debian Lenny

VLC (VideoLAN Client) is one of the most popular video players on Linux, together with players like SMPlayer or Kaffeine. It plays many audio and video formats (including Xvid, DivX, H.264, Theora, WMV, Real Video, Ogg, MP3, FLAC, APE, AC3, WAV) together with DVDs and DVD ISO images.
The version which comes included in the Debian Lenny repositories is 0.8.6h, which uses the wxWidgets kit and it is kind of outdated now. The latest release of VLC is 0.9.8a, which is now built in Qt 4 and includes several improvements over the 0.8.x series.
VLC 0.9.8a running in Debian Lenny

To compile this release from source you can follow the steps below:
1. Install the tools needed for compilation
As root, type:
apt-get install build-essential
build-essential is a meta package which includes tools like gcc or make, needed to compile source code.
2. Install the dependencies
The following command will install the development libraries which are needed for the compilation:
apt-get install libqt4-dev libpostproc-dev libavformat-dev libavcodec-dev libavutil-dev libmad0-dev liba52-0.7.4-dev libhal-dev libdbus-1-dev libfribidi-dev libgcrypt11-dev
3. Fetch the source tarball
Download the VLC 0.9.8a source tarball from here, then uncompress it:
tar -xjf vlc-0.9.8a.tar.bz2
4. Compile and install VLC
To compile VLC, just change the working directory to vlc-0.9.8a and issue the following commands:
./configure --disable-swscale
make
make install
The last one as root.
Configuration

You can also install VLC as normal user by specifying a prefix, i.e.:
./configure --prefix=/home/USER/usr/ --disable-swscale
In this case you can issue make install as normal user. Also make sure to include /home/USER/usr/bin in your $PATH.
Subscribe to:
Posts (Atom)